You
can use mental ray for Maya shaders the same way you use Maya materials,
textures, and other render nodes; you build shading networks out
of them in Hypershade. See
Connect render nodes using their default connections.
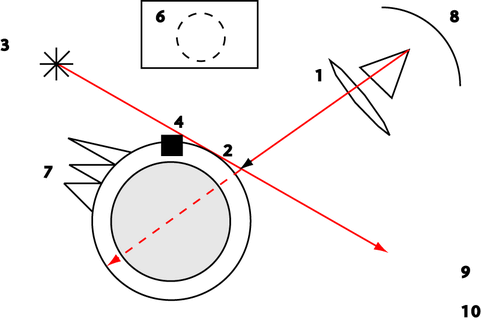
The following shows where
in a scene specific mental ray for Maya nodes are typically connected:
- Lens shader. Attaches to camera.
- Surface shader. For surface effects (Blinn,
Phong, and so on). Attaches to Shading Group.
- Light shader. For lighting style (point,
spot, and so on), and shadowing controls. Attaches to light.
- Shadow shader. Called when a shadow ray
hits an object. Overrides the appearance of the object to shadow
rays (color, transparency). Attaches to Shading Group.
- Volume Shader. Handles rays passing through
objects. Attaches to Shading Group (or to Camera for Environment
Fog).
- Geometry shaders. Called prior to rendering
for rendering. Attaches to transform node.
- Displacement shader. Same as Maya, displaces
surface geometry. Attaches to Shading Group.
- Output shader. For post effects (glow,
2D blur, DOF, and so on). Attaches to camera, attaches to multiple
shaders, control order of execution.
- Contour shading. 2 Global shaders, 1
shader on object, attaches to Shading Group.
- Photon / photon volume shaders. Describe
how photons are scattered/absorbed. Not commonly overridden. Attaches
to Shading Group.