


Define template brush settings
Each time you paint a stroke, Paint Effects creates a new brush and attaches it to the stroke. The template brush settings define the initial settings for this brush. Any changes you make to the template brush settings affect what the next stroke looks like, but they do not affect any previously painted strokes.
To define template brush attributes

Select the type of brush you want to paint with. All brush types use the shape defined by the brush attributes. For example, if you paint over a stroke with a Blur brush that has tubes, blurring occurs where the tubes cross over the paint, not along the Blur stroke path.
For more information, see Paint Effects Tool settings, specifically Brush Type.

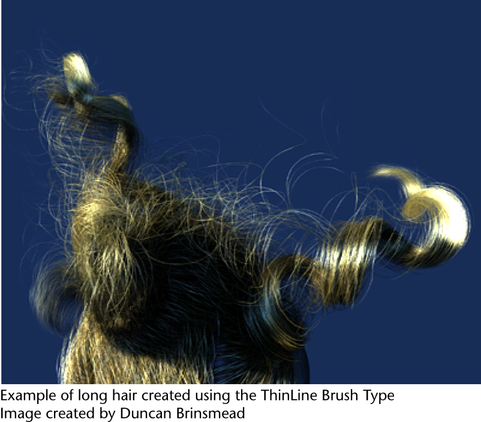
The ThinLine brush allows you to render large numbers of fine tubes much more quickly than the Paint brush type. It uses a direct anti-aliased line draw rather than a series of brush stamps. A new Multi Streak method is also available when this Brush Type is used. In combination with the Multi Streak method, the ThinLine Brush Type can be up to 100 times faster for hair than the Paint Brush Type with better line detail. In addition, new looks are possible using the Multi Streaks, such as wet clumping hair.
The Mesh type of brush renders Paint Effects using triangulated tubes instead of brush stamps. This results in accurate conical geometry with textures that correctly map on the surface. Flat surfaces are rendered more accurately than when the Paint Brush Type is used. While the Paint Brush Type is generally better when representing soft, fuzzy volumes, the Mesh Brush Type is better at hard surfaces.
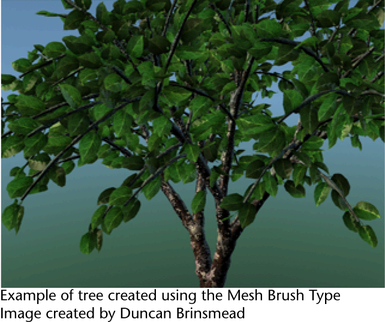
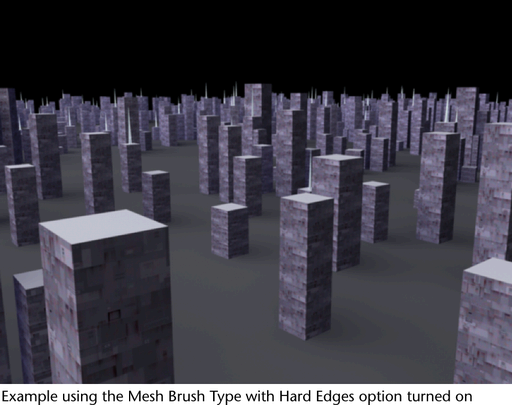
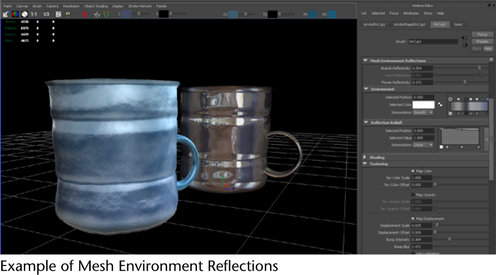
With the Mesh Brush Type you can create Paint Effects trees and plants that are convincing not just from a distance, but also close-up. You can also create shapes, such as hard-edged geometry (buildings) and you can do per-pixel lighting on the mesh (including specular highlights). There is also a built-in environment map on the brush that is useful when simulating reflective surfaces (see Set mesh environment reflections). We’ve added displacement and bump mapping to enhance the detail of the mesh surface (see Set mesh displacement/bump mapping). The triangles are not kept in memory, but rather generated at render time. As a result, you can use a lot of triangles without running out of memory.
Another feature made possible by representing the tubes as triangles is converting Paint Effects to Polygons. For more information, see Convert Paint Effects to polygons.
Use the Global Scale setting to adjust brush attribute values by a common factor. This scales the paint effect uniformly so you can paint the same effect, but in different sizes.

Set which channels are created and modified
Each pixel in a (color) rendered image consists of three values or channels. Each of the three channels represents the amount of red, green, or blue in the image.
Some image files can also contain a fourth or fifth channel of information. An alpha channel (or mask channel) represents the presence and opaqueness of objects. A depth channel (or Z depth or Z buffer channel) represents the distance of objects from the camera. These two channels are used by compositing software (for example, Maya Composer or Maya Fusion). For example, you can use the alpha channel of an image as a matte to composite an object (without its background) with another image, or you can use the depth channel to correctly composite several transparent objects over each other.
By default, Paint Effects generates an image file of the strokes in the scene with three color channels and an alpha channel. You can specify whether Paint Effects saves depth information (creates a depth channel), and whether the individual channels are updated with the stroke information in the Channels section of the Paint Effects Brush Settings window. For descriptions of the Channel options, see Channels.
Use the settings in the Brush Profile section of the Paint Effects Brush Settings window to define the brush profile. For descriptions of the Brush Profile options, see Brush Profile.
Use the settings in the Thin Line Multi Streaks section of the Paint Effects Brush Settings window to define the Thin Line Multi Streaks. For descriptions of the Thin Line Multi Streaks options, see Thin Line Multi Streaks.
Use the settings in the Mesh section of the Paint Effects Brush Settings window to define the mesh brush. For descriptions of the Mesh options, see Mesh.
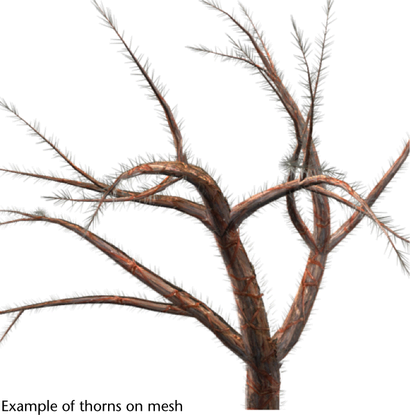
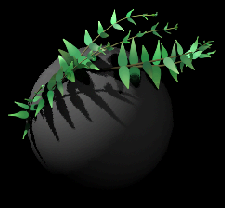
Large numbers of thorns may be generated off the surfaces of the triangles created when using the Mesh Brush Type. These thorns are drawn using the rendering method associated with the ThinLine Brush Type and render quickly. They are single segment tubes, and do not appear in the wireframe representation of the strokes. You can use these to add thorns and prickles to plants or to create furry or fuzzy tubes. For descriptions of these options information, see Thorns on Mesh.
Set mesh environment reflections
A simple ramp-based environment may be used in conjunction with the Mesh Brush Type. This can be used to create looks such as chrome, water, glass, shiny paint, etc. For descriptions of these options, see Mesh Environment Reflections.
Set mesh displacement/bump mapping
In the Texturing section of the Brush Settings window, you can apply displacements to the triangles created when using the Mesh Brush Type. If Per Pixel Shading is used, then a bump map is also applied along with the triangle displacement.
The options used to control the mesh displacement/bump mapping are: Map Displacement, Displacement Scale, Displacement Offset, Bump Intensity, Bump Blur, and Use Luminance. For descriptions of these options, see Texturing.
Use the settings in the Shading section of the Paint Effect Brush Settings window to define shading brush attributes. For simple strokes, these settings define the shading of the paint applied along the stroke path. For strokes with tubes, these settings define the shading of the paint applied to the tube roots. For descriptions of these attributes, see Shading.
The settings in the Tube Shading section of the Paint Effects Brush Settings window apply to brushes with tubes only. Use them to define shading of the paint applied to the tube tips. For descriptions of these attributes, see Tube Shading.
Map textures to color and opacity
Although in Maya, you can typically right-click a color box and select Create New Texture to map a texture to it, this is not the case in Paint Effects. To map textures to tube Color and Opacity, you must use the options in the Texturing section of the Paint Effects Brush Settings window. For descriptions of these attributes, see Texturing.
When light shines on an object, it illuminates the object’s surface. Without light, you could not see surfaces. The paint on a stroke behaves like a surface, and therefore requires light for you to see it.
You can use the lights in your scene to illuminate paint (real lights), or you can use a Paint Effects light that only affects the stroke paint and nothing else in the scene.
Use the settings in the Illumination section of the Paint Effects Brush Settings window to define how the paint is illuminated. For descriptions of these attributes, see Illumination.
When light shines on a surface, parts of the surface facing towards the light source are illuminated, and the parts of the surface facing away from the light source appear shaded. If one surface is located between a second surface and the light source, then the first surface will cast a shadow onto the second surface. By default, Paint Effects strokes do not cast shadows or produce shading effects, however, you can create them. You can create several types of shadows and shading:
Use the options in the Shadow Effects section of the Paint Effects Brush Settings window to create these shading effects. For descriptions of these attributes, see Shadow Effects.
Instead of using depth map shadows to cast shadows on surfaces, you can use “fake” shadows, which take less time to render and are sufficiently realistic on strokes that are on flat surfaces. See Fake Shadow.
Both of these shading techniques are quick to render. See Back Shadowand Center Shadow.
Tube roots are not typically exposed to light (think of grass or fur), which means the tips are illuminated and the roots are shaded.
The following shadowing options simulate this effect by shading the roots.This shading technique is particularly effective for shading plant stems. See Depth Shadow Typeand Depth Shadow Depth.
Cast shadows on objects (depth map shadows)
This is the most realistic shadowing technique, but takes longer to render. Using depth map shadows, the stroke can cast shadows on other surfaces, but it can also cast shadows on its own surfaces (tubes can cast shadows on other tubes in the same stroke). Objects can also cast shadows on strokes. See Cast Shadows.
This technique works only if the stroke uses Real Lights (see Real Lights).
You can add two types of glow effects to paint: standard Glow and Shader Glow. Add these effects in the Glow section of the Paint Effects Brush Settings window. For descriptions of these attributes, see Glow.
When you paint with tubes, Paint Effects plants tubes along the stroke path. These tubes can grow into an almost infinite variety of shapes and forms, depending on the settings you define in the Creation, Growth, Behavior, Length Mappings, and User MEL Scripts sections. Tube settings are in the Tubes section of the Paint Effects Brush Settings window. For descriptions of these attributes, see Tubes.
The settings in the Tubes > Creation section of the Paint Effects Brush Settings window define how tubes are initially created. For descriptions of these attributes, see Creation.
As part of the growth simulation, tubes can sprout branches, twigs, leaves, flowers, and buds. Although you can apply these settings literally to simulate plant growth, you can also use the growth pattern to create other interesting effects. For example, a dripping watercolor effect can be achieved using branches.
Use the options in the Tubes > Growth section of the Paint Effects Brush Settings window to select what grows off of tubes. For descriptions of these attributes, see Growth.
The following settings are available only when Branches is turned on under Tubes > Growth (see Set growth attributes). They define how tubes split into branches. For descriptions of these attributes, see Branches.
The following settings are available only when Twigs is turned on under Tubes > Growth (see Set growth attributes). They define how twigs sprout from tubes or branches. For descriptions of these attributes, see Twigs.
The following options are available only when Leaves is turned on under Tubes > Growth (see Set growth attributes). They define how leaves sprout from tubes or branches. For descriptions of these attributes, see Leaves.
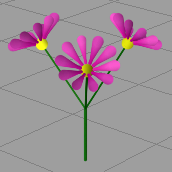
The following settings are available only when Flowers is turned on under Tubes > Growth (see Set growth attributes). They define how flowers sprout from tubes or branches. For descriptions of these attributes, see Flowers.
The following settings are available only when Buds is turned on under Tubes > Growth (see Set growth attributes). They define the size and color of bud. For descriptions of these attributes, see Buds.
You can make your tubes grow into more interesting shapes by applying forces and displacements to them in any combination.
When you apply displacement, you can displace the final position of completely-grown tubes in the stroke, warping them into new shapes. You can apply noise, wiggle, and curl displacements. You can also apply turbulence as a displacement. For information on turbulence, see Set turbulence attributes.
Use the options in the Tubes > Behavior > Displacement section of the Paint Effects Brush Settings window to displace tubes. For descriptions of these attributes, see Displacement.
You can apply forces to the tubes while they grow, at each step in the growth cycle. These small, cumulative changes affect the shape of the whole tube in a more systemic way, to produce different kinds of effects. You can apply spiral forces, gravity, wind, turbulence, and a repelling force that keeps tubes from passing through the ground. Because of the cumulative nature of growth, forces tend to have a greater effect at the tips of tubes than they do at the roots.
Use the settings in the Tubes > Behavior > Forces section of the Paint Effects Brush Settings window to apply forces to stroke tubes. Certain forces, such as Path Attract and Path Follow, do not apply to leaves or flowers. For descriptions of these attributes, see Forces.
Turbulence causes irregularities (or noise) in the motion of tubes. Use the settings in the Tubes > Behavior > Turbulence section of the Paint Effects Brush Settings window to define the turbulence force to apply to tubes. Turbulence can be applied as either a force or a displacement, depending on the Turbulence Type. For descriptions of these attributes, see Turbulence.
Spiraling occurs when tubes are wrapped around the stroke normal. Use the settings in the Tubes > Behavior > Spiral section of the Paint Effects Brush Settings window to create spiral effects. For descriptions of these attributes, see Spiral.
Bend can be used to curl up leaves and flowers, as well as to make the overall branches bend in the U direction (along the length). You can create natural looking flower petals and plants, such as fiddle head ferns. It is automatically animated in growth animations if non-zero. You can use the Curl attribute to bend leaves and petals in the V direction (along the width). Use the settings in the Tubes > Behavior > Bend section of the Paint Effects Brush Settings window to create bend effects. For descriptions of these attributes, see Bend.
When tubes have some flatness or texture (see Flatness1, Flatness2and Map textures to color and opacity), you can twist them to produce effects like a twisted ribbon. Use the settings in the Twist section of the Paint Effects Brush Settings window to create twist effects. For descriptions of these attributes, see Twist.
Map value ranges to tube length
You can map tube length to color, transparency, incandescence, tube width, and split length value ranges so that every tube uses the entire range, or only the longest tubes use the entire range. Use the settings in the Tubes > Length Mappings section of the Paint Effects Brush settings window to map these attributes. For descriptions of these attributes, see Length Mappings.
Use MEL scripts to apply custom effects
You can write MEL scripts that apply effects during the growth simulation of the brush. There are two types of scripts: creation scripts and runtime scripts.
Typically, you’ll want to modify the sample scripts provided in the Maya scripts directory. To do this:
Creation scripts override the normal tube creation routine (and therefore many of the controls). The following sample creation script is provided in your Maya scripts directory:
Runtime scripts are called every time a new segment is added to a tube. Typically, most things you want to do use runtime scripts. The following sample runtime scripts are provided in your Maya scripts directory, which is located at:
(Windows and Linux) mayapath/scripts/paintEffects
(Mac OS X) mayapath/Maya/Contents/scripts/paintEffects
Use the Tubes > User MEL Scripts section of the Paint Effects Brush Settings window to use a script. For descriptions of these attributes, see User MEL Scripts.
You can use the stroke or brush name to tailor the Runtime procedure based on the name.
Custom Paint Effects brushes that use callback functions must have two arguments at the end of all of callback procedure definitions: the brush and the stroke name. These arguments allow you to know the name of the brush, and the name of the stroke that has triggered the callback.
These callback arguments are present in the example scripts (for example <maya_home>/scripts/paintEffects/leafDroop.mel).
In order to exercise a Runtime callback, you can do the following:
You can create gaps in your tubes, and animate them using the settings in the Gaps section of the Paint Effects Brush Settings window. This is useful for creating effects like fire and rainfall. For descriptions of these attributes, see Gaps. You may need to increase the tube segments to see the gap effects; see Segments.
Use the settings in the Flow Animation section of the Paint Effects Brush Settings window to animate tube growth, and the flow of gaps, twists, and textures along each tube. For descriptions of these attributes, see Flow Animation.
For more information, see Animate tube growth, gaps, twist, and textures.