


Learning Resources > Tutorials > Getting Started with Maya > NURBS Modeling > Lesson 2: Sculpting a NURBS
surface >
Basic sculpting techniques
In the next steps, you’ll become familiar with features of the Sculpt Geometry Tool. With this tool, you use your mouse or stylus to push, pull, or smooth a surface’s shape without selecting or displaying CVs. After you practice sculpting the surface, you’ll erase your practice strokes then begin sculpting Egghead’s features.
To practice sculpting using basic sculpting operations
 . In
the Tool Settings window, click Reset
Tool, and make sure the Sculpt parameters are
displayed.
. In
the Tool Settings window, click Reset
Tool, and make sure the Sculpt parameters are
displayed.
In the Sculpt Parameters section, there are a number of operations for sculpting a surface. Each affects the region of the surface where you drag (stroke) your mouse or stylus relative to the surface normals:

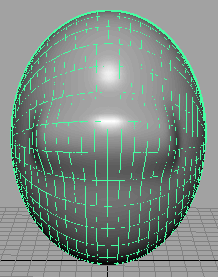
Smoothing works by averaging the position of all features within the brush radius with all other nearby features.
Unlike smoothing, Relax works by only averaging the largest surface anomalies so that the overall shape is maintained.
The Erase operation works up to the last time you saved the scene or clicked the Update button to the right of Erase Surface.
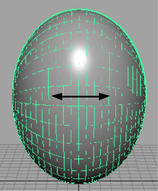
By default, Push and Pull strokes deform the surface in a direction normal (perpendicular) to the surface. To create the resulting deformation more accurately, use Push and Pull strokes in a front, side, or top view while examining the results in a separate perspective view. Tumble the perspective view regularly for the best visual feedback.
When you position the mouse pointer on the surface, it changes to a red sculpt icon that shows an abbreviation for the name of the operation you are performing. For instance, Ps stands for Push.
The red icon also displays the radius of the region affected by the stroke. The Radius(U) value changes the radius.
This has no effect because the stroke radius didn’t make contact with the CVs of either isoparm. Regardless of which operation you use, only CVs are affected by the strokes.
The strokes alter the surface because the radius overlaps the CVs. As this example shows, you need to make sure the radius is big enough to influence the desired CVs. It’s common to change the radius many times during a sculpting session.
If you prefer to affect a small region without increasing the radius, you can add CVs to the region by inserting more isoparms. You’ll do this later in the lesson.
The vertical stroke creates a thinner ridge than the horizontal stroke because the density of vertical isoparms is greater. The number of underlying CVs and their positioning affects the outcome of your strokes.
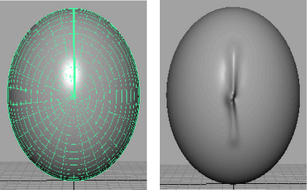
As your stroke nears the center of Egghead, a kink occurs. It’s challenging to alter a surface symmetrically in a region where many isoparms converge at a single point, called a pole. Always consider the position of isoparms as you sculpt a surface. In general, sculpt where isoparms are evenly, regularly distributed.