


Learning Resources > Tutorials > Getting Started with Maya > Rendering > Lesson 1: Rendering a scene >
Batch rendering a sequence
of animation frames
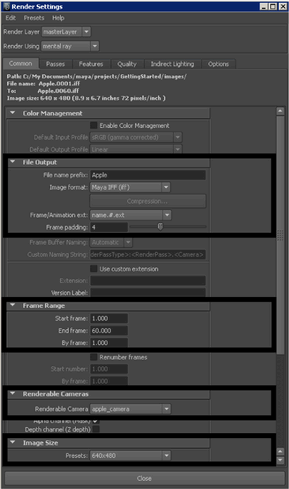
After you model, animate, and color your scene, you set several Render Settings options and then use the mental ray renderer to batch render part or all of the animation’s range of frames to files on disk. Each file represents a single frame (image) of the animation.
To set the Render Settings for batch rendering
The four-digit padded filename is compatible with many image playback programs, for example, Maya’s FCheck utility. Image playback programs let you view rendered animation sequences on your monitor at real-time speed.
For the remaining options in the Render Settings window, you’ll use the default settings. Maya will render using the quality preset (Production) that you specified earlier in the lesson.
After you set the Render Settings, the top portion of the Common tab shows the correct path and filenames for the files to be created during batch rendering. Check that this information is correct.
To batch render animation frames
It’s a good practice to save the scene before batch rendering. This is useful if, after batch rendering, you need to change any display settings and render again. By saving the scene prior to batch rendering, you can examine the scene to learn which option settings were in effect at the time you batch rendered.
The Batch Render Frame window appears.
Batch rendering 60 frames of a simple scene takes a few minutes. A complex scene may take hours per frame, depending on the speed of your computer.
To check the status of the batch render
Maya puts the resulting files in a default images directory. The files have the following names:
Apple.0001.iff
Apple.0002.iff
Apple.0003.iff
...
...
Apple.0050.iff
The images directory is located in the same path as the scenes directory. You can have Maya save to a different path by changing the project setting. See the Maya Help for further information on projects.
// Result: Rendering Completed. See mayaRenderLog.txt for information. //
The mayaRenderLog.txt file contains rendering statistics for advanced users.