Set particle attributes
with a ramp texture
A ramp texture is a 2D texture in which the color or grayscale value changes from one value to another across the extent of the image. You can use a ramp to control per particle attributes as particles age. You can also connect a ramp texture to any other per particle attribute of the particle. You commonly use ramp textures with the rgbPP, opacityPP, and radiusPP attributes. For most per particle attributes, you must add the attribute to the particle object before you use the ramp to control its value.
You can use a color ramp to change vector array (per particle) attributes as particles age. When you create a ramp for a vector array (per particle) attribute, the attribute is connected to a color ramp.
For information on the Ramp Attributes, see Ramp.
If you use a ramp and an expression to set the position, velocity, or acceleration, the ramp sets the value before the expression controls its value in a frame.
The rampPosition, rampVelocity, or rampAcceleration can receive input only from ramps. Each frame, Maya calculates the ramp attributes first, then calculates dynamics based on any value in the ramp attributes.
This creates a default ramp that controls the attribute as the particles age.
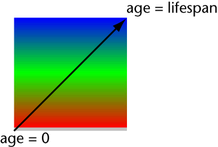
The Attribute Editor displays the default color ramp that controls the attribute. The three component values of the attribute are set to the RGB values of the vertical component (V) of the ramp over the particle’s lifetime. Values at the bottom of the ramp are used at the beginning of the lifespan, values at the top are used at the end of the lifespan.
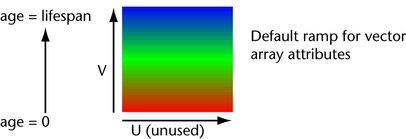
By default, at the beginning of each particle’s lifespan, the left, middle, and right vector components of the attribute equal 1, 0, 0 because the RGB value at the bottom of the ramp is red (1, 0, 0).
At the middle of the lifespan, the vector components equal 0, 1, 0 because RGB is green (0, 1, 0). At the end of the lifespan, the vector components equal 0, 0, 1 because RGB is blue (0, 0, 1). Maya interpolates vector components between these three points.
You can use any numerical values for R, G, and B in the Color Editor when you edit ramp values. Values outside the range 0 to 1 are valid, but they have no meaningful color equivalent in the display of the Texture Sample swatch. Do not edit HSV values or you’ll likely get incorrect results.
The only attributes for which the color in the swatch necessarily represent the component values of the attribute are rgbPP and incandescencePP. For other attributes that don’t have color equivalents, you can edit color values in the Color Editor by entering values in the R, G, and B boxes rather than by clicking colors directly.
For example, you can set rampAcceleration to 100, 0, 0 at some point in the lifespan by setting R, G, and B values of the corresponding point in the ramp to 100, 0, 0. These values create a red color in the ramp that’s identical to 1, 0, 0. However, adjacent points in the swatch will be interpolated with 100, 0, 0 differently than with 1, 0, 0.
You can also change the color sequence by changing other ramp attributes in the Attribute Editor such as Noise and Noise Frequency. See Rendering for details on the ramp attributes.
Remember, the horizontal component (U) of the ramp has no effect on the attribute by default. More precisely, the controlling component of the ramp is the leftmost vertical edge of the Texture Sample swatch in the Attribute Editor. To use the horizontal component as well, see Customize per particle attribute control with ramps.
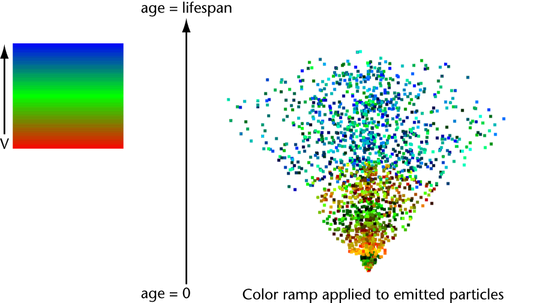
An example of a default ramp applied to emitted particles follows:
You can use a grayscale ramp to change float array attributes as particles age. When you create a ramp for a float array (per particle) attribute, the attribute is connected to a grayscale ramp. In grayscale ramps, black represents a value of 0 and white represents a value of 1.
For information on advanced ramp features, see the following topics in the Shading guide:
This creates a default ramp that controls the attribute as the particles age.
If you are working with emitterNameRatePP, set the Lifespan to the number of seconds you want the emitter to exist. The emitting particle object will disappear after the Lifespan value specified.
The Attribute Editor displays the default grayscale ramp that controls the attribute. The values of the attribute are set to the R color values in the vertical component (V) of the ramp over the particle’s lifetime. Values at the bottom of the ramp are used at the beginning of the lifespan, values at the top are used at the end of the lifespan.
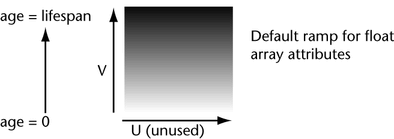
By default, at the beginning of each particle’s lifespan, the value of the attribute equals 1 because the R component at the bottom of the ramp is 1 (The color is white, with an RGB value of 1, 1, 1.)
At the middle of the lifespan, the value of the attribute equals 0.5, because the R component at the bottom of the ramp is 0.5. (The color is gray, with an RGB value of 0.5, 0.5, 0.5.)
At the end of the lifespan, the value of the attribute equals 0, because the R component at the bottom of the ramp is 0. (The color is black, with an RGB value of 0, 0, 0.)
Maya interpolates the values between the three points in the ramp.
You can use any numerical values for R in the Color Editor when you edit ramp values. Values outside the range 0 to 1 are valid, but they have no meaningful color equivalent in the display of the Texture Sample swatch. Do not edit HSV values or you’ll likely have incorrect values applied to the attribute.
Typically, opacityPP is the only attribute for which the color in the swatch represents the values in the attribute. For other attributes that don’t have color equivalents, you can edit color values in the Color Editor by entering values in the R box rather than by clicking colors directly.
You can also change the color sequence by changing other ramp attributes in the Attribute Editor such as Noise and Noise Frequency. See Rendering for details on the ramp attributes.
Remember that the horizontal component of the ramp has no effect on the attribute. To use the horizontal component as well, see Customize per particle attribute control with ramps below.
Customize per particle attribute control with ramps
A ramp has two inputs—U (horizontal) and V (vertical). By default, the V input of the array mapper is connected to the particle’s age and the U input is not connected. You can change these input connections when you are creating the ramp.
Other ramp options such as circular, diagonal, or box change on both axes. You select these in the ramp Attribute Editor.
To tune ramp control of per particle attributes, you can:
To specify how particle’s attributes get values from the ramp
 .
.
This displays the Create Ramp options window.
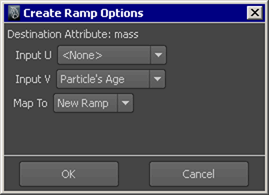
For the default ramp above, using Particle’s Age for both Input U and Input V has no advantage, because the ramp color doesn’t change in a U (horizontal) direction.
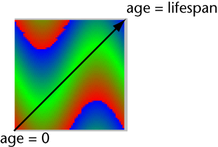
If you edit ramp attributes to create a ramp such as the following example, selecting Particle’s Age for both Input U and Input V adds versatility to your control of the attribute:
You can even use a texture as input to the ramp’s color. For example, you can map a 2D checker texture onto the color ramp as follows:
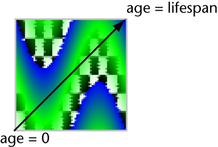
You can also edit the ramp to change the colors.
For information on advanced ramp features, see the following topics in the Shading guide:
In addition to mapping to a default ramp, you can map the destination attribute to a ramp that you have already used in the scene.
to display
the Create Ramp options window.
The ramps you have used in the scene are listed in the pop-up menu.
Ensure ramp colors portray attribute values meaningfully
When you edit ramp values for RGB (or R) in the Color Editor, values outside the range 0 to 1 are valid but have no meaningful color equivalent in the display of the Texture Sample swatch. You can create meaningful color equivalents as follows:
To ensure ramp colors portray attribute values meaningfully
The array mapper lets you scale the range of attribute values applied to the particles.
By default, the Min Value sets the lowest value the attribute has at the beginning of its lifespan—the value at the bottom of the ramp. By default, the Max Value sets the highest value the attribute has at the end of its lifespan—the value at the top of the ramp.
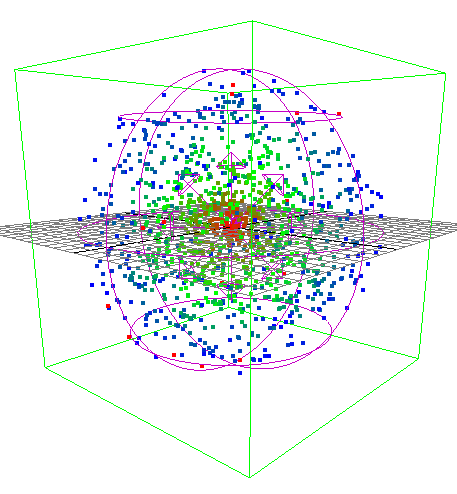
Coloring particles according to distance from origin
In this example, we’ll use the V coordinate of a ramp to color particles according to their distance from the origin. This example uses emitters and fields, which are covered in the following chapters. You may want to read about emitters and fields before doing this example. Or you can cut and paste the MEL code into the Script Editor to create the emitters and fields.
To use a ramp to color particles according to their distance from origin
To do this, you can copy the following MEL commands from the Maya Help and paste them into the Script Editor:
emitter -pos 0 0 0 -type volume -r 100 -sro 0 -nuv 0 -cye none -cyi 1 -spd 1 -srn 0 -nsp 1 -tsp 0 -mxd 0 -mnd 0 -dx 1 -dy 0 -dz 0 -sp 0 -vsh sphere -vof 0 0 0 -vsw 360 -tsr 0.5 -afc 1 -afx 1 -arx 0 -alx 0 -rnd 0 -drs 0 -ssz 0 ;
scale 10 10 10;
particle;
connectDynamic -em emitter1 particle1;
To do this, you can copy the following MEL commands from the Maya Help and paste them into the Script Editor:
radial -pos 0 0 0 -name pushIn -m -2 -att 0 -typ 0 -mxd -1 -vsh sphere -vex 1-vof 0 0 0 -vsw 360 -tsr 0.5 ;
scale 10 10 10;
connectDynamic -f pushIn particle1;
To do this, you can copy the following MEL command from the Maya Help and paste it into the Script Editor:
addAttr -ln "rgbPP" -dt vectorArray particleShape1;
to display
the Create Ramp Options.
Notice that a new attribute called rgbVPP appears in the Attribute Editor.
rgbVPP = mag( position ) / 10;
The quantity mag(position) is always equal to the particle’s distance from the origin. We’ve divided by 10, which is the maximum distance any particle can be from the origin in our setup.
In other words, this expression says that the V input to the ramp will have a value 0 if the particle is at the origin, and 10 if it’s all the way out at the boundary of the sphere.
To do this, you can cut the following MEL commands from the Maya Help and paste them into the Script Editor:
addAttr -is true -ln "pointSize" -at long -min 1 -max 60 -dv 2 particleShape1;
setAttr "particleShape1.pointSize" 4;