The following sections describe how to edit attributes to tune the effect of goals on trailing particle and nParticle objects.
Set goal weights on a per-object basis
When you add a goal to an object, Maya adds a corresponding goal weight attribute to the trailing particle object. The goal weight sets how much all particles of the trailing object are attracted to the goal. You can set the goal weight before you create the goal using the Goal options window, or you can adjust the goal weight afterwards using the Attribute Editor.
You can set goal weight to a value between 0 and 1. A value of 0 means that the goal’s position has no effect on the trailing particles. A value of 1 moves the trailing particles to the goal object position immediately.
A value between 0 and 1 causes the particles to move toward the goal as if bound to it by an elastic spring. The closer to 1, the faster the trailing particles settle at their final position. The goal weight value is 0.5 by default.
You can turn the effect of a goal object off or on without setting goal weight. With the trailing particle object attributes displayed in the Attribute Editor, turn off the Goal Active attribute associated with the goal object.
To display the Goal options window:
 . The
attributes in this window affect goals you create after you change
an attribute setting.
. The
attributes in this window affect goals you create after you change
an attribute setting.
To change the goal weight in the Attribute Editor
The goal weight is next to the name of the goal object. Change this weight to apply to the entire object.
(If you change any of the per-particle settings, this goal weight will no longer apply.)
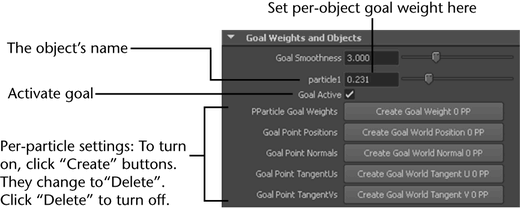
If the particle object has multiple goal objects, you’ll see a goal weight section for each object.
Set goal weights on a per-particle basis
For more control of trailing particle motion, you can tune the goal weight on a per particle basis. The per particle goal weight is controlled by the trailing object’s Goal PP attribute.
The per-particle Goal PP attribute is used for every goal object connected to the particles. By default, the Goal PP attribute has a value of 1 for each particle.
To set per particle goal weight
The Goal PP value is multiplied by the per object goal weight to create the total goal weight for each particle.
For example, if you have a per object goal weight of 0.5 and you add a per particle goal weight of 0.5 to some of the particles, the total goal weight of those particles is 0.25. If you have a second goal object and the corresponding per object goal weight is 0.1, the total goal weight of the particles is 0.05.
Set goal weights on a per-particle, per-object basis
For each goal object associated with a particle system, Maya provides a Goal Weight value that determines how strongly the particles will be attracted to that object. The basic per-particle Goal PP attribute can be used to diminish the overall effect of goal forces on each particle, but it cannot be used to selectively change the influence of a particular goal object on a particular-particle independently from other particle-object interactions—to make this change, you need to use dynamic attributes that will allow you to specify per-particle goal weight values for a particular goal object. These attributes are useful for creating varying goal attractions within a particle system to one goal object.
The dynamic attribute goalWeightNPP provides per-particle goal weights for the Nth goal object. Goal objects are numbered according to their indices in the particle system's sparse goalGeometry array. This ensures that per-particle goal weights will be preserved while goal objects are being added to and removed from the particle system. If no per-particle goal weight is found for a particular goal object, then the standard goal weight value for that object (specified by the slider next to the object's name in the particle Attribute Editor) is applied to all particles.
To set up per-particle goal weight attributes
Examine goal point data per particle
After you’ve created goal objects, you can add several per-particle dynamic attributes to the particle node. When the particle system is being attracted to goal objects, these attributes are filled with data about the specific point on each goal object to which each particle is being attracted. You can view this information in the Particles tab of the Component Editor. While you cannot change this information (you can edit it, but the values will be replaced once you re-run the simulation), you may find it useful for run-time particle expressions. For example, you can change the particle color so that the color intensifies as it approaches the goal object.
Since a particle system can have multiple goal objects, these new attributes are numbered to indicate to which goal object their data corresponds to. Goal objects are numbered according to their indices in the particle system's sparse goalGeometry array. This strategy ensures that these per-particle attributes do not change their meanings as goal objects are added to and removed from the particle system.
These attributes do not support animated UVs. If the UVs on a goal object are animated, the tangents generated will correspond to the original UV parameterization. Adding a slight deformation or control point animation to the mesh will trigger a refresh of the mesh data at every frame, thereby working around the problem.
Many different types of objects can be used as goal objects for particle systems in Maya, but tangents and normals are only properly generated for NURBS surface and polygon surface goal objects. NURBS curves, other particle systems used as goal objects, or other control-point-based primitives will not generate proper normals and tangents.
To set up goal point data per-particle attributes
Specify NURBS or polygonal UV positions for goals
When you use the CVs of a NURBS or polygonal surface as a goal, the trailing particles move directly to the CVs. The CVs, however, are usually positioned at distant or undesired positions. You can make the particles move more directly or evenly to the surface by adding and setting the predefined goalU and goalV attributes of the trailing particle object’s shape node. These per particle attributes set exact locations on a NURBS or polygonal surface where the particles are attracted.
You can also add and set the predefined goalOffset attribute to more conveniently accomplish similar results (see Specify an offset to goal positions).
If the trailing object has multiple goal objects, the same per particle U and V values are used for each goal object.
If the attributes don’t specify a valid position on the object, the closest position on the surface or curve is used as the goal position instead. A position is invalid if it is out of the object’s U and V range or it’s on a part of the curve or surface that you’ve trimmed. To ensure the closest point is used, specify a value of -1.
See Add dynamic attributes for details on adding attributes. You can set the value of these attributes with an expression, MEL script, or other attribute editing technique.
Work with polymesh goal objects
When per-particle goalU/goalV attributes apply to polymesh goal objects, you specify particular points on the goal mesh surface to which particles will be attracted. Animation of goalU/goalV values, as well as the goal object and its UV coordinates, is fully supported.
For each polymesh object, a UV Set control appears to let you decide which UV set to use when determining the goal position of a particle given its goalU/goalV values.
Since UV mappings on polymesh objects are arbitrary, it is possible that a given goalU/goalV pair may map to more than one point on the goal surface. If there are multiple potential goal points for a particle, Maya selects the point that is closest to the particle’s current position in world space, and uses that as the goal position. This decision is recomputed at every frame, so if the particle moves closer to one of the other potential goal positions, the particle will be attracted to that goal position instead of the original goal position.
Similarly, it is also possible that no point on the object matches the specified goalU/goalV values for a particular particle. In that case, the mesh vertex that is closest in UV space to the specified goal point is used. This decision is updated at every frame.
Specify an offset to goal positions
If you add the predefined goalOffset attribute to the trailing particle object’s shape node, you can set an offset to the world space position of the goal object. For example, if you have particles moving towards a goal that consists of a curve’s CVs, the offset directs the particles to each CV plus the goalOffset. The goalOffset attribute is a per particle vector attribute.
See Add dynamic attributes for details on adding attributes. You can set the value of this attribute with an expression, MEL script, or other attribute editing technique.


