The Particle Tool lets you create and position particles individually or in grids or spherical regions. By default, the Particle Tool creates particles individually, one particle per mouse click. To change the tool options, see Set the Particle Tool options.
 .
.
 (Windows
and Linux) or
(Windows
and Linux) or  (Mac
OS X).
(Mac
OS X).
This creates a new particle object consisting of the particles you positioned.
(Windows
and Linux) or (Mac
OS X). You cannot use
Edit
> Undo to
undo the entire object until you press or .
If you want to undo individual
particles before you press or , use
the  (Windows and
Linux) or
(Windows and
Linux) or  (Mac
OS X) key to remove the particles in the reverse order of creation.
Alternatively, you can press the
(Mac
OS X) key to remove the particles in the reverse order of creation.
Alternatively, you can press the  (Windows
and Linux) or
(Windows
and Linux) or  (Mac
OS X) key to go into editing mode, then click any particle and press or . Press or to leave
editing mode.
(Mac
OS X) key to go into editing mode, then click any particle and press or . Press or to leave
editing mode.
You can also change the
position of one or more particles before you press or . Press
the or key
then drag the particle. Press or to complete
the particle object.
When you create a particle object, you can set several tool options in the Particle Tool Settings window. When you change these settings, it affects only particle objects you create after the change.
After you create the object, you can change some tool options and set additional attributes (see Edit particle attributes).
To set the Particle Tool options
 to display
the options window.
to display
the options window.
The name helps you identify the object in the Outliner. If you don’t enter a name, the particle object receives a default name such as particle1.
Assign nParticles to a new or existing solver
If you are creating nParticles, you can assign the nParticle object to a new solver, or a different existing solver within your scene. Because nParticle objects can only interact with other Nucleus objects (nParticles, nCloth, and passive objects) when sharing the same Maya Nucleus solver, you may want to move objects from one solver to another or separate objects to their own solver.
To assign nParticles to a new or existing solver
If you select New Solver, Maya creates a new Maya Nucleus Solver, which appears in the Attribute Editor, and assigns the selected object(s) to it.
If you select an existing solver, Maya assigns the selected object(s) to it.
To adjust frame-to-frame dynamic velocity of moving particles
See Adjust frame-to-frame velocity conservation.
To set the number of particles per click
(Windows
and Linux) or (Mac OS
X).
To sketch a continuous curve of particles
This sets the pixel spacing between particles. A value of 0 gives you nearly a solid line of pixels. The higher the value, the more space between the pixels.
(Windows
and Linux) or (Mac
OS X).
To create a 2D grid of particles by clicking in the workspace
This sets the spacing (in units) between particles in the grid.
(Windows
and Linux) or (Mac
OS X) to create the grid.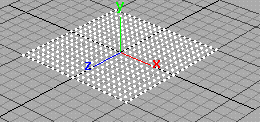
To create a 3D grid of particles by clicking in the workspace
This sets the spacing (in units) between particles in the grid.
(Windows
and Linux) or (Mac OS
X) yet.
(Windows
and Linux) or (Mac
OS X) key to enter edit mode.
or .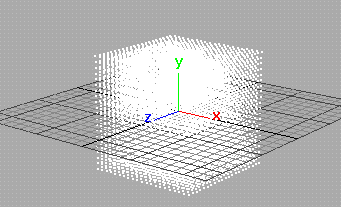
To create a 2D or 3D grid by entering values
(Windows
and Linux) or (Mac OS
X) to create the grid.


