


Learning Resources > Tutorials > Getting Started with Maya > Animation > Lesson 5: Inverse
kinematics >
Parenting a model into
a skeleton hierarchy
Parenting is the term used when placing a node beneath another in a hierarchy so it becomes the child of the node above it (its parent) in the hierarchy.
In the following steps, you add the surfaces of the mechanical arm model into the skeleton hierarchy. This process links the models’ surfaces to the skeleton hierarchy making it possible to pose and animate the model like a real mechanical arm. Using the Hypergraph to select the nodes allows you to better visualize the process and the hierarchical relationships that result.
A more common technique for combining a character model into a skeleton hierarchy is referred to as skinning or binding. The Bind Skin tool combines the surface components and joints together into a hierarchy and also takes into account any deformations that may occur when a character bends or flexes (knees, waist, neck, elbows and so on). Maya provides a few methods for skinning. For more information see Skeletons and skinning in the Maya Help. For a tutorial on skinning see the Smooth Skinning lesson in the Character Setup chapter in this guide.
To parent the mechanical arm into the skeleton
The order of selection is important. You want to select the child node first, and then Shift-select the item that will become the parent node second.
In the Hypergraph, joint4 is now the parent node for the Arm_end node in the skeleton hierarchy.
Your new hierarchy should appear as shown in the diagram below.
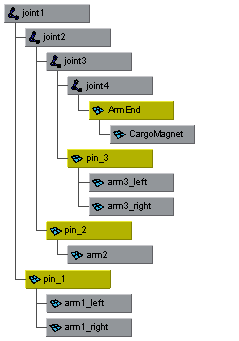
In the next steps, SwivelBase becomes the parent node for the new hierarchy so that the entire arm assembly swivels about the center of the base component.
Change the panel display to a layout that allows you to view the hierarchy in the Hypergraph.
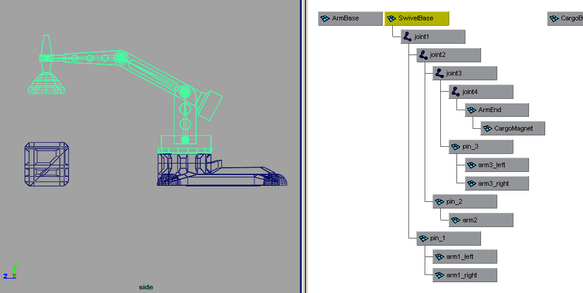
In the side view, observe that both the mechanical arm model and the skeleton are selected. Swivel_base is the parent or root node for the hierarchy. If you rotate SwivelBase, everything else below that node (the entire arm with skeleton) rotates.
Observe that the last two components of the mechanical arm are selected. If you rotate joint3, only the components below that node in the hierarchy will be affected.
Observe that only one isolated segment of the model is selected. No other components or joints are selected when pin2 node is selected. If you rotate the model at pin2, only the component at pin2 will rotate in isolation from the rest of the hierarchy because it is located lower in the hierarchy.
It is now possible to select and rotate the skeleton joints to pose the mechanical arm as a unit, and then set keyframes to animate it. Posing a character using joint rotations is referred to as Forward Kinematics (FK). FK allows for precise control when setting up a pose, but it can be a time consuming process to select and rotate each joint into the desired position.
When an animation is more focused on the goal of placing the end joint in a hierarchy in a particular position, (for example, a hand or a foot), it is more efficient to use Inverse Kinematics to pose the skeleton. For more information on forward and inverse kinematics, see Posing skeletons in the Maya Help.