The Unfold feature lets you unwrap the UV mesh for a polygonal object while attempting to ensure that the UVs do not overlap. Unfold helps to minimize the distortion of texture maps on organic polygon meshes by optimizing the position of the UV coordinates so they more closely reflect the original polygon mesh. For example, if the initial shape of the UVs cause a patterned texture to distort, you can use the Unfold feature to minimize the distortion because it attempts to maintain the UV’s relationship relative to the original polygon mesh.
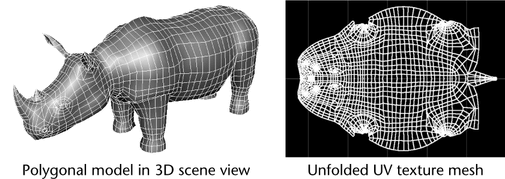
Unfold works well in situations where UV meshes need to be created from polygonal models that have complex organic shapes. In these situations, other projection methods may not be as successful and automatic mapping would produce too many individual UV shells that would necessitate many move and sew operations afterwards. For example, polygon models that are prone to overlap via other projection methods would be well suited for the Unfold feature.
When compared to Automatic Mapping, Unfold produces good UVs on larger UV shell areas because it keeps neighboring faces together (by contrast, Automatic Mapping produces many separate UV shells).
Unfold is not needed when working with simple, non-organic poly mesh forms. In these cases, other projection techniques or automatic mapping would be better suited and more straightforward. For example, a wall can be planar-projected or a bottle can be cylindrically projected.
Prior to using the Unfold feature you should consider the following:
The mesh must first have UVs to unfold. You can create UVs using almost any mapping technique (for example, cylindrical mapping, spherical mapping, and so on). In general, the initial shape of the UVs doesn’t affect the final unfolded result. However, their initial shape should be as distortion free as possible to avoid long computations when unfolding and to facilitate UV edge selection for cuts.
When unfolded, the polygon mesh should be able to lay relatively flat without overlapping. Imagine cutting a shirt along its sides so that its pattern lies flat over a table. Like this example, in Maya you must cut edges from the original shell to unfold a UV texture.
Locating the edge cuts requires some planning, in advance of the actual cuts, to obtain the best unfolded result. The better the edge cuts, the better the correlation between the original polygons and their corresponding UV mesh. In addition, you should anticipate that the polygon edge cuts will result in texture mismatches along edges, and locate edges on the model where they are least visible. For example, make edge cuts under the arms or on the back of the legs of a character.
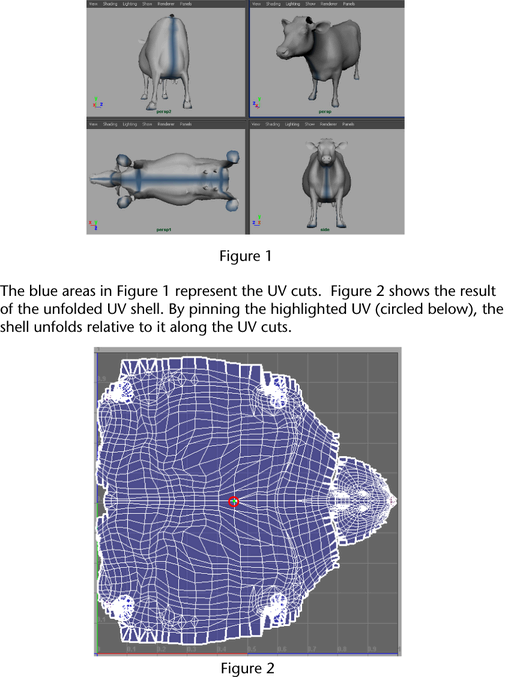
When unfolding a UV shell, it is important to consider where you are unfolding relative to. A pinned UV provides an anchor around which other UVs can be unfolded. Often, if you do not pin at least one point when unfolding a UV shell, the shell will unfold into a very tiny mesh or into an undesirable shape. For symmetrical meshes, you often want to pin a UV along the line of symmetry.
For more information about pinning, see Pinning.
When using the Smooth UV Tool, any unselected UVs are automatically pinned. Conversely, when using the Unfold command, you can choose to pin any selected UVs or unselected UVs.
To prepare a UV shell for unfolding
perform an initial UV mapping operation on the mesh to produce a UV texture mesh (for example, using Create UVs > Cylindrical Mapping).
For additional tips on determining edge cuts, see UV unfolding workflow tips.
Once you are satisfied with the cuts you’ve made, you are ready to unfold the UV shell.
 from
the UV Texture Editor toolbar.
from
the UV Texture Editor toolbar.
Two small controls appear at the bottom-left of the selected UVs.
With the Smooth UV tool you can choose to unfold the entire mesh or only part of it. However, you cannot use it to unfold multiple UV shells at once. You may also want to control specific aspects of the Unfold operation. You can do this with the Unfold option.
To unfold a polygon UV texture mesh using the Unfold feature
 .
.
 .
.
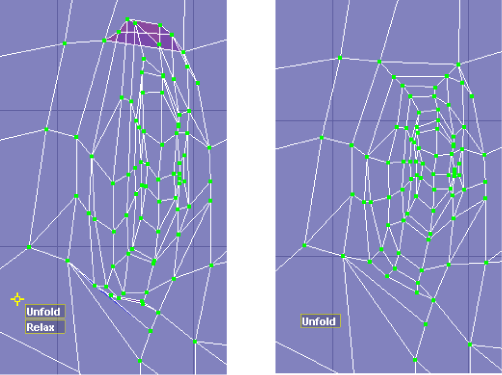
In general, the Unfold operation requires several iterations to achieve the desired final result. It may often be necessary to refine your cuts, add new ones, move and sew UV edges, or add/change pinned UVs between iterations.
When you are satisfied with your final unfolded result, use Polygons > Layout as a final step to ensure the UVs are laid out as you require.
The following workflow tips can be useful in helping you achieve your desired final unfolded result.
While it is possible to unfold a complete UV mesh for one model in one piece, an alternate approach might be to cut the UV mesh into smaller sections and unfold portions of the mesh separately. With this strategy you can more easily control regions of the unfold by pinning and so on. You’ll need to determine where you can safely cut the mesh, and later re-sew the UVs if required after the unfold operations are complete. Which approach you take will be determined by the complexity of the mesh and your individual production requirements.
Determining and selecting edge cut locations
The edge cuts should be located on the UV mesh in such a way that the UV mesh would lay flat if it were unfolded. Edge cuts are important because they allow the UV texture coordinates to freely unfold with as little distortion as possible during the Unfold operation.
The edge cuts should also be located in areas of the UV mesh where they will stay mostly unseen in the final rendered images. This reduces the possibility of the viewer seeing the texturing artifacts that can result along texture edges.
You can quickly select a path of edges using the Select Shortest Edge Path Tool (Select > Select Shortest Edge Path Tool).
The Edge Loop tools can be useful for quickly inserting edges into the mesh in locations that are not obvious to the viewer.
Whenever you need to make complex edge, vertex, or UV selections repeatedly, you can create selection sets for these components (called Quick Select sets) to easily select these components later on. To create Quick Select sets, select the components you want in the set and then select Create > Sets > Quick Select Set. This can be particularly useful when you need to repeatedly select UVs for pinning during the unfold operations.
It is critical to view and select border edges in both the scene view and the UV Texture Editor. Turn on the display of texture borders by selecting Display > Polygons > Texture Border Edges. This displays the UV borders on the polygon mesh as thicker lines so you can see your progress as you cut the UV edges.
Depending on where you initially cut the edges of the UV texture mesh, you can pin specific locations or regions of the UV texture mesh to create temporary anchor points to use with the Unfold feature. For example, with a polygon mesh of a quadruped, you can select the vertices along its spine beginning at the tip of the nose and ending at the tip of its tail (assuming this has not been cut), then align these vertices to a vertical axis or horizontal axis within the UV Texture Editor. When you perform the next Unfold iteration, turn on the Pin Selected UVs option in the Unfold UVs Options window so the selected UVs remain anchored while the Unfold operation proceeds. The UVs will then unfold in relation to the area you pinned. If you create QuickSets of the UV components involved, your pinning operations will proceed more quickly.
Pinning is useful for ensuring areas don’t move during the unfold. It’s also useful when you have some regions unfolded to your satisfaction, and need to maintain those regions while performing additional unfold iterations. When necessary you can pin a shell’s border edges. In this way you can use the Unfold feature while the shell border is pinned to unfold the shells’ interior UVs.
In general, you get better results when pinning extreme points on the mesh and respecting the polygon object’s symmetry whenever possible.
When using the Smooth UV tool to unfold, any unselected UVs are automatically pinned.
Constraining the unfold to either a horizontal or vertical direction
By default, the Unfold feature unfolds the UVs in all directions in an unrestricted manner. You can constrain the unfold process so the UVs are constrained to unfold in either the vertical or horizontal direction as they appear in the 2D view of the UV Texture Editor.
This can be useful when the appearance of the UVs is fine in one direction, but needs refinement in another.
When using the Smooth
UV Tool, you can constrain the direction of the unfold
operation by holding the  button
while dragging the mouse.
button
while dragging the mouse.
When using the Unfold option, you can set the Unfold constraint to either Vertical or Horizontal to constrain the direction of the unfold. The Unfold constraint setting also respects any pinning settings you may have set for the unfold operation.
Use Edit UVs > Align to snap UVs to match any vertical or horizontal lines that would naturally occur on the texture.
Aligning UV edges that run down the axis of symmetry can be used to your advantage. For example, the line of UVs that run down the spine of a symmetrical four-legged animal. You can select and align these UVs and then pin them so they act as a benchmark for further unfold operations.


