You
can modify the layout of multiple UVs at once on polygonal or subdivision
surface geometry using the UV Lattice Tool in
the UV Texture Editor.
The UV
Lattice Tool gives you a high level of control over your
UVs by letting you edit the layout of numerous UVs at a time with
a 2D lattice deformer.
To edit the layout of your UVs using
the lattice manipulator
- In the scene view, select the polygonal
or subdivision surface object whose UVs you want to manipulate.
- Select
Edit UVs > UV Texture Editor.
The UV
Texture Editor appears.
- In the UV Texture Editor’s
view, switch to UV mode.
 -click
in the view and select UV from the marking menu that appears.
-click
in the view and select UV from the marking menu that appears.
- In the UV Texture Editor menu
bar, select Tool > UV Lattice Tool >
 .
.
The UV
Lattice Tool Options window appears.
- Set the UV Lattice Tool options
and then click Apply and Close.
- Select Tool > UV Lattice
Tool or click the UV Lattice Tool
 button
in the UV Texture Editor toolbar.
button
in the UV Texture Editor toolbar.
- In the UV Texture Editor view,
drag around the UVs you want to manipulate. This selects the target
UVs for the lattice.
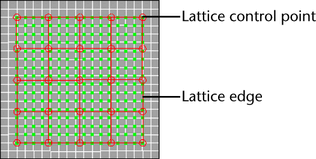
A UV lattice manipulator
appears over and surrounding the target UVs.
- Select the lattice edges or control points
that affect the region of UVs you want to manipulate by clicking
them.
 -click
lattice edges or control points to include them or remove them from
your selection.
-click
lattice edges or control points to include them or remove them from
your selection.
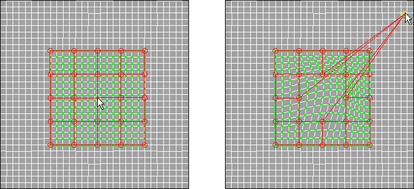
- Drag the selected lattice edges or control
points to deform the layout of the target UVs.