Layouts are UI elements that contain and arrange other UI elements. They are the principle means of controlling formatting in ELF windows. There are a number of different specialized layouts that arrange their contents in particular ways. For example a column layout arranges its contents vertically one after another in a single column, like a list, whereas a row layout arranges its contents horizontally beside each other. There are other layouts for other arrangement schemes. Layouts can contain other layouts to achieve a wide variety of appearances. All commands that create layouts end in “Layout”; for example, “gridLayout”.
For a list of the layouts that are available, see the “UI: Layouts” section of the Command List by Function.
The “frameLayout”, “tabLayout”, and “menuBarLayout” commands have extra capabilities not necessarily related to positioning their children.
A frame layout has an expand/collapse option in which it has a button beside its title to toggle its state. When in the collapsed state the contents of the frame layout are hidden and the layout collapses to take up very little space. The frameLayout callbacks for expanding or collapsing layout are only called if the layout is collapsed or uncollapsed through the visible interface (for example, the small arrow icon the user can click.) Using code such as the following will not invoke the callback:
frameLayout -e -collapse true $theFrame;
Having callbacks work in this way is the only way we can allow things to get set up correctly when the window is first being created without getting into infinite loops. If a callback is needed and you know it is safe then call it directly at the same time you do the collapse or expand.
A tab layout contains a number of other layouts, of which only one is displayed at a time. Each of the child layouts have a file folder like tab that can be selected to make that layout the visible one.
One of the more powerful layouts is the “formLayout”. This layout supports absolute and relative positioning of child controls. For example, you may specify that a control’s position remains fixed while its dimensions are relative to the size of the window. This concept is best illustrated with the following example.
window -widthHeight 300 200 TestWindow2;
string $form = `formLayout -numberOfDivisions 100`;
string $b1 = `button -label "A"`;
string $b2 = `button -label "B"`;
string $b3 = `button -label "C"`;
string $b4 = `button -label "D"`;
string $b5 = `button -label "E"`;
formLayout -edit
-attachForm $b1 "top" 5
-attachForm $b1 "left" 5
-attachControl $b1 "bottom" 5 $b2
-attachPosition $b1 "right" 0 75
-attachNone $b2 "top"
-attachForm $b2 "left" 5
-attachForm $b2 "bottom" 5
-attachForm $b2 "right" 5
-attachOppositeControl $b3 "top" 0 $b1
-attachPosition $b3 "left" 5 75
-attachNone $b3 "bottom"
-attachForm $b3 "right" 5
-attachControl $b4 "top" 0 $b3
-attachOppositeControl $b4 "left" 0 $b3
-attachNone $b4 "bottom"
-attachOppositeControl $b4 "right" 0 $b3
-attachControl $b5 "top" 0 $b4
-attachOppositeControl $b5 "left" 0 $b4
-attachNone $b5 "bottom"
-attachOppositeControl $b5 "right" 0 $b4
$form;
showWindow TestWindow2;
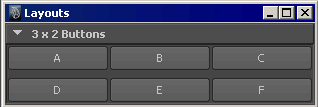
The resulting window has button A fixed to the top left corner of the window, while it’s bottom edge is attached to button B and it’s right edge is attached such that its width is 75% of the window’s width. With these attachments button A will grow or shrink as appropriate when the window is resized. Also note the attachments on buttons D and E will align their left and right edges to the button above.
Most of the formLayout attachment flags operate as you would expect them to. AttachOppositeForm and attachOppositeControl require some extra explanation. As child controls are added to the form they do not have a position but do have an order and thus an implied position relative to one another. In terms of the attachControl flag the “natural” place for the top of the second child to connect to is the bottom of the first child. The “natural” place for the left edge of the second child to connect to is the right edge of the first one.
Thus the second child is, in a sense, right of and below the first, the third is right of and below the second and so on.
Consider now that we want to make the second child attach beside the first one and that it must be a relative attachment so that child 2 will stay beside child 1 when the form’s size changes. The regular attachControl lets us connect the left of child 2 to the right edge of child 1, attachControl child2 “left” 0 child1; says to attach the left edge of child 2 to the edge of child 1 that is “nearest” in the left-right direction with a spacing offset of 0 pixels. Remembering that the implicit order has child 2 positioned immediately right of child 1 the “nearest” edge is then child 1’s right edge.
But attachControl can’t make the top of child 2 line up with the top of child 1 because of the implied ordering that attachControl follows. That is when attachOppositeControl is used.
attachOppositeControl child2 "top" 0 child1;
says to attach the top edge of child 2 to the edge of child 1 farthest from child2, its top edge, with a spacing offset of 0 pixels. The form knows to place two objects with the same top edge position side by side.
window TestWindow3;
string $form = `formLayout`;
string $b1 = `button -label "AAAAAAAAA"`;
string $b2 = `button -label "BBBBB"`;
string $b3 = `button -label "CCCC"`;
formLayout -edit
-attachForm $b1 "top" 5
-attachForm $b1 "left" 5
-attachControl $b2 "top" 0 $b1
-attachControl $b2 "left" 5 $b1
-attachNone $b2 "right"
-attachNone $b2 "bottom"
-attachControl $b3 "top" 0 $b2
-attachControl $b3 "left" 0 $b2
-attachNone $b3 "right"
-attachNone $b3 "bottom"
$form;
showWindow TestWindow3;
Next we see the action of the attachOppositeControl flag on the position of the second button. As long as the first button is attached to the top of the form, this use of attachOppositeControl is the same as doing an attachForm $b2 “top”. If button 1 was attached relative to a control that could move the use of attachOppositeControl here would be essential here.
window TestWindow4;
string $form = `formLayout`;
string $b1 = `button -label "AAAAAAAAA"`;
string $b2 = `button -label "BBBBB"`;
string $b3 = `button -label "CCCC"`;
formLayout -edit
-attachForm $b1 "top" 5
-attachForm $b1 "left" 5
-attachOppositeControl $b2 "top" 0 $b1
-attachControl $b2 "left" 5 $b1
-attachNone $b2 "right"
-attachNone $b2 "bottom"
-attachControl $b3 "top" 0 $b2
-attachControl $b3 "left" 5 $b2
-attachNone $b3 "right"
-attachNone $b3 "bottom"
$form;
showWindow TestWindow4;
Now we use attachOppositeControl in the other direction to make the third button fit directly under the second.
window TestWindow5;
string $form = `formLayout`;
string $b1 = `button -label "AAAAAAAAA"`;
string $b2 = `button -label "BBBBB"`;
string $b3 = `button -label "CCCC"`;
formLayout -edit
-attachForm $b1 "top" 5
-attachForm $b1 "left" 5
-attachOppositeControl $b2 "top" 0 $b1
-attachControl $b2 "left" 5 $b1
-attachNone $b2 "right"
-attachNone $b2 "bottom"
-attachControl $b3 "top" 0 $b2
-attachOppositeControl $b3 "left" 0 $b2
-attachNone $b3 "right"
-attachNone $b3 "bottom"
$form;
showWindow TestWindow5;
And to have the third button line up below the first and extend over as far as the left edge of the second we do the following:
window TestWindow6;
string $form = `formLayout`;
string $b1 = `button -label "AAAAAAAAA"`;
string $b2 = `button -label "BBBBB"`;
string $b3 = `button -label "CCCC"`;
formLayout -edit
-attachForm $b1 "top" 5
-attachForm $b1 "left" 5
-attachOppositeControl $b2 "top" 0 $b1
-attachControl $b2 "left" 5 $b1
-attachNone $b2 "right"
-attachNone $b2 "bottom"
-attachControl $b3 "top" 0 $b2
-attachForm $b3 "left" 5
-attachControl $b3 "right" 0 $b2
-attachNone $b3 "bottom"
$form;
showWindow TestWindow6;
Now that the “attachForm $b3 “left” 5" places button 3 to the left of button 2 the nearest side for the “-attachControl $b3 “right” 0 $b2” is now button 2’s left edge. And finally, we want the third button to run from the left edge of button 1 to the right edge of button 2.
window TestWindow7;
string $form = `formLayout`;
string $b1 = `button -label "AAAAAAAAA"`;
string $b2 = `button -label "BBBBB"`;
string $b3 = `button -label "CCCC"`;
formLayout -edit
-attachForm $b1 "top" 5
-attachForm $b1 "left" 5
-attachOppositeControl $b2 "top" 0 $b1
-attachControl $b2 "left" 5 $b1
-attachNone $b2 "right"
-attachNone $b2 "bottom"
-attachControl $b3 "top" 0 $b2
-attachOppositeControl $b3 "left" 0 $b1
-attachOppositeControl $b3 "right" 0 $b2
-attachNone $b3 "bottom"
$form;
showWindow TestWindow7;


