
The Paint Skin Weights Tool is one of the Artisan-based tools in Maya. With the Paint Skin Weights Tool, you can paint weight intensity values on the current smooth skin. See the following topics for more information on working with the Paint Skin Weights Tool:
See also How Artisan brush tools work.
To open the Paint
Skin Weights Tool settings, select Skin
> Edit Smooth Skin > Paint Skin Weights Tool >  .
.
Lets you specify the settings for the Paint Skin Weights Tool in the Tool Settings editor. Both the Influence and Paint Weights sections are unique to the Paint Skin Weights Tool.
For descriptions of all other attributes in other sections, see Artisan Tool Settings. The main brush settings are common to all Artisan-based tools.
Click the icons to use the following tools.
![]()
Click to fix selected vertices that have weights causing undesirable deformation on the mesh. Maya assigns the selected vertices with the same weight values as their neighboring vertices, resulting in smoother deformation. See Fix smooth weights.
![]()
Click to move the weight values of selected vertices from their current influence(s) to selected influence(s). See also Move weights to other influences.
When you click the Move weights button (or select Skin > Edit Smooth Skin > Move Weights To Influences), the weight values of the selected vertices are removed from their current ‘source’ influences and re-assigned to the selected ‘target’ influence(s).
If you have more than one new influence selected, the moved weights are distributed based on the influence's existing weights. If the selected influences all have a weight of 0, the moved weights are distributed evenly. If the selected influences have existing weight values, the moved weights are distributed proportionally.
Normalize Weights mode
Select from the following options:
Select this mode if you want the weight value you enter to be used exactly. When you use this mode, Maya adds or removes weights from other influences in order to make the total weights on all influences add up to 1.0.
For example, if you change a weight from 1.0 to 0.5, Maya distributes the remaining 0.5 amongst neighboring influences. This mode replicates the normalization process in previous versions of Maya.
This is the default. When Post mode is active, Maya defers normalization calculations until you deform the mesh. This lets you continue painting weights or adjusting interactive bind manipulators without having the normalization process change your previous skin weighting work.
Selecting this mode lets you paint or change weights without affecting the weights for other influences, and still have the skin normalization occur when you deform the mesh.
If you use interactive skin binding, this mode is automatically selected for you. (See Interactive bind for smooth skinning.) As a result, for interactive binding, weights are not normalized until you deform the mesh.
For more information on skin weight normalization, see Smooth skin weight normalization and Set normalization mode and normalize weights.
Select from the following types of weight to paint.
Select this option to paint weights values to control the blend between classic linear and dual quaternion skinning on a per-vertex basis. See Smooth skinning methods and Blend smooth skinning methods.
You can find the following attributes in the Influence section.
Sort
These options let you set how joints are displayed in the Influences list. Select from the following options:
Sorts the joint names by hierarchy (parent-child) and displays them as branches that you can expand and collapse. The top of the list shows the root joint of the hierarchy.
This option is useful if you are painting a single a region of the skin—the joints you need to select from the list while painting are typically next to one another.
Size controls
Use these buttons to expand and shrink the Influences list as you work with the Paint Skin Weights Tool.
Influences list
This area displays a list of all influences bound to the selected mesh. For example, all joints that influence skin weights for a selected character mesh.
Each influence displays with a color button that lets you adjust the influence color.
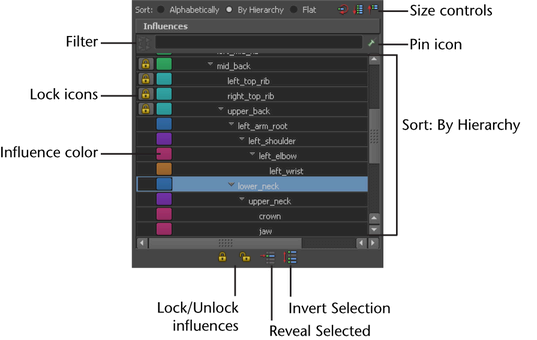
Click to hold and un-hold the weight of selected influences. When an influence is held, a lock icon displays next to its name in the Influences list, and it is not affected as you paint weights for other influences. These buttons replace the Toggle Hold Weights On Selected button in previous versions of Maya.
Click to quickly reverse which influences are selected in the list. This option is useful in conjunction with the Influences list hold and un-hold buttons.
For example, select only those influences you want to work with, then click Invert Selection to change your selection to all other influences in the list. You can then click to hold all other influences.
Mode

Lets you toggle between paint modes.
Select from the following options:
Select
When on, you switch from painting skin weights to selecting skin points and influences. This mode is important for several skin weighting tasks, such as Fix smooth weights and Move weights to other influences. Select mode also provides the ability to select multiple vertices, then view and modify their weight in the Value field.
Gradient settings
You can find the following settings under the Gradient heading.
When on, weight values are represented in color on the mesh. This can make it easier to see small values when painting, and to determine whether a joint is influencing vertices where it should not.
When Use color ramp is on, you can use the Weight Color ramp and Selected Color options to customize the color ramp. You can also select one of the Color Preset options.


 -click
the button to open the
-click
the button to open the 

