The Channel Box is the primary, fastest, and most streamlined tool for editing object attributes. It lets you quickly set keys, and lock, unlock, or create expressions on attributes.
Like the Attribute Editor, you use the Channel Box to modify an object’s attribute values. The Channel Box is different from the Attribute Editor in the following ways:
You can also make a channel keyable, nonkeyable displayed, or nonkeyable hidden from the Channel Control Editor. See Channel Control Editor .
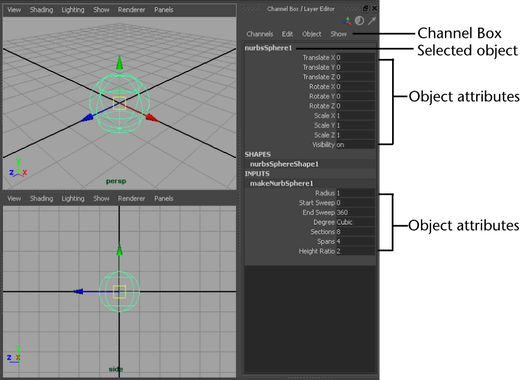
The information displayed in the Channel Box varies, depending on what kind of object or component you have selected. If you haven’t selected an object, the Channel Box is blank.
The Channel
Box appears in the sidebar when you select Display >
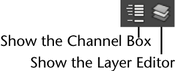
UI Elements > Channel Box/Layer Editor, or click the Channel
Box/Layer Editor icon  in the Status
Line (toolbar).
in the Status
Line (toolbar).
You can display either the Channel Box or the Attribute Editor in the sidebar, but not both.
If the Show Layer Editor within Channel Box option is off in the Maya Preferences, then the Channel Box and Layer Editor buttons appear separate.
When you select a geometric object, the Channel Box displays these sections:
| Section | Usage |
|---|---|
| objectName | Lists the keyable transform attributes that translate, scale, and rotate the object’s absolute position in the world space. Also shows the object’s visibility attribute. |
| SHAPES | Lists the names of nodes that define the geometry of the object. Other nodes, such as related particle emitters may be found here. |
| INPUTS | Lists the names of other nodes that affect this one. Typically, these comprise the “construction history” of the node. |
| OUTPUTS | Lists the names of the output nodes (nodes that receive data) for this node. |
If you’ve selected two or more objects, the Channel Box displays the attributes for the last object selected only. To display the attributes in the Channel Box of another selected object, select Object > objectName.
Edits you make in the Channel Box affect all selected objects of the same type as the one displayed.
If you display attributes of an object component, the Channel Box displays only one section for shape attributes that pertain to the component.
For example, suppose you’ve created a NURBS curve with the following CVs:

If you turn on component selection mode (in the main menu bar) and select the CVs, the Channel Box displays this:
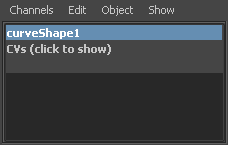
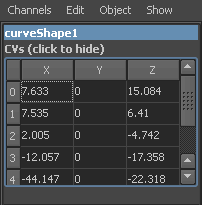
You can display the CV values in the Channel Box and enter new values. To display the values, click CVs (click to show) in the Channel Box.
The following colors represent the state of channels in the Channel Box:
| Locked | Gray |
| Nonkeyable | Light gray |
| Muted | Brown |
| Blended | Green |
| Keyed | Light Orange |
| Expression | Purple |
| Constrained | Blue |
| Connected | Yellow |
You can organize the way nodes and their attributes appear in the Channel Box using the Show menu. This is useful for filtering out the attributes you don’t need to change, especially in complex scenes that consist of many nodes and attributes.
To filter the attributes displayed by type
A checkmark appears next to the attribute type and the Channel Box hides any attributes that do not match.
You can filter by multiple types by toggling them on and off in the Show > Attributes menu.
If you require a more granular filter, you can select specific attributes in the Channel Box from the Show > Show Selected Type(s) menu. This reduces the attributes displayed to just those types you have selected.
After you have done this, you can also select Show > Invert Shown to display all the attribute types you didn’t select. This can be helpful when there are only a few types you want to hide.
You can also create your own custom filters and add them to the Show > Attributes menu.
To create a custom filter type
The attributes shown in the Channel Box are reduced to only those you have selected and any others of the same type.
The custom filter is saved to the Show > Attributes menu. You can select it at any time to filter by the same set of attribute types.
You can undo filtering at any time by selecting Show > Show All.
How do I work with the Channel Box?
To set a key for one attribute

This sets the key for the object attribute value you specified.
To set a key for all attributes
This sets the key for all the object attribute values displayed in the Channel Box.
You can key the same attribute value for two or more objects. Select the objects, click the frame, enter the value in the text box, then select Channels > Key Selected.
You can also key multiple attribute values for multiple objects. Follow the instructions in the previous paragraph, only select several attribute text boxes using Ctrl- or Shift-click before typing the numerical entry.
To make a channel keyable or nonkeyable
The Channel Box’s Channels pop-menu appears.
The selected channel now appears light gray in the Channel Box.
To copy keyed attribute values
 -click
the attribute name or text box and select Copy Selected from
the pop-up menu.
-click
the attribute name or text box and select Copy Selected from
the pop-up menu.
-click
the attribute name or text box and select Paste Selected from
the pop-up menu.
Breakdowns are a type of key that maintains a proportional relationship with adjacent keys. You can set a breakdown key for an attribute from the Channel Box.
To set a breakdown for selected attributes
-click
the attribute name or text box and select Breakdown Selected.
Creates an animation keyframe for the selected object’s highlighted attribute(s) at the current frame in the Time slider. For more information see Keys.
Creates a breakdown for the selected object’s highlighted attribute(s) at the current frame in the Time slider. For more information see Breakdowns.
Disables the selected object’s highlighted attribute(s) animations during playback. All muted attributes appear gray in the Channel Box. For more information see Muting animation.
Removes the animation of the selected object’s highlighted attribute(s) and places it in the keys clipboard. For more information see Cutting, copying, and pasting keys between scenes.
Duplicates the highlighted
attribute(s) of one object to any number of other objects. To utilize this
function, first shift-select all the objects for which the duplicated
values are to apply. Next, shift-select the object which contains
the value you wish to duplicate. Highlight the appropriate attributes. -click
one of the attributes and select Duplicate Values from
the marking menu that appears.
Makes the current transformation, rotation, scale, or all three on the selected objects be the objects’ zero position. For more information see Modify > Reset Transformations, Freeze Transformations.
Removes the link between an attribute and its controlling connection. An attribute will be highlighted purple if it has a controlling connection. For more information see Break connections between attributes.
Opens the Expression Editor and displays the expression of the highlighted attribute of the selected object. Expressions allow you to assign certain behaviours to attributes. Form more information see Expression Editor.
Opens the Set Driven Key window with the selected object and attribute in the Driven section. Driven keys allow you to manage the attributes of one object through the attributes of a seperate object. For more information see Driven keys.
Opens the Graph Editor for the selected object and highlighted attribute. The Graph Editor can be used to modify the animation of an attribute via its graphical representation. For more information see Graph Editor overview.
Opens the Channel Control editor for the selected object. The Channel Control editor allows you to view a node’s attributes as well as modify its keyable and editable status. For more information see Channel Control Editor.
Opens the Connection Editor for the selected object. The Connection Editor allows you to view and modify the connections between the nodes in the scene. For more information see Render node connections.
Opens the Attribute Editor for the selected object. The Attribute Editor allows you to view the and object’s nodes and modify their associated attributes. For more information see Attribute Editor.
Opens the Material Attributes Editor for the selected object. The Material Attributes Editor allows you to modify the display of the surface of the selected object. For more information see Surface, displacement, volumetric materials.
Opens the Add Attribute window for the selected object. The Add Attribute window allows you to create a new attribute that controls a combination of existing attributes or a variable to store attribute values. For more information see Modify > Add Attribute.
Opens the Edit Attribute window for the selected object. The Edit Attribute window allows you to edit custom attributes. For more information see Modify > Edit Attribute.
Opens the Delete Attribute window for the selected object. The Delete Attribute window allows you to delete custom attributes. For more information see Modify > Delete Attribute.
Publishes the selected attribute(s) to the asset at the closest level above the attribute’s node. For more information see Publish or unpublish attributes.
Locks all attributes that are not currently published to an asset for all nodes in the Channel Box. For more information see Lock an asset.
Contains a number of attribute related settings that affect the way you interact with an object’s attributes in the scene.
Toggles the display of an object’s name in the scene. For more information on namespaces see File referencing tips.
Toggles the state of the manipulators for the selected object. No Manips removes the manipulators completely for an attribute and disables dragging. Invisible Manips prevents the manipulators from appearing when you select and attribute name. Standard Manip allows the manipulators to appear when you select and attribute name. For more information see Show or hide the manipulator for an attribute in the Channel Box.
If you have multiple objects selected in your scene, you can view each of their attributes by selecting them from the Object menu.


 -click
the attribute name or text box and select
-click
the attribute name or text box and select