


Dope Sheet menu
bar
Many of these menu items appear and behave in a similar fashion to the main Edit menu in the scene view. However, as the Dope Sheet works directly with animation curves and attributes, there are no hierarchy options available within the settings windows for the edit functions.
Cut removes existing keys from a selected attribute and places a copy of that information on the keys clipboard. If a curve segment is selected in the graph view, this area will be removed when you choose Edit > Cut. If no curve segment is selected, Cut will operate on the item selected in the Outliner portion of the Dope Sheet. See Edit > Keys > Cut Keys.
Copy copies existing keys from a selected attribute and places that information on the keys clipboard. If you select a curve segment in the graph view, this area will be removed when you choose Edit > Copy. If no curve segment is selected, Copy will operate on the item selected in the Outliner portion of the Dope Sheet. See Edit > Keys > Copy Keys.
Paste adds keys from the keys clipboard to an attribute. Pasted keys can be merged with existing keys, inserted at a time (displacing existing keys), or used to replace keys at a time. See Edit > Keys > Paste Keys.
Delete removes existing keys from a selected attribute. It works the same as Cut except it does not place a copy of the removed keys on the keys clipboard. See Edit > Keys > Delete Keys.
Scale operates on a selected range of keys, expanding or compressing the animation to correspond to a new time range. Note that Scale will operate on the entire range of keys if an attribute is selected in the Dope Sheet outliner and a curve segment is not selected. See Edit > Keys > Scale Keys.
Use Snap to force selected keys to snap in time to the nearest whole time units. Use Select Unsnapped to check for keys not at whole time units. See Edit > Keys > Snap Keys.
This menu controls the layout of the Dope Sheet view area.
If you want to shift the view so the current time is in the middle of the editor, select Center Current Time from the View menu.
This adjusts the graph view to fit the display when new curves associated with a selected object are loaded into the Dope Sheet.
This option loads the Dope Sheet Summary into the Dope Sheet outliner. See Dope Sheet outliner for more information about summary objects.
The Curves menu items are functions for processing animation curves.
Pre and Post Infinity animation curves options
In Maya, animation curves are extrapolated outside the first and last keys of the curve. Curves before the first key and after the last key will be flat (no change in value over time) unless you set the pre and post tangent controls to anything other than constant. You can use these options to automatically generate specific types of repeating animation. For definitions of the pre and post infinity curve types, see Pre and Post Infinity.
This operation calculates a new animation curve for an attribute using the input nodes that contribute to its properties. See Bake Channel Options window. Bake Channel is useful to:
Change Rotation Interp lets you can change the rotation interpolation type of existing curves.
You can change the rotation interpolation type only on rotation channels that have keyframes on all three channels (rotateX, rotateY, rotateZ). In addition, because the rotateX, rotateY and rotateZ channels always share the same interpolation type, changing interpolation for a single channel such as rotateX, will automatically change rotateY and rotateZ as well.
Use this operation to remove keys that are not necessary to describe the shape of an animation curve. Excess keys may accumulate on an animation curve as a result of adding keys manually or performing operations such as a Bake Channel. You may need to remove keys from an animation curve to reduce the complexity of the graph view. You might also need to provide larger spans for adjusting curve tangents.
See Simplify Curve.
You can resample dense data curves with the Curve > Resample Curves option in the Graph Editor or Dope Sheet. Resampling creates a periodic frame rate by placing keys at uniform intervals.
To resample a curve, you select a sampling filter, which is an algorithm defining how the keys in the curve are resampled. Tangent and curve values are ignored. The filter converts animation curves with keys at either uniform or non-uniform intervals to curves with keys at a uniform interval that you specify. See Resample Curve Options window.
This menu selection lets you edit the attributes of the selected animation curves in the Attribute Editor spreadsheet.
Non-Weighted and Weighted Tangents
Specify the tangent weighting for selected keys. The default setting is non-weighted tangents, which provide simple handles for manipulating the tangent’s angle.
Weighted tangents represent the amount of influence a tangent has on an animation curve segment. By turning on Free Tangent Weight, it is possible to simultaneously edit the influence and angle of the tangent quickly and intuitively. Users of desktop illustration packages will recognize the familiar Bezier-style behavior when in this mode.
Mutes the selected keys. Keys that are muted do not contribute to the animation on their channels.
When keys are muted, the following occurs:
Mute channels have the same number of keys as the muted keys animation channels, and their keys are positioned the same as those on the muted keys animation channels.
Unmutes the selected
keys. Keys that are not muted contribute to the animation on their
channels. Unmuting keys disables their Mute channels (indicated
by the red x symbol ![]() next
to the names of the muted keys channels in the Dope
Sheet Outliner) but does not remove them.
next
to the names of the muted keys channels in the Dope
Sheet Outliner) but does not remove them.
To remove Mute channels, see Mute keys in the Dope Sheet or Graph Editor.
Tangents describe the entry and exit of curve segments from a key. This menu operates on the shape of curve segments around selected keys. Note that these settings affect only existing animation curves segments’ tangents. See Tangents menu.
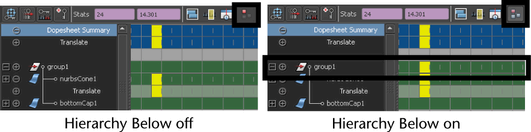
Use Hierarchy Below to toggle the display of objects acting as summary objects for objects beneath them.
For example, in the following diagram, a cone with a Translate X channel is under a group with no animation on it. With Hierarchy Below on, the group1 node acts as a summary group and displays the animation information of its child node (the cone). With Hierarchy Below off, only the summary objects (Dopesheet Summary, Scene Summary) display summary information.
When List > Auto Load Selected Objects is on, the objects that appear in the Dope Sheet outliner will change every time you make a selection to show the currently selected objects. If List > Auto Load Selected Objects is off, it locks the objects currently in the Dope Sheet outliner so you can continue to edit their animation curves even if you make a new selection in a scene view.
You can use this item only when List > Auto Load Selected Objects is off. When Auto Load Selected Objects is off, the objects appearing in the Dope Sheet outliner may be out of sync with what is currently selected in a scene view. To load the currently selected objects, select List > Load Selected Objects.
To work on the animation of one object in the Dope Sheet and another object not loaded in the Dope Sheet outliner, select that object and choose Options > Add Selected to List. This will add the selected object to the Dope Sheet outliner without disrupting the layout in the Dope Sheet.
