Graph Editor menu
bar
The Graph Editor menu bar contains tools and operations for manipulating animation curves and keys within the graph view of the Graph Editor. Note that you still have access to the main menu bar while working with the Graph Editor.
Many of these menu items appear and behave in a similar fashion to the main Edit menu in the scene view. However, as the Graph Editor works directly with animation curves and attributes, there are no hierarchy options available within the settings windows for the edit operations.
Cut removes existing keys from a selected attribute and places a copy of that information on the keys clipboard. If a curve segment is selected in the graph view, this area will be removed when you choose Edit > Cut. If no curve segment is selected, Cut will operate on the item selected in the Outliner portion of the Graph Editor. See Edit > Keys > Cut Keys.
Copy copies existing keys from a selected attribute and places that information on the keys clipboard. If you select a curve segment in the graph view, this area will be removed when you choose Edit > Copy. If no curve segment is selected, Copy will operate on the item selected in the Outliner portion of the Graph Editor. See Edit > Keys > Copy Keys.
Paste adds keys from the keys clipboard to an attribute. Pasted keys can be merged with existing keys, inserted at a time (displacing existing keys), or used to replace keys at a time. See Edit > Keys > Paste Keys.
Delete removes existing keys from an attribute. It works the same way as Cut except it doesn’t put a copy of the removed keys on the keys clipboard. See Edit > Keys > Delete Keys.
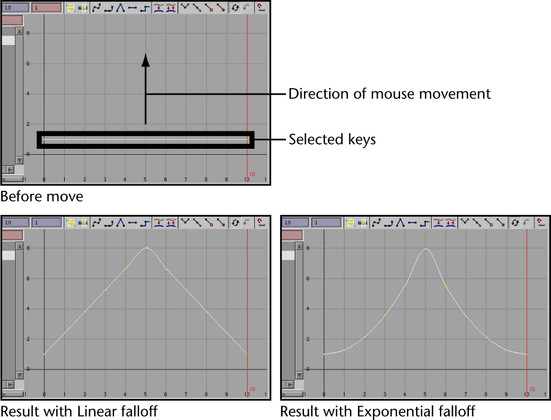
Scale expands or compresses a selected range of keys and curve segments to fit a specified time range. If a channel is selected in the Graph Editor Outliner, and a curve segment is not selected, then Scale adjusts all the keys for the selected channel. Also, you can scale keys that are in a selected region of the Graph Editor when the Only Scale Specified Keys option is on.
For more information on Scale, see Edit > Keys > Scale Keys.
Transformation Tools > Move Keys Tool
You can manipulate groups of keys proportionally or in relation to a selected key using the Move Keys Tool.
The Move Tool’s Move Key Settings are only available when the Graph Editor is active.
The Move Option settings are identical to those of the Move Nearest Picked Key Tool’s Direct Key Settings. See Move Nearest Picked Key Tool.
Transformation Tools > Scale Keys Tool
Use the Scale Tool to scale a region of animation curve segments and the positions of keys in the graph view.
In the Scale Tool Settings window, you can select two ways to scale keys in the graph view. To display the Scale Tool Settings window, double click the Scale Tool icon when the Graph Editor is the active window.
For more information, see Scale keys and Scale curves.
Transformation Tools > Lattice Deform Keys Tool
You can manipulate curves in the Graph Editor with the Lattice Deform Keys tool. The Lattice Deform Keys tool lets you draw a lattice deformer around groups of keys, so that you can manipulate many keys at once. This tool gives you a high-level of control over your animation curves.
Once you draw a lattice around a group of keys, you can then move the control points of the lattice to deform the affected animation curves or scale the lattice points around a picked point to transform the affected curves.
You can also use the Lattice Deform Keys Tool to deform keys that lie along a single (horizontal or vertical) graph view axis.
For more information, see Manipulate curves with the lattice manipulator.
Snap causes selected
keys to snap in time to the nearest whole time unit values or attribute
values. Use Select Unsnapped to check for
keys not at whole time units. The default is to snap to nearest
time units. Select
Edit > Keys > Snap Keys >  to view
the options window and edit the settings. See
Edit > Keys > Snap Keys.
to view
the options window and edit the settings. See
Edit > Keys > Snap Keys.
Selects all keys from the selected channel, or any keys in the Graph View if no objects or attributes are selected that are not at a whole time unit.
Loads only the selected animation curves’ nodes into the Graph Editor and unloads all other objects and animation curves. For example, if you select the translateX and translateY curves for the rightWrist joint of your character and then select this menu item, only the following nodes will appear in the Graph Editor: rightWrist_translateX, rightWrist_translateY.
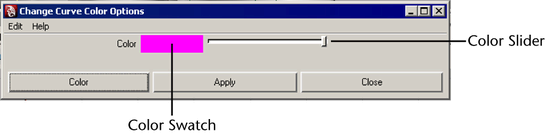
Changes the color of the curve selected in the Graph view to the custom color specified in the Change Curve Color Options window.
Opens the Change Curve Color Options window. This window lets you create custom curve colors for the animation curves selected in the Graph view.
You can also create custom curve colors for your animation curves from the Attribute Editor or through MEL. See Change animation curve colors through the Attribute Editor or with MEL.
This menu controls which components are visible, and therefore editable, in the graph view of the Graph Editor. This is useful for controlling the amount of information displayed in the graph view, as well as specifying which of the animation curve components are available for editing.
If you change the view in the Graph Editor and want to shift the view so the current time is in the middle of the editor, select Center Current Time from the View menu.
This option automatically adjusts the graph view to fit the display of the animation curves associated with a selected object or objects.
When types of animation that do not create animation curves (such as motion paths and Expressions) are part of your animation, you can use Show Results to see a graphic representation of the behavior of these animation types.
Any numeric attribute can drive Show Results. This is useful for looking at animations driven by anything other than a single animation curve.
Screen Based samples the result of what one pixel represents in time. This may not accurately reflect the actual animation (especially if you are zoomed out). However, by adjusting the sampling rate, you can choose between curve accuracy and update time. A higher sampling rate means more accurate representation but longer computation time.
In order to operate on a component of an animation curve, you must make it viewable by loading it into the Graph Editor. By default, objects selected in a scene view are automatically loaded in the Graph Editor.
Keys are represented in the graph view as black points, and when selected, they are highlighted yellow.
In order to operate on a component of a tangent, you must make it available by being designated as viewable.
Tangents are represented in the graph view as brown handles tangential to the curve segment of the animation curve. When selected, they are highlighted green.
Note that if Unify Tangents has been turned on for a curve segment, the handles on both sides of the key will be adjusted uniformly when you edit the selected handle. If Break Tangent is in effect, each tangent handle operates independently of the other.
These options control which components of an animation curve are available for selection and editing.
The Curves menu items process entire animation curves.
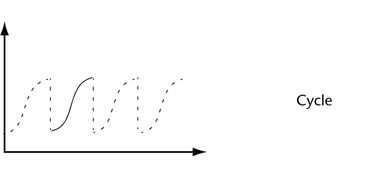
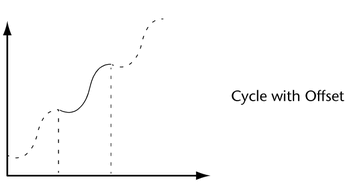
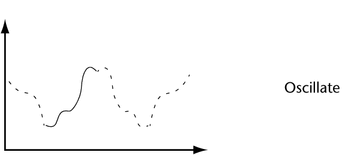
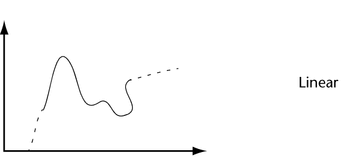
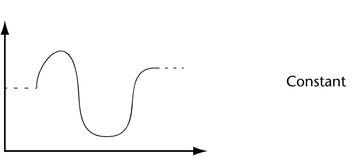
Animation curves are extrapolated outside the first and last keys of the curve. Curves before the first key and after the last key will be flat (no change in value over time) unless you set the pre and post infinity controls to anything other than constant. You can use these options to automatically generate specific types of repeating animation.
The Pre and Post settings define the behavior of an animation curve before and after the first key of that curve.
This setting controls the smoothness resolution of curves in the graph view. Decreasing the resolution lessens the time to display the graph view.
Note that this setting has no impact on the behavior of animation curves, and it affects only the display of the curves in the graph view.
This operation calculates a new animation curve for an attribute using the input nodes that contribute to its properties. This is different from the Edit > Keys > Bake Simulation operation. This operation is useful when you want to:
To create animation curves from these animation types, you will need to perform Edit > Keys > Bake Simulation.
Time Range
Specifies what keys are baked.
Specifies the frequency with which Maya will evaluate the animation and generate keys. Increasing this value decreases how often Maya sets keys for the animation. Decreasing has the opposite effect.
The Sample By value is based on the Time Unit setting. It represents the frequency with which Maya will analyze the object’s animation and generate a key. A value of 1 creates a key at each time unit. Greater values decrease the frequency of generated keys, and smaller values increase the frequency.
This is on by default. This option preserves the keys that are outside the baked time range and only applies to directly connected animation curves.
When turned on, bake simulation does not remove keys that are outside the bake range.
When turned off, only the keys created within the specified time range during the bake will be present on the animation curve after the operation.
Templates the selected animation channel in the outliner and its corresponding animation curve in the graph view.
When an animation channel is templated, its keys continue to contribute to its object’s overall animation, but its curve and keys in the graph view are no longer selectable. Also, a small red template icon appears beside the templated channel in the outliner, and the templated channel’s curve appears gray in the graph view.
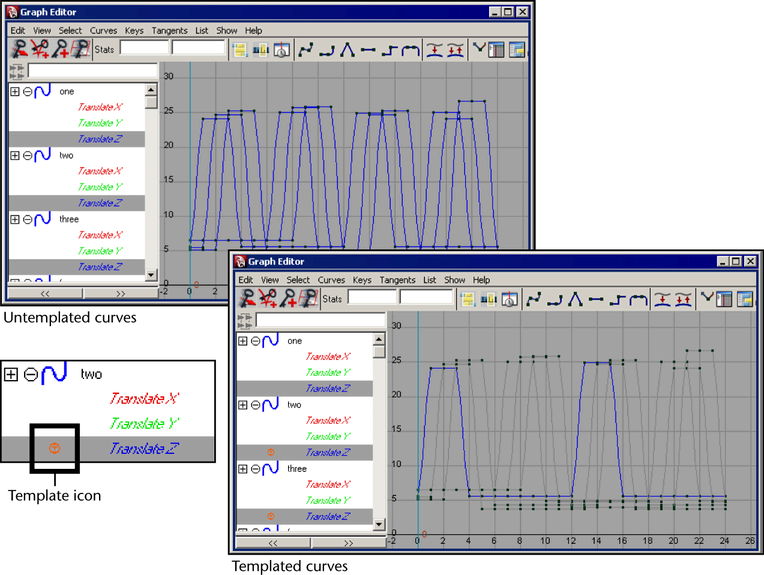
Templating animation channels and their curves is useful when you have several overlapping animation curves with many keys, and you want to edit only one curve, but you need to be able to see all the other curves in the graph view.
Untemplates the selected animation channel in the outliner and its corresponding animation curve in the graph view. When an animation channel is untemplated, its curve and keys in the graph view can once again be selected.
This setting scales down large key values or scale up small key values to fit within a -1 to 1 range. When animation curves are normalized, they are adjusted to fit within the range of normalization. Curve normalization is useful when you want to view, compare, or edit animation curves that are related (such as rotation and translation curves), but have drastically different ranges. For example, with curve normalization you can compare all the translation and rotation animation curves for an object.
This setting turns off curve normalization for the selected animation curves. When the curves are reverted back to their non-normalized states, the animation curves are returned to their original ranges.
Change Rotation Interp lets you can change the rotation interpolation type of existing curves.
You can change the rotation interpolation type only on rotation channels that have keyframes on all three channels (rotateX, rotateY, rotateZ). In addition, because the rotateX, rotateY and rotateZ channels always share the same interpolation type, changing interpolation for a single channel such as rotateX, will automatically change rotateY and rotateZ as well.
For more information on rotation interpolation, see Animated rotation in Maya.
Calculates the rotation using three separate angles representing rotations about the X, Y, and Z axes, and an order or rotation. In this mode, the curves that define the rotation for a given node are represented in Euler-angles, interpolation is performed on each curve independently in Euler space, and keyframes may occur at your discretion—they are not synchronized with the other sibling rotation curves at the node. You can also animate a single rotation ordinate. This is the default setting.
Creates curves that have keyframes on sibling curves locked together as in Synchronized Quaternion Curves but the interpolation between keyframes in performed in Euler-space.
It’s useful to keep rotation keyframes synchronized because rotation is a composition of the three separate rotate values. Deleting just one key on a curve can have a dramatic and unexpected effect on the interpolation.
Calculates rotation interpolation using three orientations about the X, Y, and Z axes, and an angle of rotation. The interpolation between keyframes is defined using quaternion interpolation. Keyframes on related curves are locked together. When you add, delete, or move a keyframe on one curve, the corresponding key is also updated in the sibling curves.
For example, if you drag a keyframe on the X curve to frame 14, the corresponding keys on the Y and Z curves also move to frame 14. The Graph Editor displays a quaternion key as a solid diamond shape.
Use this operation to remove keys that are not necessary to describe the shape of an animation curve. Excess keys may accumulate on an animation curve as a result of adding keys manually or performing operations such as Bake Channel. You may need to remove keys from an animation curve to reduce the graph complexity and provide larger spans for adjusting curve tangents.
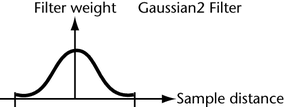
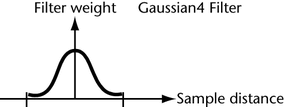
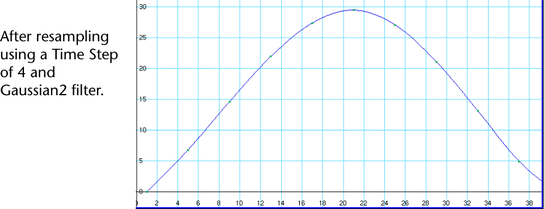
Resampling creates a periodic frame rate by placing keys at uniform intervals.
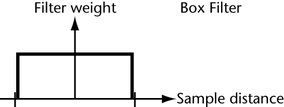
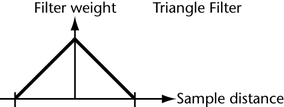
To resample a curve, you select a sampling filter, which is an algorithm defining how the keys in the curve are resampled. Tangent and curve values are ignored. The filter converts animation curves with keys at either uniform or non-uniform intervals to curves with keys at a uniform interval that you specify.
This menu selection lets you edit the values and attributes of the selected animation curves in a spreadsheet format in the Attribute Editor.
Takes a snapshot of your curve. Use Swap Buffer Curve to switch between your curve snapshot and the current curve. See Swap Buffer Curve and View curves while editing.
Toggles between the original curve (the buffer curve snapshot) and the current, edited curve. Lets you view and play both the curves animations. See Buffer Curve Snapshot, Swap Buffer Curve, and View curves while editing.
The default setting is non-weighted tangents, which provide simple handles for manipulating the tangent’s angle. To change the weighting of an animation curve, use Curves > Weighted to change the curve’s tangent type to weighted.
Weighted tangents represent the amount of influence a tangent’s length has on an animation curve segment. By turning on Free Tangent Weight (see Free Tangent Weight), it is possible to simultaneously edit the influence and angle of the tangent quickly and intuitively. Users of desktop illustration packages will recognize the familiar Bezier-style behavior when in this mode.
Tangent weights are represented by the length of the tangent handle, and editable tangent weights are manipulated by dragging the handle’s length.
Tangents of weighted animation curves have not only an angle but also a weight. The higher the weight of a tangent, the more influence it has on the shape of the curve segment compared with the tangent at the other end of the curve segment.
Allows manipulation of the in and out tangent handles individually so you can edit the curve segment entering or exiting the key without affecting its opposite handle.
Causes the manipulation of an in or out tangent handle to affect its opposite handle equally. Unify Tangents retains the relative position of the tangent handles even after tangents are individually adjusted (by editing tangents separately after choosing Keys > Break Tangents).
Specifies that when you move a tangent, only its angle can be changed. This forces the associated curve segment to retain the weight of the tangent. This applies only to weighted curves.
Specifies that when you move a tangent, its angle and weight can be changed. This allows the weight of a tangent to be adjusted as well as the angle. This only applies to weighted curves.
Mutes the selected keys. Keys that are muted do not contribute to the animation on their channels.
When keys are muted, the following occurs:
Mute curves have the same number of keys as the muted keys animation curves, and their keys are positioned the same as those on the muted keys animation curves.

Unmutes the selected keys. Keys that are not muted contribute to the animation on their channels. Unmuting keys disables their Mute curves (indicated by the red x symbol next to the names of the muted keys curves in the Graph Editor Outliner) but does not remove them.
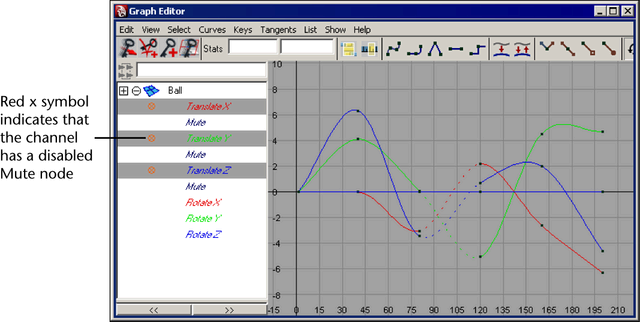
To remove Mute curves, see Mute or unmute a channel in the Dope Sheet or Graph Editor.
Tangents describe the entry and exit of curve segments from a key. This menu operates on the shape of curve segments around selected keys. Note that these settings affect only existing animation curves segments’ tangents.
 +s+
+s+  -click
to display the marking menu.
-click
to display the marking menu.
Specifying a spline tangent creates an animation curve that is smooth between the key before and the key after the selected key. The tangents of the curve are co-linear (both at the same angle). This ensures that the animation curve smoothly enters and exits the key. When animating fluid movement, a spline tangent is an excellent place to start. You use a minimum number of keys to achieve your look.
When animating fluid movement, a spline tangent is an excellent place to start. You use a minimum number of keys to achieve your look.
Specifying a linear tangent creates an animation curve as a straight line joining two keys. If the in tangent type is linear, the curve segment before the key is a straight line. If the out-tangent type is linear, the curve segment after the key is a straight line. When animating the color of a heating element on a stove, you would use linear to achieve that gradual change in color from charcoal gray to burning hot red.
Specifying a clamped tangent creates an animation curve that has the characteristics of linear and spline curves.
The keys’ tangents will be splines unless the value of two adjacent keys are very close. In this case, the out tangent of the first key and the in tangent of the second key will be interpolated as linear.
When animating a skeleton in a walk-cycle, you may notice a slipping of the pelvic and foot joint position. This occurs because the value of the keys on the curve are either the same or close to (within tolerance of) the value of the other. Maya assigns a default spline tangent to describe what occurs between these keys. This is why you get the joint positions slipping.
By setting the tangent type to clamped for these keys, the slipping is corrected and the tangents becomes a combination of linear and spline.
In the Maya environment preferences, Clamped is the default tangent type.
Specifying a stepped tangent creates an animation curve whose out tangent is a flat curve.
The curve segment is flat (horizontal), so the value changes at the key without gradation.
The light from a strobe light turns on and off. To create a strobe-like effect, you would use a step tangent.
FBIK animation keys use the stepped next tangent type by default. This tangent type differs from regular Stepped tangents in that its interpolation values jump immediately to that of the next key, rather than holding the value of the current key until the next key is reached. For more information on Stepped Next tangents and FBIK, see How do I manage my full body IK keys? in the Pose and animate your character with full body IK topic .
Sets the in and out tangents of the key to be horizontal (with a slope of 0 degrees). When a ball reaches its ascent, it hangs in the air for a brief time before starting its descent. You can create this effect by using a flat tangent.
Specifying a fixed tangent allows a key’s tangents to remain unchanged as the key is edited.
When animating a ball, you may find the ball isn’t falling from a desired height, yet its impact with the floor and everything else is perfect. Using a fixed tangent lets you change the height of the ball while retaining the tangent’s angle. This is somewhat different from Edit > Keys > Bake Simulation.
This process is useful when you want to:
Specifying a plateau tangent forces your animation curves to not go beyond the positions of their keyframes so that their maximum and minimum values (‘hills and valleys’) do not extend past or overshoot their keyframes. Plateau tangents are useful when you want the positions of your keyframes to be exact because they stop your animation curves from wandering beyond the boundaries set by the values of their keyframes.
For example, if you animate a ball rolling off a table, falling to the floor, and then rolling on the floor; the resulting animation will look different with spline tangents than with plateau tangents. With spline tangents, the ball will fall through the floor and then come back up to the floor. With plateau tangents, the ball will not fall through the floor.
Plateau tangents are similar to spline and clamped tangents. Plateau tangents ease animation curves in and out of their keyframes like spline tangents, but also flatten curve segments that occur between equal-valued keyframes like clamped tangents. Plateau tangents also have two unique characteristics: they flatten keyframes at the points in their curves where hills and valleys occur and they flatten the first and last keyframes on their curves.
Lets you specify a type of tangent for the In Tangent only. The In Tangent defines the type of curve segment that comes before a key. For descriptions of the tangent type options in this menu, see Tangents menu.
Lets you specify a type of tangent for the Out Tangent only. The Out Tangent defines the type of curve segment that comes after a key. For descriptions of the tangent type options in this menu, see Tangents menu.
When Auto Load is turned on, the objects that appear in the Outliner will change every time you make a selection to show the currently selected objects. If Auto Load is turned off, it locks the objects currently in the Outliner so you can continue to edit their animation curves even if you make a new selection in a scene view.
You can use this item only when Auto Load is off. When Auto Load is off, the objects appearing in the Outliner may be out of sync with what is currently selected in a scene view. To reload the Outliner with the current selection, choose Option > Reload List.
To work on the animation of one object in the Graph Editor and another object not loaded in the Outliner, select that object and choose Options > Add Selected to List. This will add the selected object to the Graph Editor Outliner without disrupting the layout of the objects and animation curves currently in the Graph Editor.
To save the view of the animation of one or more objects in the Graph Editor, create a bookmark.
Bookmark Current Objects
Opens the Bookmark Current Objects window. This window lets you set a bookmark for the objects currently loaded in the Graph Editor. An object bookmark allows you to load objects into the Graph Editor without having to select them in the scene view.
Object bookmarks appear as a list in the Bookmarks menu. When you select an object bookmark (indicated by the checkmark), its associated objects are loaded into the Graph Editor. When you remove an object bookmark selection (no checkmark), its associated objects are unloaded from the Graph Editor.
Bookmark Selected Curves
Opens the Bookmark Selected Curves window. This window lets you set a curve bookmark for the selected curves. A curve bookmark allows you to load curve nodes into the Graph Editor without having to select the curves’ objects in the scene view.
Curve bookmarks appear as a list in the Bookmarks menu. When you select a curve bookmark (indicated by the checkmark), its associated curve nodes are loaded into the Graph Editor. When you cancel a curve bookmark selection (no checkmark), its associated curve nodes are unloaded from the Graph Editor.