Show in Contents

Add to Favorites

Home: Autodesk Maya Online Help

Edit particle attributes

Particles

Use lights, reflections, refractions, and shadows

Choose how particles render
The particle
render type of a particle object specifies the form of
its particles. For example, you can display particles as small spheres,
streaking tails, or 2D images of your favorite snapshot. Once you
select the particle render type, you can add attributes specific
to the render type to tune the appearance.
For information on hardware and software rendering
of particles, see
Rendering particles.
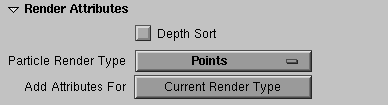
To
set the Particle Render Type
- Select
the particle object.
- In the Render Attributes section
of the Attribute Editor, select the
type from the Particle Render Type pop-up
menu.
Workspace preview rendering doesn’t display
render types with full detail. You must hardware render or software
render. Turn on Shading > Smooth Shade All if
you want workspace rendering to display color that you add to particle
objects.
When you test render or render to disk, use
hardware rendering for the particle render types that don’t have s/w after
their names. Blobby Surface, Cloud, and Tube must be software rendered.
If you use the wrong rendering technique, the particles won’t be
displayed. If you use hardware rendering, you must composite the
particle images with software rendered images of the other objects
in the scene.
The following
rules apply to the software render types:
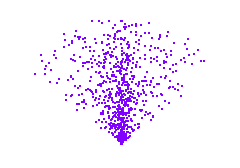
Points
The Points render
type displays particles as points. This is the default render type.
To
set Points render type
- Select
the particle object.
- In
the Attribute Editor, set Particle
Render Type to Points.
- To
add default Particle Render Type attributes
that let you tune the appearance, click the Add
Attributes For Current Render Type button.
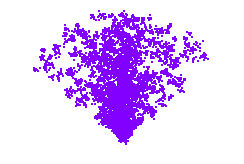
MultiPoint
The MultiPoint render
type displays each particle as multiple points. The extra points
make the particle object appear denser. You can use this render type
to create dust, clouds, mist, or other gaseous emissions.
To
set MultiPoint render type
- Select
the particle object.
- In
the Attribute Editor, set Particle
Render Type to MultiPoint.
- To
add default Particle Render Type attributes
that let you tune the appearance, click the Add
Attributes For Current Render Type button.
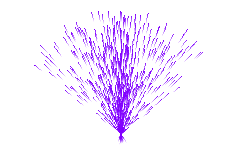
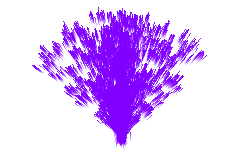
Streak
The Streak render
type displays moving particles with an elongated tail. This render
type enhances the display of objects such as meteors or rain. The streak
length is based on the velocity of the particle, so if the particles
are stationary or moving slowly, you won’t see the particles.
To
set Streak render type
- Select
the particle object.
- In
the Attribute Editor, set Particle
Render Type to Streak.
- To
add default Particle Render Type attributes
that let you tune the appearance, click the Add
Attributes For Current Render Type button.
MultiStreak
The MultiStreak render
type is a combination of Streak and MultiPoint render
types; it displays multiple points with tails for each moving particle.
The faster the particles move, the longer the tails.
To
set MultiStreak render type
- Select
the particle object.
- In
the Attribute Editor, set Particle
Render Type to MultiStreak.
- To
add default Particle Render Type attributes
that let you tune the appearance, click the Add
Attributes For Current Render Type button.
Sprites
The Sprites render
type lets you display a texture image or image sequence at each
particle. Each particle can display an identical or different image
or image sequence. Depending on the type of texture image you use,
you can use sprites to create effects such as smoke, clouds, fog,
and stars.
A sprite appears as a small rectangle until
you map a texture image to it. The image faces the camera directly
regardless of the camera’s position or orientation.
If
the texture image lacks an alpha channel, the image is opaque and
occupies the sprite rectangle. If the texture image has an alpha
channel, the sprite uses the image’s transparency. To avoid displaying
the rectangle, you must make the peripheral parts of the original
texture image transparent.
Use the Sprite Wizard
The particle Sprite Wizard simplifies
the process for displaying a texture image or image sequences on
particles. The particle Sprite Wizard leads
you through the steps necessary to associate image files with sprites.
You can assign a single image or a sequence of images to each particle.
The images can be assigned randomly, or using various criteria such
as the particleID or a ramp. You can also edit the sprites once
you’ve created them with the Sprite Wizard.
The Sprite Wizard automatically:
- Assigns
a Lambert material to the particle object.
- Adds
a creation expression and runtime expression that enables all the wizard
options.
- Connects
a ramp to the spriteNumRamp attribute.
- Sets
the particle render type to Sprites and adds the attributes for
sprites.
- Assigns
the images you specify to the sprites.
NoteThe image files you use as sprites must
have filename extensions in the format file.n, not file.000n (zero-padded
extensions).
To
use the Sprite Wizard
- Select
the particle object to which you want to assign sprites.
- Select
Particles > Sprite Wizard.
The Sprite Wizard leads
you through a series of choices. For help, read the pop-up help
that appears with each text box.
For additional information on the Custom
Start and Custom Cycling options, see
Customizing sprites with the Sprite Wizard.
- To
see the sprite images, turn on Shading > Smooth
Shade All and Shading > Hardware
Texturing.
To
edit the sprites
- Do
one of the following:
- Select
the particle object and display the Attribute Editor.
Open the Sprite Attributes section of
the Particle Attribute Editor to
edit the attributes. You can also edit the sprite attributes using
the Channel Box.
- Select
the particle and select
Particles > Sprite Wizard to
re-open the Sprite Wizard window. You can
change the file names, the frame ranges, or other settings in the Sprite
Wizard window. When you accept the changes, the wizard
updates the appropriate attributes for you.
To change the images of an existing sprite animation:
- Select
the particle object.
- Select
Particles > Sprite Wizard.
- Select
a new image sequence for the Sprite File.
- Turn
on Use existing setup with new images in
the second Wizard screen.
All the existing settings in the Sprite
Wizard are used with the new image sequence.
Editing sprite attributes
Once
you have created the sprites, you can optionally edit these Render and Sprite attributes
in the Attribute Editor or in the Channel
Box:
Customizing sprites with the Sprite
Wizard
You
can customize how the initial sprite images are selected and how
the images are cycled by modifying the expressions that are automatically
added to the particle object when you use the Sprite
Wizard. You can customize the selection of the initial
sprite image whether or not you choose to animate the selection
of the initial image.
To customize the selection
of the initial sprite image
- Create
the particles and select
Particles > Sprite Wizard.
- Select
the Sprite File you wish to use
and click Continue.
- Select
how you want to assign images to the particles: either No
animation or Cycle through the images
for each particle, and click Continue.
- Select Custom Start and
click Continue.
- Select
how you want the images to be cycled for each particle If you select Custom
Cycling, see
To customize sprite cycling.
Click Continue.
- Click Apply to
apply the wizard.
- Select
the particle and select Window > Animation
Editors > Expression Editor.
- In
the Expression Editor, select Select Filter
> By Expression Name.
- Select
the expression with the name of the particle object to which you have
applied the sprites.
- Click
the Creation checkbox.
- If
you selected No Animation for the image
assignment, look for the first occurrence of the line “Custom Start:
If your sprites are not animated” in the creation expression.
If you selected Cycle through the images
for each particle for the image assignment, look for
the second occurrence of the line “Custom Start: If your sprites
are animated” in the creation expression.
- Insert
your custom expression. For information on writing expressions, see
Expressions.
To
customize sprite cycling
- Create
the particles and select
Particles > Sprite Wizard.
- Select
the Sprite File you wish to use
and click Continue.
- Select Cycle
through the images for each particle and click Continue.
- Select
the technique used to assign the initial sprite to each particle
and click Continue.
- Select Custom Cycling for
how you want the images to be cycled for each particle and click Continue.
- Click Apply to
apply the wizard.
- Select
the particle and select Window > Animation
Editors > Expression Editor.
- In
the Expression Editor, select Select
Filter > By Expression Name.
- Select
the expression with the name of the particle object to which you have
applied the sprites.
- Select Runtime
before dynamics or Runtime after dynamics.
- In
the runtime expression, look for the line “Custom Cycle.”
- Insert
your custom expression. For information on writing expressions, see
the MEL and Expressions guide.
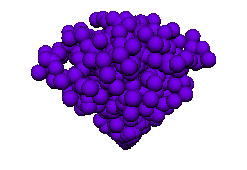
Spheres
The Spheres render
type displays particles as opaque spheres. You cannot display the
spheres with transparency.
To
set Spheres render type
- Select
the particle object.
- In
the Attribute Editor, set Particle
Render Type to Spheres.
- To
add default Particle Render Type attributes
that let you tune the appearance, click the Add
Attributes For Current Render Type button.
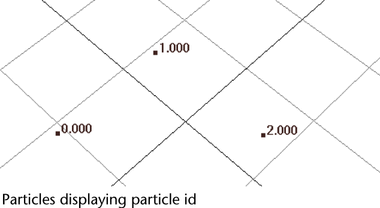
Numeric
The Numeric render
type displays the current values of any attribute of the particle
object. This is useful when you want to know the value of an attribute
such as velocity at a certain frame. By default, Maya displays particle ids
for the Numeric render type.
To
set Numeric render type
- Select
the particle object.
- In
the Attribute Editor, set Particle
Render Type to Numeric.
- To
add default Particle Render Type attributes,
which let you tune the appearance, click the Add
Attributes For Current Render Type button.
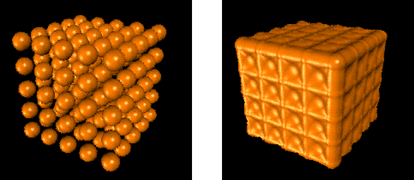
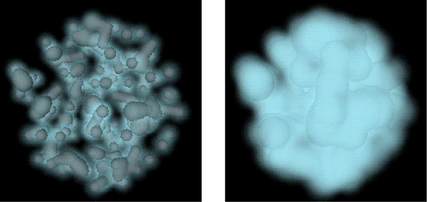
Blobby surface
The Blobby
Surface render type displays particles as metaballs.
Metaballs are spheres that blend together to form surfaces. Blobby
Surfaces appear only in software rendered images.
NoteInside edges of blobby surfaces seen through
other blobby surfaces are not anti-aliased
To avoid this, you can increase the particle
rendering quality by selecting the particle object and making the
following render settings. Open the Maya Software tab
of the Render Settings window. Under Number
of Samples, set Particles to
4, or to achieve very high quality particle rendering, set Particles to
8.
To
set Blobby Surface (s/w) render
type
- Select
the particle object.
- In
the Attribute Editor, set Particle
Render Type to Blobby Surface.
- To
add default Particle Render Type attributes
that let you tune the appearance, click the Add
Attributes For Current Render Type button.
- Apply
a shading group to the particle object.
- Add
a light to the scene.
- Software
render the scene.
Cloud
The Cloud render
type displays particles as blurred or cloudy metaballs. Metaballs
are spheres that blend together to form surfaces. Clouds appear
only in software rendered images. See
Create raytraced shadows with particles.
To
set Cloud (s/w) render type
- Select
the particle object.
- In
the Attribute Editor, set Particle
Render Type to Cloud (s/w).
- To
add default Particle Render Type attributes
that let you tune the appearance, click the Add
Attributes For Current Render Type button.
- Add
a light to the scene.
- Software
render the scene.
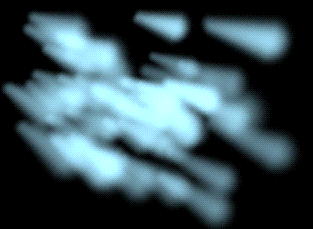
Tube
The Tube render
type displays particles as tubes. Tubes appear only in software
rendered images.
To
set Tube (s/w) render type
- Select
the particle object.
- In
the Attribute Editor, set Particle
Render Type to Tube (s/w).
- To
add default Particle Render Type attributes
that let you tune the appearance, click the Add
Attributes For Current Render Type button.
- Add
a light to the scene.
- Software
render the scene.