|
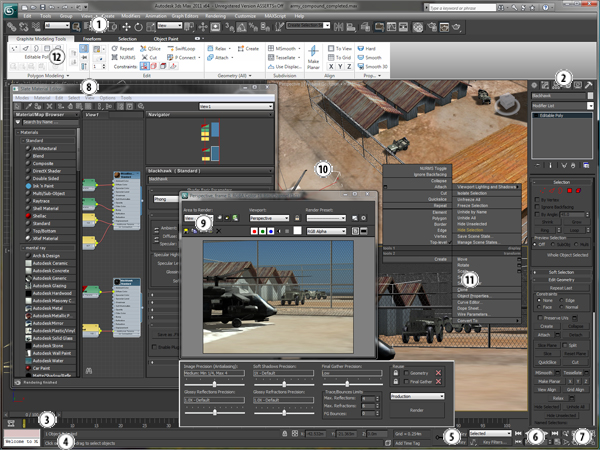
Main Toolbar |
| The main toolbar provides quick access to tools and dialogs for many of the most common tasks in 3ds Max. |
 |
 |
Graphite Modeling Tools |
| Graphite Modeling Tools combines a wealth of new polygon-modeling features, including freeform sculpting and powerful loop-modeling tools, with the tried and true toolset in a dynamic, configurable new “ribbon” interface |
|
 |
Quad Menu |
| When you click the right mouse button anywhere in an active viewport, except on the viewport label, a quad menu is displayed. The options available in the quad menu depend on the selection. |
|
 |
Viewport |
| When you start 3ds Max, the main screen contains
four viewports showing the scene from different angles. You can set a viewport to show a simple wireframe or shaded view of the scene, and you can also employ advanced but easy-to-use Review features such as shadows (hard-edged or soft-edged), exposure control, and ambient occlusion to display highly realistic, near-rendered results in real time. |
| | |
 |
Command Panel |
| The command panel comprises six user-interface panels that give you access to most of the modeling features of 3ds Max, as well as some animation features, display choices, and miscellaneous utilities.
To switch between the different panels, click their respective tab at the top of the command panel. |
|
 |
Time Slider |
| The time slider lets you navigate along the timeline and jump to any animation frame in your scene.
You can quickly set position and rotation or scale keys by right-clicking the time slider and choosing the desired key from the Create Key dialog. |
|
|
 |
Rendered Frame Window |
| The rendered frame window displays a rendering of your scene. Press F9 to trigger the rendering process. Using Rendered Frame Window controls, you can change render presets, lock the rendering to a single viewport, render regions of the viewport for faster feedback, and change mental ray settings such as final gather and reflections without having to access other portions of the program. |
|
 |
Slate Material Editor |
| The Slate Material Editor, which you open with the M key, provides functions to create and edit materials and maps.
Materials are assigned to objects and create greater realism in a scene by using different maps. |
|