Camera Map Per Pixel Map


Command entry: Material Editor Material/Map Browser Maps Standard Camera Map per Pixel

The Camera Map Per Pixel map lets you project a map from the direction of a particular camera. It is meant as an aid to 2D matte painting: You can render a scene, adjust the rendering using an image-editing application, then use this adjusted image as a matte that is projected back onto the 3D geometry.

TipFinal rendering can be slow. Script-driven network rendering can help improve performance.

Limitations

The Camera Map Per Pixel does not handle these situations:

Procedures

To use Camera Map Per Pixel:

  1. Create the 3D model.
  2. Set up a camera.
  3. Set up the rendering resolution you want.

    To get good results, the plate should be at least 2K pixels; 3K to 6K, or higher is recommended.

  4. Render the scene to an editable image format such as TIFF.
  5. Render the scene again, this time to a format such as RPF that has a Z-depth component. Make sure the Z option is turned on.
  6. Use an image-editing application to make changes you want to the editable image.
  7. Apply Camera Map Per Pixel to the Diffuse Color component of the geometry on which you want the matte to appear. Use these settings:
    • Set Camera to the same camera you used for the renderings.
    • Set Texture to the matte image you edited.
    • Set ZBuffer Mask to the Z-depth rendering (the RPF or RLA file).

      Adjusting (which usually means increasing) the value of ZFudge can improve the quality of edges of the projection.

      Usually it is a good idea to have Remove Back Face Pixels turned on. Another way to adjust the projection edge is to adjust this control's Angle Threshold.

      TipIf you have persistent problems with seams, try generating a mask with an alpha channel and using it to clean up the edge of the projection.

    If you have multiple mattes to project, you might need to slice geometry to make each map's target a separate object.

Interface

Map Channel

Sets which map channel to use. Default=1.

Camera

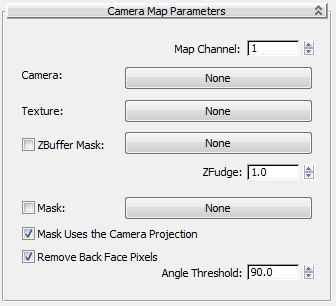
Click to turn on, and then choose a camera in the scene by selecting it in a viewport, or press H to use the Pick Object dialog.

Once you have assigned a camera, its name appears on this button.

This camera should be the one used to render the map used in the Texture and ZBuffer Mask components.

Texture

Click to assign the texture to project. You can assign any kind of map, but typically this is a Bitmap that contains an image file that you first rendered from the same camera, and then possibly edited with a different application.

ZBuffer Mask

Click to assign a map that contains Z-depth data used to mask the projection from unwanted surfaces. Typically this is an RPF file or an RLA file rendered using the same camera, with the Z channel option turned on.

Use the toggle to turn use of the ZBuffer Mask on or off. By default, it is off, and it is not turned on automatically when you assign the ZBuffer Mask.

  • ZFudgeZFudge values other than 1.0 add a margin of deviation to the use of the Z-depth data, letting you fine-tune the Z-Buffer masking. Default=1.0.
Mask

Behaves like the mask in the Mask map by letting you view one map through another. Black areas of the mask are transparent, white areas are opaque, and gray areas are partially transparent, based on the percentage of the gray.

  • Mask Uses the Camera ProjectionWhen on, the mask uses the same camera projection as the Texture and ZBuffer Mask. When off, it uses the object's UVW coordinates. Default=on.
Remove Back Face Pixels

When on, sets the projection to exclude surfaces that face away from the camera, based on the value of Angle Threshold. Default=on.

  • Angle ThresholdSpecifies the angle to use as a cutoff when removing backface pixels. Default=90.0.

    At the default of 90 degrees, faces perpendicular to the camera, or at a greater angle, are not projected.