 Command entry:Render Setup dialog
 Choose Default Scanline Renderer as the production renderer. Advanced Lighting panel Choose Radiosity.
Radiosity is a technique to calculate indirect light. Specifically, radiosity calculates the interreflections of diffuse light among all the surfaces in a scene. To make this calculation, radiosity takes into account the lighting, materials, and environment settings in the scene.
Radiosity processing is distinct from the rendering process. You can render without radiosity. However, to render with radiosity, you must calculate radiosity first.
Once a radiosity solution for a scene exists, you can use it in multiple renderings, including multiple frames of an animation. If the scene contains moving objects, radiosity might need to be recalculated; see Animation with Radiosity.
For an overview of radiosity and how radiosity works in 3ds Max, see Radiosity Solution.
For suggestions regarding workflow for using radiosity, see Radiosity Workflows.
Follow these steps if your scene does not already use real-world units.
 (3D Snap Toggle) and on the Snaps panel, turn off all the settings. Then turn on Vertex to enable vertex snapping. Close
the dialog.
Measure Distance to measure some object in the scene for which you know the size; for example, a door or window. The distance
displays in the Coordinate Display of the status bar.
Units Setup and adjust the Scene Unit Scale.
(3D Snap Toggle) and on the Snaps panel, turn off all the settings. Then turn on Vertex to enable vertex snapping. Close
the dialog.
Measure Distance to measure some object in the scene for which you know the size; for example, a door or window. The distance
displays in the Coordinate Display of the status bar.
Units Setup and adjust the Scene Unit Scale.
For example, if your object measures 35 scene units long, and your model uses US Standard measurement, then you would enter 1 for the scale, and choose Inches from the drop-down list. This would give you an object 35 inches long.
If your object measures 90 scene units long, and your model uses Metric measurement, then you would enter 1 for the scale, and select Centimeters from the drop-down list. This would give you an object 90 centimeters long.
Example: To process radiosity with photometric lighting:
For example, if the ceiling is 96 scene units high in the model, make sure the units are set to US Standard (inches) and not Metric.
 Create panel, click
  (Lights).
Photometric Lights Target Point Light.
Environment to open the Environment panel of the Environment And Effects dialog.
Advanced Lighting Radiosity to display the Advanced Lighting panel with Radiosity chosen as the advanced lighting type.
Radiosity to display the Radiosity panel.
(Lights).
Photometric Lights Target Point Light.
Environment to open the Environment panel of the Environment And Effects dialog.
Advanced Lighting Radiosity to display the Advanced Lighting panel with Radiosity chosen as the advanced lighting type.
Radiosity to display the Radiosity panel.
Example: To process radiosity with standard lighting:
Photometric lights are recommended for use with radiosity. But if you are working on a scene that already contains standard lights, you can follow these guidelines.
Create panel, click (Lights).
 (Render Production).
Advanced Lighting to display the Advanced Lighting panel. On the Select Advanced Lighting rollout, choose Radiosity as the
advanced lighting type.
Advanced Lighting Radiosity to display the Advanced Lighting panel with Radiosity chosen as the advanced lighting type.
(Render Production).
Advanced Lighting to display the Advanced Lighting panel. On the Select Advanced Lighting rollout, choose Radiosity as the
advanced lighting type.
Advanced Lighting Radiosity to display the Advanced Lighting panel with Radiosity chosen as the advanced lighting type.
Radiosity controls appear as rollouts on the Advanced Lighting panel of the Render Setup dialog. To choose radiosity, use the Select Advanced Lighting rollout.
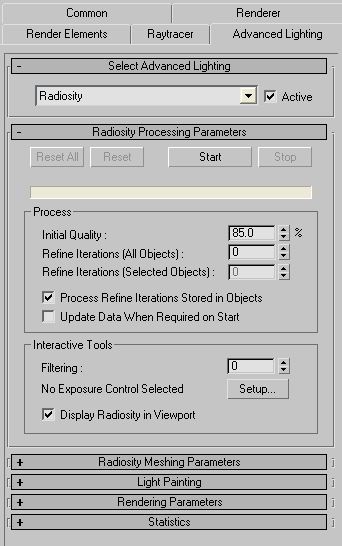
Contains the main controls for processing a radiosity solution.
Controls the creation of a radiosity mesh and its size in world units.
The light painting tools in this rollout allow you to touch up shadowed and illuminated areas manually. You can use these tools to touch up shadow and light-leak artifacts without having to do additional remodeling or radiosity processing. Using Pick Illumination, Add Illumination, and Remove Illumination, you can add or remove illumination on one selection set at a time.
Provides parameters for controlling how to render the radiosity-processed scene.
This rollout lists information about the radiosity processing.


 (Select And Move) transform to adjust the location of the light or its target.