The Level Of Detail utility lets you construct an object that alters its geometric complexity or level of detail based on its size in the rendered image. You create several versions of the same object each with different levels of detail, group them as one, and then run the Level Of Detail utility, which automatically creates a special LOD controller as a Visibility track. The LOD controller then hides and unhides the objects in the group, depending on their size in the rendered scene.
The main purpose of this utility is to save time in rendering complex objects and in manipulating objects in the viewports. Since a portion of rendering speed is directly related to the number of faces that must be rendered in a scene, using the Level Of Detail utility lets you reduce the number of rendered faces as an object reduces its apparent size. In addition, you can use this utility to display a simple stand-in for a more complex object in the viewports. Since the stack is not calculated for objects hidden in the viewports, you can speed up viewport manipulation by using this utility to substitute complex stack objects with simple stand-ins.
To set up an object for the Level Of Detail utility:
 Select all of the objects, and use the
  Align tool to center all of them about a common center.
The name of the objects within the group appear in the Level Of Detail list, in order of complexity; only the least complex object in the group is displayed in the viewports, while all other objects are made invisible.
Select the Level Of Detail object, and then choose Group menu  Open.
Select the object in the viewport.
Open.
Select the object in the viewport.
 Modify panel to access that object's parameters.
Close.
Modify panel to access that object's parameters.
Close.
To assign materials within the group:
Select the grouped object.
To dismantle a Level Of Detail object:
If you look at a Level Of Detail object in Track View, you'll see only the tracks for the sub-object that's currently displayed in the viewports. To see all sub-objects in Track View, you need to turn off Visible Objects.
If you need to dismantle a grouped Level Of Detail object, and restore its sub-objects to their independent states, follow these steps:
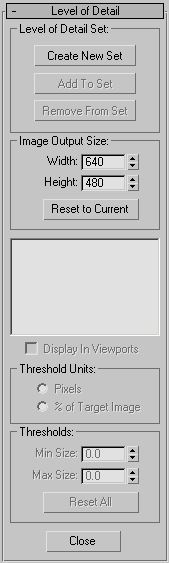
Lets you create a new set, and add or remove objects from the current set.
Adds an object to the Level of Detail set. You must first attach the object you want to add to the group object. To add an object to the set, use Align to center the object with the group object. Select the object you want to add, and then choose Attach from the Group menu, and then click the group object. Finally, click the Add to Set button, and then click the object you want added.
Removes the object highlighted in the list window from the current set. Note that the object then becomes visible in the viewports,
but is still part of the group. To remove the object from the group, choose Group menu Open, select the object you want removed, and choose Group menu Detach. Select the group object again, and choose Group menu Close.
The Width and Height spinners in this area are set to the current rendering output size each time you enter the Level of Detail utility. Using the spinners, you can change this to any resolution. If the percent of Target Image option is selected, as you change the Target Image Size, the threshold values change as well.
Lists all of the objects in the group by complexity, with the least complex at the top of the list. The numbers at the left of each object name are the threshold values that indicate at what size the object will be displayed in the rendered scene. The numbers can be one of two types of units, pixels, or percentage of the target image. You set the type of unit in the Threshold Units group.
Displays in the viewport the object highlighted in the list window. Only one object in the group is displayed in the viewports at any time. As a default, the least complex object is displayed, but you can look at the other objects by highlighting them in the list and selecting this item. Double-clicking the object name in the list performs the same function.
The options in this group box let you choose between two types of threshold units. Switching between these two options does not alter the effect; it alters the method by which you set the thresholds.
Sets the minimum size of the object before it's replaced by the less complex object, and the maximum size of the object before it's replaced by the more complex object. The values vary depending on the current type of Threshold Unit. The default threshold values are initialized so that the most complex object is 100 percent of the image output size. The remaining thresholds are set using an algorithm based on a ratio of the number of faces between each object. It assumes that all faces are the same size, and then picks thresholds so that the faces would remain a constant size as displayed on the screen. Usually, this will provide the type of smooth transition you need, but you can customize the threshold values. The threshold values are interrelated between the objects, so altering the minimum size of one object, for example, will also alter the maximum size of the next object.
Resets all thresholds for all objects in the list, using the previously described algorithm.


 Utilities panel