Everything in 3ds Max is located in a three-dimensional world. You have a variety of options for viewing this enormous stage-like space, from the tiniest details to the full extent of your scene.
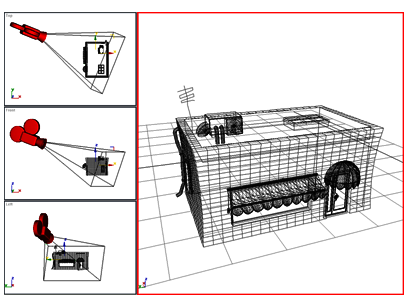
Different viewports can display different angles; on the right, the largest viewport shows a camera view.
Using the view options discussed in this section you move from one view to another, as your work and imagination require. You can fill your screen with a single, large viewport, or set multiple viewports to track various aspects of your scene. For exact positioning, flat drawing views are available, as are 3D perspective and axonometric views.
You navigate 3D space by adjusting the position, rotation and magnification of your views. You have full control over how objects are rendered and displayed on the screen.
You can also use the Grab Viewport command to create snapshots of your work as you go.
This section presents brief topics designed to help you quickly start learning how to organize viewports and navigate through 3D space. For details about viewport commands, see Viewport Controls.
Viewports are openings into the three-dimensional space of your scene, like windows looking into an enclosed garden or atrium. But viewports are more than passive observation points. While creating a scene, you can use them as dynamic and flexible tools to understand the 3D relationships among objects.
The grid you see in each viewport represents one of three planes that intersect at right angles to one another at a common point called the origin. Intersection occurs along three lines (the world coordinate axes: X, Y, and Z) familiar from geometry as the basis of the Cartesian coordinate system.
Each viewport can be set to display either of two types of views: axonometric or perspective.
3ds Max defaults to a 2 x 2 arrangement of viewports. Thirteen other layouts are available, but the maximum number of viewports on the screen remains four.
You can choose from multiple options to display your scene. You can display objects as simple boxes, or render them with smooth shading and texture mapping. If you want, you can choose a different display method for each viewport.
3ds Max contains controls to help you adjust display performance: the balance between quality and time in displaying objects.
To navigate through your scene, use the view navigation buttons located at the lower-right corner of the 3ds Max window. All view types, except Camera and Light views, use a standard set of view navigation buttons.
When you click one of the view navigation buttons, you can change these basic view properties: zooming, panning, and orbiting.
The ViewCube ® 3D navigation control provides visual feedback of the current orientation of a viewport, lets you adjust the view orientation, and also switch between standard and isometric views.
The SteeringWheels ® 3D navigation controls are tracking menus that allow you to access different 2D and 3D navigation tools from a single tool.
Walkthrough navigation lets you move through a viewport by pressing a set of shortcut keys, including the arrow keys, much as you can navigate a 3D world in many video games.
The Camera and Light view navigation buttons are the same with a few exceptions. The buttons are visible when a viewport with a Camera or Light view is active. The Camera and Light view navigation buttons do more than adjust your view. They transform and change the parameters of the associated camera or light object.
Progressive Display (for Nitrous viewports) or adaptive degradation (for legacy viewport drivers) can improve viewport performance when you transform geometry, change the view, or play back an animation. It does so by decreasing the visual fidelity of certain objects temporarily; for example, by drawing larger objects or those closer to the camera as bounding boxes instead of wireframes.
Most viewport-handling commands are found on the Views menu and on the viewport label menus.
You use the Display panel, layers, and Scene Explorer to control how objects are displayed in viewports, and to hide or freeze objects. This section covers usage of the Display panel controls.


