The Edit UVWs dialog contains three toolbars: one above the editing window and two below.
Interface
Upper Toolbar
Contains controls for manipulating the texture sub-objects in the view window and setting options. When transforming with
Rotate and Scale, pressing Ctrl+Alt will allow you to transform the selection from the point of the mouse click, instead of the selection center. The initial
click specifies the center of the transform.
-
 Move
Move
-
Lets you select and move sub-objects. Flyout options are Move, Move Horizontal, and Move Vertical. To constrain the movement
to a single axis, hold
Shift while dragging.
-
 Rotate
-
Lets you select and rotate sub-objects. By default, rotation occurs around the selection center; to rotate around the cursor
location, hold
Ctrl+Alt while dragging.
-
 Scale
Scale
-
Lets you select and scale sub-objects. Flyout options are Scale, Scale Horizontal, and Scale Vertical. By default, scaling
occurs around the selection center; to scale around the cursor location, hold
Ctrl+Alt while dragging.
Pressing Shift as you scale constrains the transform to a single axis.
-
 Freeform Mode
-
Lets you select and move, rotate, or scale vertices, depending on where you drag.
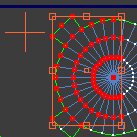
After you select sub-objects, the Freeform gizmo appears as a rectangular bounding box around the selection. As you move the
cursor over the gizmo's various elements and inside the gizmo, the cursor's appearance, and the result of starting to drag
in this location, change:
-
 Position the cursor anywhere inside the gizmo and then drag to move the selection. To constrain movement to the vertical or
horizontal axis, depending on how you begin dragging, press and hold Shift before dragging.
Position the cursor anywhere inside the gizmo and then drag to move the selection. To constrain movement to the vertical or
horizontal axis, depending on how you begin dragging, press and hold Shift before dragging.
-
 Position the cursor over a gizmo edge center point, and then drag to rotate the selection about the pivot. As you drag, the
amount of rotation is shown in the center of the gizmo.
Position the cursor over a gizmo edge center point, and then drag to rotate the selection about the pivot. As you drag, the
amount of rotation is shown in the center of the gizmo.
Ctrl+drag to rotate in five-degree increments; Alt+drag to rotate in one-degree increments. Freeform rotation respects the angle snap status.
-
 Position the cursor over a gizmo corner and then drag to scale the selection. By default, scaling is non-uniform; if you press
and hold Ctrl before dragging, scaling is uniform on the horizontal and vertical axes. Press and hold Shift before dragging to constrain scaling to the vertical or horizontal axis, depending on how you begin dragging.
Position the cursor over a gizmo corner and then drag to scale the selection. By default, scaling is non-uniform; if you press
and hold Ctrl before dragging, scaling is uniform on the horizontal and vertical axes. Press and hold Shift before dragging to constrain scaling to the vertical or horizontal axis, depending on how you begin dragging.
By default, scaling takes place about the gizmo center. If you've moved the pivot (see following item), you can scale about
the transform center instead by pressing and holding Alt before dragging.
-
 Position the cursor over the pivot, a wireframe cross that appears by default at the center of the gizmo. When this cursor
appears, drag to move the pivot. Rotation always occurs about the pivot; scaling takes place about the pivot if you press
and hold Alt before dragging.
Position the cursor over the pivot, a wireframe cross that appears by default at the center of the gizmo. When this cursor
appears, drag to move the pivot. Rotation always occurs about the pivot; scaling takes place about the pivot if you press
and hold Alt before dragging.
TipYou can also position the pivot with the
Set Pivot controls on the Quick Transform rollout.
If you Ctrl+select one or more vertices outside the gizmo, the gizmo expands to encompass the entire selection.
-
 Mirror
-
Reverses the positions of selected sub-objects and flips UVs. Flyout options are Mirror Vertical, Mirror Horizontal, Flip
Horizontal, and Flip Vertical.
Flip first detaches the selection along its boundary edges and then applies a Mirror Horizontal or Vertical, depending on
the mode.
-
 Show Map
-
Toggles the display of the map in the editor window.
-
 UV/VW/UW
-
By default, the UV portion of the UVW coordinates is displayed in the view window. However, you can switch the display to
edit the UW portion or the VW portion.
 Options
-
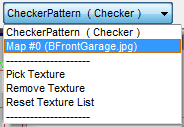
- [texture list drop-down]
-
Contains all the maps of the material assigned to the object.
The names of the maps assigned in the Material Editor and in the Edit UVWs dialog (via Pick Texture) appear in the list.
Below the map names are several commands:
- Opens the Material/Map Browser, which you can then use to add and display textures that are not presently in the object's
material. To modify the texture, use the Material Editor.
- Eliminates the currently displayed texture from the editor.
- Returns the texture list to the current state of the applied material, removing any added textures and restoring any removed
textures that were part of the original material, if they still exist in the material. This command also adds any new maps
in the material, so it essentially updates the UVW editor to the current state of the material.
Choose a map you want to use in the view window. For example, you might use a bump or texture map as a reference to move UVW
vertices.
A checker texture named CheckerPattern (Checker), useful for checking for distorted areas of the texture mapping, is built
in to the Edit UVWs dialog. By default, this texture appears as the background texture when you first open the editor after
applying Unwrap UVW to an object. To cause the pattern to appear on the object in viewports set to display textures, choose
it from the drop-down list, even if it's already active in the editor.
Lower Toolbars
The two lower toolbars include functions for selecting and transforming sub-objects and setting display properties.
Sub-object Selection toolbar
The first of the two lower toolbars contains functions for setting the sub-object mode, making procedural selections, and
using soft selection.
 Vertex/
 Edge/
Edge/ Polygon
-
Enables selection at the respective texture sub-object level. These buttons are the equivalents of the sub-object levels on
the modifier stack and on the Unwrap UVWs modifier

Selection rollout.
Note Selected sub-objects are colored red by default. Sub-objects that share a common geometric vertex or edge with a selection
are blue by default. This helps you identify sub-objects that that share the same seam. You can change these colors using
Customize User Interface
Colors panel.
The active sub-object level is synchronized between the modifier stack and Selection rollout of the Unwrap UVW modifier and the Sub-object Selection toolbar setting. When you choose a sub-object
level in one, it's also activated in the other. Similarly, selecting sub-objects in a viewport selects them in the editor
and vice-versa. However, because you can toggle the sub-object mode via the modifier stack but not via the toolbar or Selection
rollout buttons, it's possible for a sub-object mode to be active in the Edit UVWs dialog but not in the viewports.
-
 Select by Element UV Toggle
-
When on, selecting a sub-object in the editor window selects the entire cluster to which the sub-object belongs. This is different
from
Select By Element XY Toggle on the Unwrap UVWs modifier
Selection rollout, which applies to geometry elements.
 Grow: UV Selection
-
Expands the texture-coordinate selection by selecting sub-objects adjacent to selected sub-objects.
Vertex and face expansion proceeds outwards in all available directions. Edge expansion proceeds along available UV paths.
For example, to select a cluster outline, select one outer edge, and then click Expand Selection repeatedly.
TipTo expand a sub-object selection with regard to the object geometry, use
Grow: XY Selection.
 Shrink: UV Selection
-
Reduces the texture-coordinate selection by deselecting all sub-objects adjacent to non-selected sub-objects.
 Loop UV
-
Selects a loop of texture vertices, edges, or polygons. Usage is as follows:
- Select two or more adjacent vertices or polygons in one or more rows or columns, and then click Loop. This selects all sub-objects
in line with the selection(s).
- Select one or more edges, and then click Loop. This selects all edges in line with the selected edge(s).
 Grow Loop UV
-
Extends a loop or loops at both ends, when possible.
 Shrink Loop UV
-
Deselects the sub-objects at both ends of a loop or loops.
-
 Ring UV
-
Selects a ring of texture vertices, edges, or polygons. Usage is as follows:
- Select two or more adjacent vertices or polygons in one or more rows or columns, and then click Ring. This selects all sub-objects
on edges parallel to the selection(s).
- Select one or more edges, and then click Ring. This selects all edges parallel to the selected edge(s).
 Grow Ring UV
-
Extends a ring or rings at both ends, when possible.
 Shrink Ring UV
-
Deselects the sub-objects at both ends of a ring or rings .
-
 UV Paint Selection
-
Lets you “paint” a sub-object selection by dragging in the editor window. After activating this mode, move the cursor into
the editor window, and then drag to select sub-objects. To exit Paint Select mode, right-click or choose a transform tool.
Paint mode selects only sub-objects that are fully inside the selection brush. The dotted circle attached to the mouse shows
the size of the brush. To change the brush size, use the Enlarge and Shrink tools (see following).
 Enlarge Brush Size
-
Increases the size of the UV Paint Selection “brush”: the circle attached to the mouse cursor.
 Shrink Brush Size
-
Decreases the size of the UV Paint Selection “brush”: the circle attached to the mouse cursor.
- UV_SelectionFromBase/SelectionToBase
-
These commands transfer sub-object selections from the base object (must be editable poly) to the texture coordinates and
vice-versa. They are available only from the Customize User Interface dialog:
- Converts a sub-object selection from the base editable poly object to the texture coordinates in the Unwrap UVW modifier.
It is available only when the Editable Poly level in the modifier stack is active. The CUI action is available from the PolyTools
category.
- Converts a sub-object selection from the texture coordinates in the Unwrap UVW modifier to base editable poly object. It is
available only when the Unwrap UVW level in the modifier stack is active. The CUI action is available from the UVW Unwrap
category.
Soft Selection tools
Soft Selection makes a selection of UV vertices behave as if surrounded by a "magnetic field." Unselected vertices within
the field are drawn along smoothly while you transform the selection, the effect diminishing with distance. You can adjust
this distance, or “falloff,” whether it applies to object space or texture space, and the formula by which it diminishes.
To use Soft Selection, first set a value that encompasses vertices to be moved or scaled, then transform sub-objects with
a falloff effect.
 Soft Selection
-
Toggles the Soft Selection feature. When on, soft-selected vertices display using a color gradient that falls off from the
central, explicitly selected vertices.
- Falloff
-
Use this numeric setting to specify the falloff distance. As the value increases, unselected vertex colors change gradually
from the selected vertex to reflect the area of influence.
 Soft Selection Falloff Type
-
- XY/UV
-
Choose from the drop-down list to specify object or texture space for the falloff distance. XY selects object space, UV selects
texture space.
For an explanation of the difference between object and texture space, see this note.
 Limit Soft Selection By Edges
-
When on (the default), limits the falloff region by the specified number of edges (using the numeric setting) between the
selection and the affected vertices. The affected region is measured in terms of "edge-distance" space rather than absolute
distance.
Transform/Display toolbar
-

 Absolute/Relative Type Ins
-
In Absolute mode (the default),
3ds Max treats values you enter into the U, V, and W fields (see following) as actual coordinates within the texture space. In Relative
mode,
3ds Max applies transform values you enter as offsets to current values.
- U, V, and W
-
These fields display the UVW coordinates for the current selection. If the selection uses multiple values for a particular
axis, the field is blank. Use the keyboard or the spinners to edit them.
These fields are active at all sub-object levels, but they always apply to vertices. With a single vertex selected, they display
the current coordinates. With multiple vertices (or one or more edges or faces) selected, they display any coordinates the
vertices belonging to the selection have in common; otherwise, they're blank.
-
 Lock Selected Subobjects
-
When on, prevents you from adding or removing sub-objects from the selection. In this mode you can transform selected sub-objects
without touching them.
-
 Display Only Selected Faces
-
When on, only selected polygons appear in the editor window; the rest are hidden. This option is supported at all sub-object
levels, but applies to selected polygons only. Changing the viewport polygon selection automatically updates the display in
the editor.
 Hide/Unhide Selected Sub-objects
-
Hides selected sub-objects or reveals all hidden sub-objects. From the flyout, choose

(Hide) or

(Unhide).
You can apply Hide repeatedly to reduce the number of displayed sub-objects incrementally.
 Freeze/Unfreeze Selected Sub-objects
-
Freezes selected sub-objects or unfreezes all frozen sub-objects. From the flyout, choose

(Freeze) or

(Unfreeze).
When frozen, sub-objects cannot be selected or transformed directly, although they are subject to indirect transformation
via soft selection.
- All IDs (drop-down)
-
Filters the object's material IDs. Displays texture faces that match the ID that you choose from the drop-down list. The list
displays only IDs available in the modified object.
-
 Pan View
-
Click Pan View, then drag in the editor window to change the visible portion.
TipWith a three-button mouse, you can pan the window at any time by dragging with the middle mouse button held down.
-
 Zoom View
-
Click Zoom, and then click+drag to zoom the window.
TipWith a wheel mouse, you can also zoom by turning the wheel.
-
 Zoom To Region
-
Click Zoom Region, and then region-select (by dragging) part of the window to zoom in.
-
 Zoom Extents
-
Zooms in or out to fit the texture coordinates in the window. The flyout buttons, from top to bottom, let you zoom to all
texture coordinates, to the current selection, and to all clusters/elements containing any selected sub-objects.
-
 Grid Snap
-
When on, moving sub-objects tends to snap the vertex closest to the mouse cursor, which is highlighted by a square outline,
to the nearest grid line or intersection.
This is the default tool on this flyout; Pixel Snap is also available.
You can set the snap strength on the Unwrap Options dialog.
-
 Pixel Snap
-
Snaps to the nearest pixel corner when you have a bitmap in the background. Available from the Grid Snap flyout.
Combine this with Center Pixel Snap to snap to the center of pixels rather than the corner.
NoteWith multiple vertices selected, all vertices snap to the nearest pixel, relatively; this can slightly alter the spatial relationships
among them.


 Linear (the default)
 Smooth
 Slow Out
 Fast Out