Command entry:
Create panel


(Helpers)
Standard
Object Type rollout
Tape
Command entry:Create menu
Helpers
Tape Measure
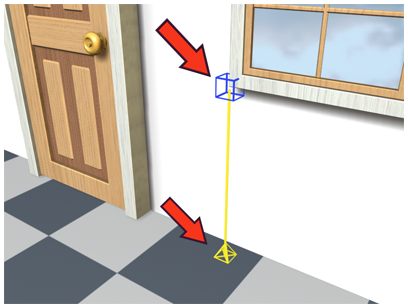
Tape provides an on-screen "tape measure" for determining and setting distances. The tape is composed of two named objects,
in the same way targeted lights and cameras are. By default, these are named Tape## and Tape##.Target. The tape and target
icons are connected by a line representing the current distance between them.
You can drag a length (the default), or enter a specific length by turning on Specify Length. You can snap or align either
end of the tape or link to objects in your scene. Deleting either end deletes the tape.
NoteWhen you add a Tape helper object,
3ds Max automatically assigns a
Look At controller to it, with the tape's target object assigned as the Look At target. You can use the controller settings on the Motion panel
to assign any other object in the scene as the Look At target.
Selection
You can select a tape-measure object from either end, or from the middle. When you click the connecting line, both ends of
the tape object become selected so you can move them as one. Note that the same is true of target cameras and lights.
NoteLine selection is available only when clicking with the mouse. Region selection doesn't work for this.
TipThe Length readout of the tape object is displayed in the Modify panel only when you select the tape end of the object (as
opposed to the target or link line). You can lock the Length display by activating the Pin Stack button while the tape end
is selected, and then proceed to adjust any part of the tape object or any other object in your scene.
Procedures
To measure a distance:
- Click Tape and drag from one point to create the tape, and then drag to a second point and release the mouse button to create
the target.
The distance between tape and target appears in the Length field. The number in the Length field is gray to indicate that
this is a read-only measurement.
NoteTo snap the tape ends to object vertices, edges and so on, turn on
Snap with the appropriate snap settings activated.
 Move either end to a new location. The line between stretches to the new distance, shown in the Length field.
NoteFor accurate results when moving a tape endpoint with Snap, you must turn on Pivot in the Snap Settings panel as well as the
types of sub-object you want to snap to; see
Snaps. This is because the endpoints are actually pivots.
To set a distance:
Interface
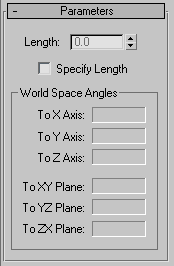
Parameters rollout
- Length
-
Specifies the length of the tape object. You must select the Specify Length check box to enable this option.
- Specify Length
-
Activates the Length parameter setting. Otherwise the tape object's length will be specified by clicking and dragging in the
viewport.
World Space Angles group
- To X/Y/Z Axis
-
Displays the angle of the tape object relative to each axis in world space.
- To XY/YZ/ZX Plane
-
Displays the angle of the tape object relative to each of these home planes.