 Command entry: Particle View
  Click a Force operator in an event or add a Force operator to the particle system and then select it.
The Force operator lets you influence particle motion with one or more space warps from the Forces category. Use this operator along with different forces to simulate the effects of wind, gravity, and so on.
The following force space warps work with the Force operator:
This rollout appears in the parameters panel below the main operator rollout after you highlight the operator, right-click it, and then choose Use Script Wiring. Thereafter, a check mark appears next to the Use Script Wiring in the right-click menu, and the rollout appears whenever you highlight the operator. To turn off script wiring, choose Use Script Wiring again from the right-click menu.
Script wiring lets you use a script to control parameters that you normally specify in the operator's parameters. Place a Script operator before the Force operator in the event, and then use it to define values in the particleFloat channel. You'll find an example script below.
Choose either of the following:
The following script sets each particle's float value as one tenth of its particle ID, or birth index number. The first particles get a low float value, and thus a low Influence value, and each successive particle gets a larger float value than the one before. As a result, the later a particle is born, the more subject it is to the space warp(s) in the Force operator.
on ChannelsUsed pCont do
(
  pCont.useFloat = true
)

on Init pCont do (

)

on Proceed pCont do
(
  count = pCont.NumParticles()

  for i in 1 to count do
  (
    pCont.particleIndex = i
    j = pCont.particleID
    pCont.particleFloat = pCont.particleID/10.0
  )
)To affect particle motion with force space warps:
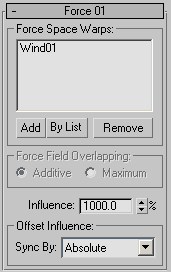
The user interface appears in the parameters panel, on the right side of the Particle View dialog.
This group displays the forces currently in effect, and let you add and remove forces.
Shows the forces that apply to this operator. If more than three forces apply, a scroll bar appears at the right side of the list.
If you delete a listed space warp from the scene, its name is replaced in the list by the entry “<deleted>”.
Click this button, and then use the Select Force Space Warps dialog to add one or more space warps to the list. The space warps must already exist in the scene.
Particle Flow adds space warps to the list in same order in which they appear in the dialog. To effect a different order, use the Add button to add them one at a time.
Determines how multiple forces that occupy the same volume of space affect the particles. With Additive, the forces are combined according to their relative strengths. With Maximum, only the force with the greatest strength affects the particles.
For example, you might apply Wind and Gravity space warps to particles, and set their Strength parameters to 1.5 and 1.0, respectively. If you choose Additive, the Wind space warp will have approximately 50 percent more influence over the particles than the Gravity space warp. But if you choose Maximum, only the Wind space warp will affect the particles.
Specifies the strength with which the force or forces are applied to the particles as a percentage. Default=1000.0.
A negative Influence value reverses the force effects.
Choose the time frame for applying animated parameters. For an explanation, see Animation Offset Keying group.
Choose the time frame for applying animated parameters:


