Command entry:
Create panel


Helpers
MassFX (on drop-down list)
UConstraint
Create constraint helper in a viewport.

Modify panel
Connection rollout > Apply rigid bodies.
Command entry:Select one or two objects.
MassFX toolbar
Click active constraint or choose a different one from the flyout.
Command entry:Select one or two objects.
Animation menu
Simulation - MassFX submenu
Constraints
Choose a constraint from the submenu.
The Constraint helper in MassFX lets two rigid bodies work together, as with a door and its frame using the Hinge constraint.
Alternatively, you can use a constraint to link a single rigid body to a point in space. For an overview of constraints, see
Constraining Physics Objects.
Procedure
To use the MassFX constraint:
The most convenient way to apply a MassFX constraint is from the MassFX toolbar:
- Create the object or objects to be constrained. Use the Hierarchy panel Pivot controls to position their pivots where you want the constraints to be attached.
For example, if one object is a door, position its pivot along the vertical edge where the hinge would be attached in the
real world.
- Depending on whether you want to constrain a rigid body to a point in space or to another rigid body, select one or two objects,
respectively.
In the latter case,select the parent object first and then select the child object. The child object is the one that is mainly
affected by the constraint; for example, with a hinged door, the door is the child and the door frame is the parent.
TipThe objects need not be rigid bodies; if not, you're prompted to add modifiers when you apply the constraint.
- On the MassFX toolbar, click the active constraint preset or choose a different one from the flyout.
If prompted to apply the MassFX Rigid Body modifier, click Yes to proceed.
NoteIn all cases you're adding the same helper object: a UConstraint. The different flyout presets simply include different settings
based on the type of constraining action to apply. You can adjust these as necessary to create any kind of constraint after
applying the constraint.
- Move the mouse horizontally back and forth in a viewport to adjust the display size of the constraint, and then click to set
the size.
NoteThis applies to most constraints but not all, such as the Slide constraint. In that case, just click in a viewport to finish
creating the constraint.
The command panel switches to the Modify panel and displays the UConstraint settings.
- Adjust the settings as necessary and position the objects and constraint where they should start out in the simulation.
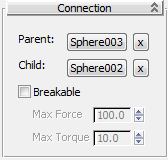
Connection
- Parent
-
Sets the rigid body to use as the parent of the constraint. Click the button labeled with the name of the associated object,
then in the viewport select the rigid body to use as the new parent. The constraint is then linked to the parent object, rotating
and moving with it. The parent object can be dynamic or kinematic, but not static.
To remove the parent object, click the X button. When the parent is unset (not linked to any rigid body), as indicated by
the "None" label, the constraint is anchored to global space (that is, its current location). Creating a constraint with a
single rigid body selected sets that rigid body as the child, with no parent, constraining the rigid body relative to global
space.
- Child
-
Sets the rigid body to use as the child of the constraint. Click the button labeled with the name of the associated object,
then in the viewport select the rigid body to use as the new child. The child object can be only a dynamic rigid body, not
kinematic or static.
You can use the X button to remove the child object, but that results in an invalid constraint.
- Breakable
-
When on, the constraint can be broken during the simulation. If a linear force exceeding Max Force or a twisting force exceeding
the Max Torque (see following) is applied between the parent and child object, the constraint "breaks"; that is, it turns
off and is no longer applied.
- Max Force
-
When Breakable is on, the amount of linear force beyond which the constraint will break. To make the constraint more difficult
to break, increase the value.
- Max Torque
-
When Breakable is on, the amount of twisting force beyond which the constraint will break. To make the constraint more difficult
to break, increase the value.
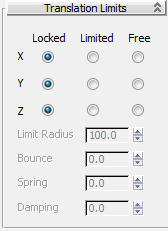
Translation Limits
- X/Y/Z
-
For each axis, choose how to constrain motion along the axis:
- Prevents the rigid bodies from moving along this local axis.
- Allows the objects to move along this local axis by an amount of the Limit Radius (away from the initial offset between the
parent and child). If more than one axis is set to Limited, the motion is limited radially: within a circle or sphere, not
a square or box. The distance of the Limit Radius is represented visually in the viewports for each Limited axis.
- Motion of the rigid bodies along the respective axis is unrestricted.
- Limit Radius
-
The distance along the limited axis or axis that the parent and child can move away from their initial offset.
- Bounce
-
For any limited axes, the amount that the objects will rebound off the limit when hit. A value of 0.0 indicates no bounce,
while a value of 1.0 is full bounce.
- Spring
-
For any limited axes, the strength of the "spring" that pulls the objects back to the limit if the limit is exceeded. Small
values indicate a low spring force, while larger values will pull the objects with increasing force back to the limit. A value
of 0.0 is a special value indicating a hard limit, attempting to prevent the objects from exceeding the translation limit.
- Damping
-
For any limited axes, if the translation exceeds the limit, the amount of "mud" they move through beyond the limit.
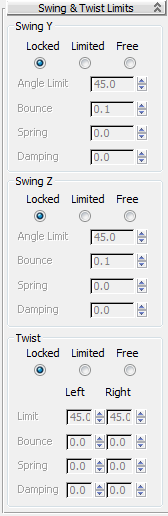
Swing & Twist Limits
Swing Y / Swing Z
Swing Y and Swing Z refer to rotation around the local Y and Z axes, respectively, of the constraint. Choose one of the following
for each:
- Angle Limit
-
When Swing is set to Limited, the number of degrees away from the center to allow rotation. This is applied to both sides,
so the total range of motion is twice this value. For example, if you set Angle Limit to 45 degrees, the total allowed rotation
equals 90 degrees.
- Bounce
-
When Swing is set to Limited, the amount that the objects rebound off the limit when hit. A value of 0.0 indicates no bounce,
while a value of 1.0 is full bounce.
- Spring
-
When Swing is set to Limited, the strength of the spring that pulls the objects back to the limit if the limit is exceeded.
Small values indicate a low spring force, while larger values will pull the objects with increasing force back to the limit.
A value of 0.0 is a special value indicating a hard limit, attempting to prevent the objects from exceeding the swing limit.
- Damping
-
When Swing is set to Limited and the limit is exceeded, the amount of "mud" the objects will rotate through beyond the limit.
Twist
Twist refers to rotation around the local X axis of the constraint.
- Prevent the parent and child objects from rotating around the local X axis of the constraint.
- Allow the parent and child to rotate within a fixed degree range around the local X axis.
- Allow the parent and child to rotate unrestricted around the local X axis of the constraint.
- Limit
-
When Twist is set to Limited, the Left and Right values are absolute degrees for each edge of the limit. (The visualization
of these limits in the viewports can help you to adjust them as desired.)
- Bounce
-
When Twist is set to Limited, the amount that the objects rebound off the limits when hit. Each limit may specify a unique
value. A value of 0.0 indicates no bounce, while a value of 1.0 is full bounce.
- Spring
-
When Twist is set to Limited, the strength of the spring that pulls the objects back to the limit if either limit is exceeded.
Each limit can specify a unique value. Small values indicate a low spring force, while larger values will pull the objects
with increasing force back to the limit. A value of 0.0 is a special value indicating a hard limit, attempting to prevent
the objects from exceeding the swing limit.
- Damping
-
When Twist is set to Limited and either limit is exceeded, the amount of "mud" the objects will rotate through beyond the
limit. Each limit can specify a unique value.
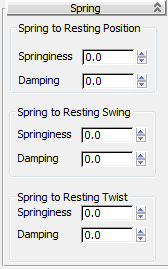
Spring
The Bounce and Spring settings for the constraint limits (see preceding) control how the constraint behaves past the edges
of the limits, while settings on Spring rollout are always applied. These settings are more like what you might call a "spring"
in the real world.
Spring to Resting Position
- Springiness
-
The amount of force that always pulls the translation of the parent and child objects back to their initial offset positions.
Small values indicate a low spring force, while larger values drive the objects with increasing force back to the initial
offset. A value of 0.0 indicates no spring force.
- Damping
-
If Springiness is non-zero, the amount of "mud" that restricts the spring force. This does not cause the objects themselves
to seem to move through mud, but rather lessens the effect of the spring.
Spring to Resting Swing
Similar to Spring To Resting Position, but pulls the objects back to their initial rotation offset around the local Y and
Z axes instead of their position offset.
Spring to Resting Twist
Similar to Spring To Resting Swing, but pulls the objects back to their initial rotation offset around the local X axis.
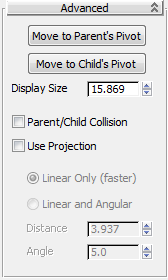
Advanced
- Move to Parent's Pivot
-
Sets the position of the constraint at the pivot of the parent object. This option is useful for constraints where the child object should rotate around the pivot of the parent, such as
a wrecking ball constrained to the tip of a crane.
- Move to Child's Pivot
-
Adjust the position of the constraint to be located at the pivot of the child object. This option is useful for constraints between two bones, for example.
- Display Size
-
The size to draw the constraint helper in the viewports. This property has no effect on simulation; it is just so that you
can make your constraints big enough not to be hidden inside the objects they constrain but not too much larger.
- Parent/Child Collision
-
When off (the default), the parent and child rigid bodies connected by a constraint cannot collide with one another. This
allows, for example, rigid bodies for a thigh and leg to overlap at the knee without problem. Turn on this option to allow
the two rigid bodies to react to each other as well as others.
- Use Projection
-
When on and the parent and child objects violate the limits of the constraint, fixes the situation by forcing them to the
limit.
Joint projection is something of a "blunt instrument." It simply moves one actor, disregarding any collisions that might otherwise
intervene. This can lead to penetration of collision geometries, so it is recommended that you avoid using joint projection
unless there are real problems in terms of joint violation, and then use it judiciously.
After turning on Use Projection, choose a projection method and set the corresponding value(s):
- Projects linear distances only. Set the Distance value.
- Performs both linear and angular projection. Set the Distance and Angle values.
- Distance
-
The minimum distance for the constraint violation to exceed for projection to take effect. Errors below this distance will
not use projection. Setting this value too low can introduce unwanted oscillations into the simulation.
- Angle
-
The minimum angle (in degrees) that the constraint violation must exceed for projection to take effect. Errors below this
angle will not use projection.