Command entry:
Video Post toolbar


(Add Image Filter Event)
Choose Lens Effects Focus from Filter Plug-In list.
Setup
The Lens Effects Focus dialog lets you blur objects based on their distance from the camera. Focus uses the Z-Buffer information
from the scene to create its blurring effects. You can use Focus to create effects such as foreground elements in focus and
background elements out of focus.
Like Flare, Glow, and Highlight, you can load and save your focus settings for future use. Focus settings are saved to LZO file (.lzo).
Procedures
To save your focus settings, do one of the following:
You can save all of your lens focus settings to a file, so you can reload them any time. Lens Effects Focus settings are saved
as LZO files.
- Click the Reset button.
This resets Lens Effects Focus to its default settings.
- Click the Load button.
This displays a Windows-standard file open dialog from which you can select the settings file you want to load.
- Click the Save button.
This displays a Windows-standard Save As dialog in which you specify a directory and filename.
Interface
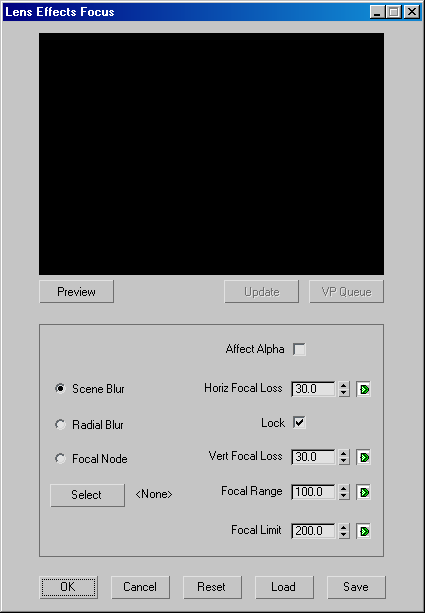
The Lens Effects Focus dialog contains a preview window, and an area below to control the parameters of Focus.
Preview group
- Preview window
-
Lets you quickly preview the Focus effect.
- Preview
-
Displays a generic scene to which you can quickly set up a Focus effect. Appears light green when selected.
- VP Queue
-
Lets you preview the scene in the Video Post queue. Preview must be selected for the VP Queue function to work.
Focus Control group
The settings on the left side of the panel let you select a method for blurring your scene. The settings on the right side
of the dialog let you determine how much blurring is applied to the scene.
- Scene Blur
-
Applies the blurring effect to the entire scene, not just a portion of it.
- Radial Blur
-
Applies the blurring effect to the entire scene in a radial fashion, starting at the center of the frame. This is useful for
emphasizing fish-eye lens effects and effects where the edges of the frame are blurred. This type of Focus depends on the
Focal Range and Limit settings.
- Focal Node
-
Lets you select a specific object in the scene as the focal point for blurring. The selected objects remains in focus, while
objects outside of the set Focal Limit are blurred.
- Select
-
Displays the Select Focal Object dialog so you can select a single 3ds Max object to use as the focal object. The object you select can be animated over time, which results in animated follow focus
effects. You can also choose your camera target as the focal object so its depth in the scene determines the focus.
- Affect Alpha
-
When this option is selected, the blur effect is also applied to the Alpha channel of the image when you render to a 32-bit
format. Select this option to composite the blurred image over another.
- Horiz. Focal Loss
-
Specifies the amount of blur applied to the image in the horizontal (X-axis) direction. Values range from 0 to 100% focal
loss. This parameter can be animated.
- Lock
-
Locks the horizontal and vertical loss settings together. When selected, the vertical focal loss is automatically updated
to match your changes to the horizontal loss.
- Vert. Focal Loss
-
Specifies the amount of blur applied to the image in the vertical (Y-axis) direction. Values range from 0 to 100% focal loss.
This parameter can be animated.
- Focal Range
-
Specifies how far away from the center of the image (Radial Blur) or from the camera (Focal Object) the blur effect begins.
Increasing values move the radius of the effect farther away from the camera or the center of the image. This parameter can
be animated.
- Focal Limit
-
Specifies the distance from the center of the image (Radial Blur) or the distance from the camera (Focal Object) at which
the blur effect is at full strength. Setting a high Focal Limit with a low Focal Range, produces a gradual increase in the
amount of blur in the scene, while setting Focal Limit and Range close together produces a rapid blur effect over a short
distance. This parameter can be animated.
NoteDo not set Focal Range and Focal Limit to the same value. This produces an abrupt change from a blur to a sharp focus, producing
an undesirable visual effect.
WarningWhen you animate Lens Effects parameters, this creates pointers into the actual scene, so Lens Effects animation is lost if
you save the Video Post queue in a
VPX file. To preserve the animation, save the Video Post data, including Lens Effects animation, in the MAX file.
Button group
- Reset
-
Resets Lens Effects Flare to its default settings.
- Load
-
Displays a Windows-standard file open dialog from which you can select the settings file you want to load.
- Save
-
Displays a Windows-standard Save As dialog in which you specify a directory and filename. Lens Effects Focus settings are
saved as LZO files.