Command entry:
Select a Particle Flow source icon.


Modify panel
Setup rollout
Click Particle View (or press
6).
Command entry: 
Create panel

(Geometry)
Particle Systems
Object Type rollout
Click PF Source.
Setup rollout
Click Particle View (or press
6).
The menu bar provides access to a number of important Particle View functions.
Procedures
To render only particles in specific events:
- In Particle View, highlight the events containing the particles you want to render.
- Choose Select menu Assign Selection To Viewport.
- Render using the Area To Render Selected option.
To bring a Particle Flow setup into a different scene:
- In Particle View, highlight the events containing the particles you want to merge with a different scene. For example, to
designate only a particular flow, you might highlight its global event, and then choose Select menu Select Downstreams.
- Choose Select menu Save Selected, and use the file dialog to specify a file to save.
NoteAny scene objects on which Particle Flow depends are also saved. For instance, if a
Shape Instance operator in one of the highlighted events refers to a certain object, that object is saved along with the designated events.
- Open or create the scene with which the saved Particle Flow setup will be combined, and then use Merge to merge the file from step 2.
Interface
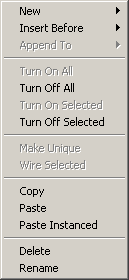
Edit menu
Each of the first three commands on this menu presents a submenu containing all actions. Choose the command, and then choose
an action from the submenu.
NoteThe Undo and Redo commands are available from the main 3ds Max Edit menu, and their default keyboard shortcuts are the same: Ctrl+Z and Ctrl+Y, respectively.
- New
-
Adds a new event containing the chosen action to the event display.
- Insert Before
-
Inserts the chosen item above each highlighted action. Available only when one or more actions are highlighted.
- Append To
-
Inserts the chosen item at then end of each highlighted event. Available only when one or more events are highlighted.
- Turn On All
-
Turns on all actions and events.
- Turn Off All
-
Turns off all actions and events.
- Turn On Selected
-
Turns on any highlighted, turned-off actions or events. Available only when one or more highlighted items are turned off.
- Turn Off Selected
-
Turns off any highlighted, turned-on actions or events. Available only when one or more highlighted items are turned on.
- Make Unique
-
Converts an instanced action to a copy that's unique to its event. Available only when one or more instanced actions are highlighted.
- Wire Selected
-
Wires one or more highlighted tests to a highlighted event, or one or more highlighted global events to a highlighted birth
event. Available only when one or more tests and a single event are highlighted, or when one or more global events and a single
birth event are highlighted.
- Copy
-
Copies any highlighted events, actions, and wires to the paste buffer. Keyboard equivalent: Ctrl+C.
- Paste
-
Pastes the contents of the paste buffer to the event display. Keyboard equivalent: Ctrl+V.
The result of copying and then pasting multiple items depends on what you copied:
- If you copied multiple actions, pasting adds them all to a single new event, even if they originally came from different events.
- Copying multiple events or wires pastes them exactly as copied.
- If you copied a combination of actions and events, pasting creates a new event for each group of actions from a single event.
For example, if you highlight event A, some actions from event B, and some actions from event C, copying and then pasting
would add three events: a copy of event A, a second event with the actions from event B, and a third event with the actions
from event C.
- Paste Instanced
-
Pastes the contents of the paste buffer to the event display, making instances of any pasted actions and their originals.
For the results of pasting multiple copied items, see Paste, above.
- Delete
-
Deletes any highlighted items. Keyboard equivalent: Delete.
Deleting an event also deletes all of its actions.
- Rename
-
Lets you enter a new name for any single highlighted item in the event display. Available only when one action or test is
highlighted
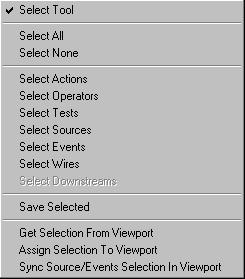
Select menu
By default, the Select tool is active when Particle View is open, as indicated by the arrow-shaped mouse cursor. You can use
this tool to highlight, move, and copy events, actions, tools, and wires. You can also use the commands on this menu to highlight
all elements, no elements, or elements by category.
NoteWhen you render using any of the Selected options,
3ds Max renders only events that are selected in the viewports. You can use the last three commands on this menu to manage and coordinate
selection of events and flows between Particle View and the viewports. This also applies to use of the Views menu
Shade Selected command.
- Select Tool
-
Activates the Select tool. Choose this to return to the Select tool after using interactive tools for panning and zooming
the event display. Alternatively, simply right-click anywhere in the event display to activate the Select tool.
- Select All
-
Highlights all items in the event display.
- Select None
-
Deselects all items in the event display. Alternatively, click an empty area in the event display.
- Select Actions
-
Highlights all operators and tests in the event display.
- Select Operators
-
Highlights all operators in the event display.
- Select Tests
-
Highlights all tests in the event display.
- Select Events
-
Highlights all events in the event display.
- Select Wires
-
Highlights all wires in the event display.
- Select Downstreams
-
Highlights all events after currently highlighted events. Available only when one or more events are highlighted.
- Save Selected
-
Saves only highlighted elements in the event display to a MAX file. You can then open this file, or combine it with an existing
scene with Application menu Import Merge.
NoteThe Particle View
Save Selected command saves all items selected in Particle View
and in the scene. So if a PF Source icon is selected in the scene, then this command will save its global event as well as any
birth events associated with it. if you want to save only parts of a Particle Flow setup, first unselect everything in the
scene.
Also, if an action references an object (for example, a Shape Instance operator uses a geometry object), and the action or its parent event is highlighted when you use Save Selected, then the reference
object is saved as well.
- Get Selection From Viewport
-
Highlights global events whose source icons are selected in the viewports.
- Assign Selection To Viewport
-
Transfers an event selection to the viewports. Use this to render only particles in specific events. First, in Particle View,
highlight the events to render. Next, choose this command, and finally, render using the Area To Render Selected option.
- Sync Source/Events Selection In Viewport
-
Selects all events of any source icons selected in the viewports. You can then propagate this selection to Particle View with
the Get Selection From Viewport command.
Use this function to render a specific particle flow using one of the Render Selected options.
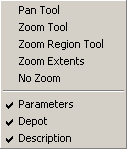
Display menu
The first five commands on this menu are also available as icons, in the Display tools section on the right side of the bottom
border of the Particle View dialog. Each command's Display tools icon is shown below.
-
 Pan Tool
-
Drag in the event display to move the view. The mouse cursor changes to a hand icon. You can also pan the view by dragging
with the middle mouse button or wheel button held down.
To exit this mode, right-click in the event view or choose the command again.
-
 Zoom Tool
-
Drag in the event display to zoom the view. The mouse cursor changes to a magnifying-glass icon. Drag upward to zoom in, or
downward to zoom out.
To exit this mode, right-click in the event view or choose the command again.
-
 Zoom Region Tool
-
Drag in the event display to define a zoom rectangle. The mouse cursor changes to the image of a magnifying glass inside a
zoom region. When you release the mouse button, the display zooms to show only the area defined by the region.
To exit this mode, right-click in the event view or choose the command again.
-
 Zoom Extents
-
Sets the zoom to show the entire particle diagram in the event display.
-
 No Zoom
-
Sets the zoom to the default level. This is the level displayed when you first open Particle View in a given session.
- Parameters
-
Toggles display of the parameters panel, on the right side of the Particle View dialog. Default=on.
- Depot
-
Toggles display of the depot, below the Particle View dialog. Default=on.
- Description
-
Toggles the Description panel, to the right of the depot. Default=on.
The Description panel displays a brief description of any action highlighted in the depot.
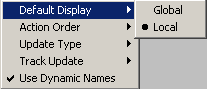
Options menu
This menu contains a number of options useful in analyzing and debugging particle systems.
- Default Display
-
Determines whether the Display operator is applied locally or globally to new particle systems and events. Default=Local.
- When you create a new particle system, Particle Flow adds a single Display operator to the global event. It does not add a
Display operator to each new event.
- Particle Flow adds a Display operator to each new event. This lets you easily distinguish particles in different events in
the viewports.
- Action Order
-
For predictable results, don't use similar actions in the global and local events. However, if comparable actions do exist
in both the global event and other events, Particle Flow applies them to the system in the order specified here. Typically,
the effect that's applied last is the one that's visible in the particle system. Default=Locals First.
For example, consider a situation in which the global event contains a Shape operator set to Cube, and the other events in
the same system contain Shape operators set to Tetra or Sphere. By default, Particle Flow applies the global Shape operator
last at each integration step, overwriting any local shapes, so all particles would be cubes. But if you set Action Order
to Globals First, the local shapes are applied last, and particles appear as tetrahedrons or spheres, depending on which event
they're in.
- At each integration step, Particle Flow first applies actions in the global event, and then actions in the other (local) events.
Typically, the result is that actions in the local events override comparable actions in the global event.
- At each integration step, Particle Flow first applies actions in the local events, and then actions in the global event. Typically,
the result is that actions in the global event override comparable actions in the local events.
- Update Type
-
This setting determines how Particle Flow updates the system when you change a parameter during playback. Because the state
of the particle system at any given frame can depend on events in previous frames, using the Complete option can provide a
more accurate depiction of the result of the change, at a cost in speed; it takes more time to recalculate the entire system
starting at the first frame. Default=Complete.
- When you change a setting during playback, Particle Flow updates the entire system, starting at the first frame.
- When you change a setting during playback, Particle Flow updates the system starting at the current frame.
- Track Update
-
Provides options for visualizing the particle system status in Particle View.
- Adds a tab above each event that shows the number of particles in the event. The global event's count shows the total number
of particles in the particle system.
Use this, in addition to the ability to display particles differently in each event, to trace particle progress through the
system.
- Highlights each action in color whenever Particle Flow evaluates it.
The highlighting is very fast, but this option can add significant computational overhead to the particle system, with the
result that real-time playback might skip a greater number of frames. To see all frames, turn off Time Configuration Real Time.
- Use Dynamic Names
-
When on, action names in events are followed by their most important setting or settings, in parentheses. When off, only the
names appear. Default=on.
Tools menu
The Tools menu in Particle View provides several utilities for managing Particle Flow.
- Synchronize Layers
-
Synchronizes Particle Flow geometry with source objects. Use this option after you move PF Source objects to different layers.
The Synchronize Layers option does not change objects' layers, but rather synchronizes Particle Flow geometry with source
objects so they will function correctly.
- particleFlowUtility.synchronizeLayers()
- Repair Cache System
-
Repairs the cache system if it stops working.
If a Cache operator ends up in a different event from the one it was originally placed in, whether through direct manipulation
or from being merged into another Particle Flow system, the operator might stop functioning because of ID conflicts. In such
cases, use this function to restore the cache to working condition.
- particleFlow.repairCacheSystem(bool doReport)
- Preset Manager
-
Opens the Particle Flow Preset Manager dialog (see following).
- particleFlow.presetManager()
Particle Flow Preset Manager dialog
You can use the Preset Manager to save a scene as a preset for later retrieval via Preset Flow in Particle View. Keep in mind that all objects in the scene are saved as a part of the preset, regardless of whether they
are part of the Particle Flow. This ensures that any Particle Flow reference objects are included in the preset.
To save a new preset, enter a Preset Name and Preset Description, and then click Save Scene As Preset Flow.
- Preset Name
-
Enter an identifying name for the new preset.
- Preset Description
-
Enter a description for the new preset.
- Presets
-
A list of the current presets in the system. Click a preset to see its description.
- Save Scene as Preset Flow
-
Saves the current scene as a preset. The preset is saved as a pair of files: preset_name.txt with the description of the preset; and preset_name.max file with the scene itself. Both files are saved in \plugcfg\Particle Flow Presets\ within the install folder. Since presets are saved as files, it is possible to exchange or modify the presets by manipulating
the files.