 Command entry:
 Material Editor
  Standard material Maps rollout Diffuse button (or Color button for the Strauss shader)
Command entry: Material Editor Arch & Design material General Maps rollout Main Maps group Diffuse Color button
Standard material Maps rollout Diffuse button (or Color button for the Strauss shader)
Command entry: Material Editor Arch & Design material General Maps rollout Main Maps group Diffuse Color button
You can use a bitmap file or procedural map to assign a pattern or texture to a material's diffuse color. The colors of the map replace the material's diffuse color component. This is the most common kind of map usage.
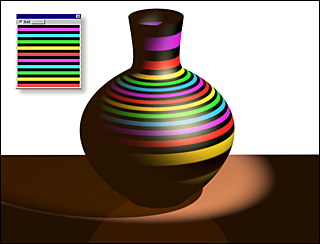
Applying a texture with a diffuse color map
Using a map for the diffuse color is like painting an image on the surface of the object. For example, if you want a brick wall in your scene, you can use a bitmap with an image of bricks as the diffuse map in the material applied to the wall object.
 lock off and using a different map for each component, you can obtain interesting blend effects. But in general, the purpose
of the diffuse map is to simulate a single surface that is more complex than a basic material, and for this purpose you can
leave the lock on.
lock off and using a different map for each component, you can obtain interesting blend effects. But in general, the purpose
of the diffuse map is to simulate a single surface that is more complex than a basic material, and for this purpose you can
leave the lock on.
3ds Max opens the Material/Map Browser.
(If you choose Bitmap as the map type, 3ds Max opens a file dialog that lets you choose the image file.)
Alternatively, you can use the Slate Material Editor to wire a map node to the Diffuse Color component.


