Editable Mesh (Vertex)


Command entry:Select an editable mesh object. Modify panel Selection rollout Vertex
Command entry:Select an editable mesh object. Modify panel Modifier Stack display Expand Editable Mesh. Vertex
Command entry:Select an editable mesh object. Quad menu Tools 1 quadrant Vertex

Vertices are points in space: they define the structure of faces. When vertices are moved or edited, the faces they form are affected as well. Vertices can also exist independently; such isolated vertices can be used to construct faces but are otherwise invisible when rendering.

At the Editable Mesh (Vertex) sub-object level, you can select single and multiple vertices and move them using standard methods.

Procedures

To weld mesh vertices:

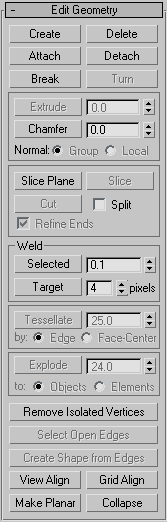
You can use either of two methods to combine several vertices into one, also known as welding. If the vertices are very close together, use the Weld function. You can also use Weld to combine a number of vertices to the average position of all of them.

Alternatively, to combine two vertices that are far apart, resulting in a single vertex that's in the same position as one of them, use Target Weld.

TipWelding vertices is considerably easier with poly objects. See this procedure: To weld polygon vertices:
  1. To use Weld:
    1. On the Selection rollout, turn on Ignore Backfacing, if necessary. This ensures that you're welding only vertices you can see.
    2. Select the vertices to weld.
    3. If the vertices are very close together, go to the Edit Geometry rollout Weld group and click Selected. If that doesn't work (you get a No vertices within weld threshold. message), proceed to the next step.
    4. Increase the numeric value to the right of the Selected button.

      This is the threshold value; the minimum distance that vertices can be apart from each other to be welded.

    5. Click Selected again.

      At this point, one of three things happens: None, some, or all of the vertices are welded. If the latter, you're done. If either of the others occurs, proceed to the next step.

    6. Continue increasing the threshold value and clicking Selected until all of the vertices are welded.
  2. To use Target Weld:
    1. On the Selection rollout, turn on Ignore Backfacing, if necessary. This ensures that you're welding only vertices you can see.
    2. Find two vertices you want to weld, and determine the ultimate location of the resulting vertex. You can weld any two vertices, but for best results the two should be contiguous; that is, they should be connected by a single edge.

      For this example, we'll call the vertices A and B, and the resulting vertex will be at vertex B's location.

    3. Click the Target button.

      The button stays highlighted, to indicate that you're now in Target Weld mode.

    4. Drag vertex A to Vertex B.

      While you're dragging, the mouse cursor image is a four-headed, +-shaped arrow. When over an eligible target vertex, the cursor changes to a crosshairs.

      TipIf you have trouble dragging in the proper direction, open the Axis Constraints toolbar and click the XY button.
    5. Release the mouse button.

      The pair is welded. The resulting vertex remains at vertex B's position, and you exit Target Weld mode.

      TipIf you have trouble combining the two vertices, try increasing the Pixels value with the spinner to the right of the Target button.

      You remain in Target Weld mode, and can continue to weld pairs of vertices.

    6. Exit Target mode by right-clicking in the active viewport or clicking the Target button again.

To select vertices by color:

  1. On the Surface Properties rollout, click the Existing Color swatch, and specify the color of vertex you want in the Color Selector.
  2. Specify ranges in the RGB Range spinners. This lets you select vertices that are close to the specified color, but don't match exactly.
  3. Click the Select button.

    All vertices matching the color, or within the RGB range, are selected.

    You can add to the selection by holding Ctrl as you click the Select button, and you can subtract from the selection by holding the Alt key.

    TipYou can select all vertices of the same color by first selecting the vertex you want matched, dragging a copy of the Edit Color swatch to the Existing Color swatch, and then clicking the Select button. (If you want an exact match, be sure to set the RGB Range spinners to 0 first.)

Interface

Selection rollout

For information on the Selection rollout settings, see Selection Rollout (Editable Mesh).

Soft Selection rollout

Soft Selection controls affect the action of sub-object Move, Rotate, and Scale functions. When these are on, 3ds Max applies a spline curve deformation to unselected vertices surrounding the transformed selected sub-object. This provides a magnet-like effect with a sphere of influence around the transformation.

For more information, see Soft Selection Rollout.

Edit Geometry rollout

See Edit Geometry Rollout (Mesh) for detailed descriptions of these controls.

Surface Properties rollout

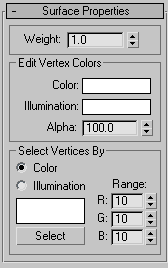
These controls let you set the weight and color for vertices.

Weight

Displays and lets you change vertex weights for NURMS operations (see MeshSmooth Modifier).

Edit Vertex Colors group

Use these controls to assign the color, illumination color (shading), and alpha (transparency) values of selected vertices.

Color

Click the color swatch to change the color of selected vertices.

Illumination

Click the color swatch to change the illumination color of selected vertices. This lets you change the illumination of a vertex without changing the vertex's color.

Alpha

Lets you assign an alpha (transparency) value to selected vertices.

The spinner value is a percentage; zero is completely transparent and 100 is completely opaque.

Select Vertices By group

Color/Illumination

These radio buttons let you choose to select vertices by vertex color value or vertex illumination value. Set the desired options and then click Select.

Color Swatch

Displays the current color to match. Click to open the Color Selector, where you can specify a different color.

Select

Depending on which radio button is selected, selects all vertices whose vertex color or illumination values either match the color swatch, or are within the range specified by the RGB spinners.

Range

Specifies a range for the color match. All three RGB values in the vertex color or illumination color must either match the color specified by the Color swatch in Select By Vertex Color, or be within a range determined by adding and subtracting the Range values from the displayed color. Default=10.

For example, if you've chosen Color and set the color swatch to medium gray (R=G=B=128), and are using the default Range values of 10,10,10, then clicking the Select button selects only vertices set to RGB color values between 118,118,118 and 138,138,138.

See Also