Command entry:
Views menu

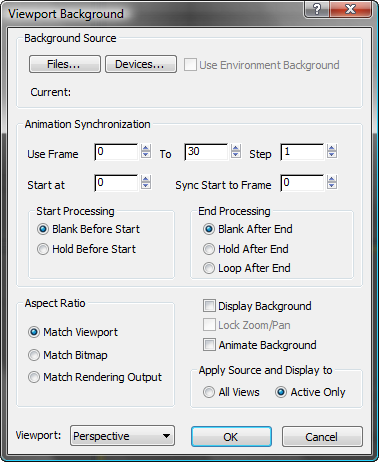
Viewport Background
Viewport Background
Viewport Background dialog
Command entry:Click or right-click the Shading viewport label.
Shading viewport label menu Viewport Background
Viewport Background
Viewport Background dialog
Command entry:Keyboard
Alt+B
The Viewport Background dialog controls display of an image or animation as the background for one or all viewports. You can
use this for modeling, for example, by placing front, top or side view sketches in the corresponding viewports. Or use Viewport
background to match 3D elements with digitized camera footage, or for rotoscoping.
You select the image or animation to display in the active viewport, set the frame synchronization between the animated image
file and the current scene, and turn the assigned image on and off. These changes do not affect the rendered scene.
To place an image in the background of the rendered scene, use the Environment And Effects dialog Environment panel, accessed from the Rendering menu.
NoteWhen safe frames are displayed in a viewport, and the Aspect Ratio options are set to either Match Viewport or Match Rendering
Output, the assigned viewport background image is confined to the Live area of the safe frames and will correctly match the
rendered background bitmap.
TipIf you are using a viewport driver with hardware acceleration (OpenGL or Direct3D), the viewport background might not appear.
If this happens, choose Customize
Preferences. In the
Viewports preferences, click Configure Driver. Then in the
Configure OpenGL dialog or the
Configure Direct3D dialog, go to the Background Texture Size group and turn on Match Bitmap Size As Closely As Possible (
do not change the numeric setting). Click OK in both dialogs to accept your change.
Procedures
To assign an image to one or all viewports:
- Activate the viewport that is to display the background image.
- Choose Views menu Viewport Background Viewport Background or press Alt+B.
This opens the Viewport Background dialog.
- In the Background Source group, click the Files button.
This opens the Select Background Image dialog.
- Use the dialog to open the image or animation to use.
- To display the image in all viewports, choose All Views in the Apply Source And Display To group.
- Click OK.
The image is displayed in a single viewport or all viewports.
To update the image or map in the viewport:
Because of the time it takes to render the image or map in the viewport, the map is not automatically updated when you alter
the bitmap or assign a new bitmap.
To display the environment map in a viewport:
- In the Environment dialog, assign an environment map. (See the procedure “To choose an environment map.”)
- In the Environment dialog Background group, be sure Use Map is turned on (the default).
- Activate the viewport where you want the map displayed.
- Choose Views menu Viewport Background Viewport Background.
- In the Viewport Background dialog Background Source group, turn on Use Environment Background.
- Click OK.
The map is displayed in the viewport.
To display an animated background:
- Assign an animation file (AVI, MOV, or IFL file) as the viewport background.
- Turn on Animate Background.
- Choose Customize Preferences. On the Viewports panel, turn on Update Background While Playing.
Now the background plays when you click Play, or when you drag the time slider.
TipIf you follow these steps and the background still doesn't appear to animate, open the
Time Configuration dialog and in the Playback group, turn off Real Time.
To use the environment map with animation controls:
This procedure is useful if you’ve assigned an animated environment map and want access to the animation controls on the Viewport
Background dialog.
- In the Viewport Background dialog Background Source group, turn off Use Environment Background.
- In the same group, click File.
- Choose the same map you’re using as the environment map.
- Set parameters in the Animation Synchronization group.
- Click OK.
The environment map appears in the viewport. The image is renderable.
To match the viewport background with the rendered background:
- Activate the viewport to render.
- Click or right-click the General viewport label (“[ + ]”). On the General viewport label menu. choose Show Safe Frame.
This turns on Safe Frames in the viewport.
NoteYou can also use Views menu
Configure
Safe Frame tab. In the Application group, turn on Show Safe Frames In Active View.
- In the Material Editor, create a material that contains the bitmap for your rendered background.
- At the bitmap level of the Material Editor, on the Coordinates rollout, choose Environ.
The Mapping control is automatically set to Screen. This is the only mapping type that works for this purpose.
- On the main menu, choose Rendering Environment.
- Drag the map from the Material Editor Maps rollout to the Environment Map button on the Environment dialog. Click OK on the Instance (Copy) Map dialog.
- In the Viewport Background dialog Background Source group, click Files to assign the same bitmap.
- In the Aspect Ratio group, turn on either Match Viewport or Match Rendering Output. Click OK.
- Render the viewport.
The background displayed in the rendered scene should exactly match the background displayed in the Live area of the safe
frames.
NoteWhen you use the Match Bitmap option, the bitmap reverts to its original aspect ratio and does not match the rendered scene,
unless you're rendering to the same aspect ratio.
To remove a background image:
- Activate the viewport in which the background image is visible.
- On the Views menu, choose Viewport Background Viewport Background.
Notice that the name and path of the background file is displayed in the Current field in the Background Source group
- In the Background Source group, click Devices.
- On the Select Image Input Device dialog, choose No I/O Handlers from the drop-down list, then click OK.
- On the Bitmap Manager Error dialog, click OK.
The current field no longer displays the background file name. Instead No I/O Handler is listed in the Current field.
- Click OK to close the Viewport Background dialog.
Next time you open up the Viewport Background dialog, no file name will be displayed in the Current field.
TipThis technique will work only on systems that don't have any other Image Input Devices installed.
Interface
Background Source group
Options let you select the background image, either from a bitmap image file, a video file, or from a device such as a video recorder.
- Files
-
- Devices
-
Displays the Select Image Input Device dialog. This lets you use a background from a digital device. (No device is supported
by the default 3ds Max installation.)
- Use Environment Background
-
Lets you display in the viewports the map you've assigned as your environment background. If no environment map has been assigned
in the Environment dialog, or Use Map in that dialog is off, then the Use Environment Background check box is not available.
Animation Synchronization group
Controls how sequences of images (for example, from IFL, AVI, or MOV files) are synchronized to the viewport for rotoscoping.
- Use Frame
-
The first field sets the first frame of the incoming sequence that you want to use, and the second field sets the last one.
- Step
-
Sets the interval between the frames you want to use. For example, if this spinner is set to 7, 3ds Max uses every seventh frame.
- Start At
-
Specifies the frame number at which you want the first input frame to appear. What happens in the viewport before the start
frame depends on the option you choose for "Start Processing," below.
- Sync Start To Frame
-
Determines which frame from your incoming sequence is displayed at the Start At frame. For example, you could have a 30-frame
IFL sequence that starts in your scene at frame 10, but you could use the 5th frame from the IFL on frame 10 by setting Sync
Start to 5.
Start Processing group
Determines what happens in the viewport background before the start frame.
- Blank Before Start
-
Makes the viewport background blank before the start frame.
- Hold Before Start
-
Specifies that the viewport background will contain the start frame.
End Processing group
Determines what happens in the viewport background after the last input frame.
- Blank After End
-
Makes the viewport background blank after the last input frame.
- Hold After End
-
Specifies that the viewport background will contain the last input frame until the last frame in the animation.
- Loop After End
-
Specifies that the viewport background will loop from the end frame back to the start frame, ad infinitum.
Aspect Ratio group
Controls the proportions of the viewport background by matching it to the bitmap, rendering output, or to the viewport itself.
- Match Viewport
-
Changes the aspect ratio of the image to match the aspect ratio of the viewport.
- Match Bitmap
-
Locks the aspect ratio of the image to the native aspect ratio of the bitmap.
- Match Rendering Output
-
Changes the aspect ratio of the image to match the aspect ratio of the currently chosen rendering output device.
NoteWhen the Match Bitmap or Match Rendering Output option is chosen, 3ds Max centers the image and clears the edges of the viewport to the background color.
Display Background
Turns on display of the background image or animation in the viewport.
Lock Zoom/Pan
Locks the background to the geometry during zoom and pan operations in orthographic or user viewports. When you Zoom or Pan
the viewport, the background zooms and pans along with it. When Lock Zoom/Pan is turned off, the background stays where it
is, and the geometry moves independently of it. Use Match Bitmap or Match Rendering Output to enable Lock Zoom/Pan. This control
is disabled if you choose Match Viewport.
Keyboard shortcut: Ctrl+Alt+B
WarningIf you zoom in too far, you can exceed the limit of virtual memory, and crash 3ds Max. When you perform a zoom that requires more than 16 megabytes of virtual memory, an alert asks if you want to display the
background during the zoom. Choose No to perform the zoom and turn off the background. Choose Yes to zoom with the background
image. Your machine might run out of memory as a result.
Animate Background
Turns on animation of the background. Shows the appropriate frame of the background video in the scene.
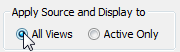
Apply Source And Display To group
- All Views
-
Assigns the background image to all viewports.
- Active Only
-
Assigns the background image to only the active viewport.
Viewport
The name of the currently active viewport appears in a list to the left of the OK and Cancel buttons. This reminds you which
viewport you're working with and lets you change the active viewport by selecting its name from the list.
NoteWhen you use different images for different viewports, the settings for each viewport are stored separately. Each time you
display the Viewport Background dialog, the settings of the currently active viewport are displayed. If you switch the viewport
using the list, the settings remain the same. This is useful for copying settings from one viewport to another.