Use Fire to produce animated fire, smoke, and explosion effects. Possible uses for Fire effects include campfires, torches, fireballs, clouds, and nebula.
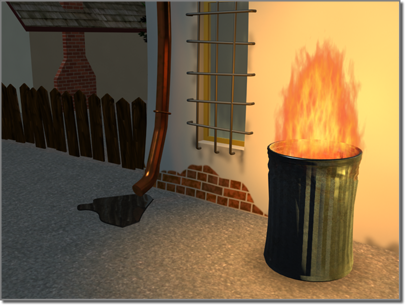
Scene using fire
You can add any number of fire effects to a scene. The order of effects is important because effects near the bottom of the list are layered in front of effects near the top of the list.
Each effect has its own parameters. When you select a fire effect in the Effects list, its parameters appear in the Environment dialog.
Fire renders only in Camera or Perspective views. Orthographic or User views don’t render Fire effects.
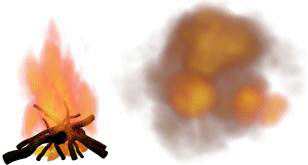
Sample fire effects
Example: To create a campfire:
 (Auto Key) and advance to the end of the animation.
The Fire effect doesn’t cast any light in the scene. If you want to simulate illumination from the fire effect, you must create lights as well.
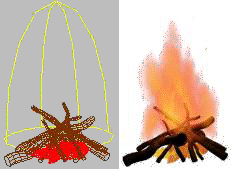
Example model with fire
You create a fire apparatus, or "gizmo," to position the effect in your scene and to define the maximum boundaries of the effect. The apparatus is a Helper object found in the Atmospheric Apparatus subcategory.
There are three kinds of apparatus: BoxGizmo, SphereGizmo, and CylGizmo.
You can move, rotate, and scale the apparatus, but you cannot apply modifiers.
Using non-uniform scale is a good way to change the shape of the apparatus for effects. (You will see a warning when you use this transform. Because you don't modify atmospheric apparatus, you can safely ignore the warning.)
You must assign an atmospheric apparatus to a fire effect before you can render the effect. Use buttons in the Gizmos area to manage the list of apparatus objects.
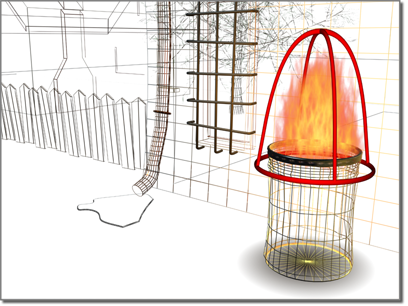
Gizmo for the fire in the scene shown at the beginning of this topic
Click to enter Pick mode and click an atmospheric apparatus in the scene. The apparatus displays the fire effect when you render. The name of the apparatus is added to the apparatus list.
Multiple apparatus objects can display the same fire effect. For example, torches on a wall can all use the same effect. Assign a different seed to each apparatus to vary the effect.
You can assign single apparatus to multiple fire effects. For example, one apparatus can display both a fireball and a tendril flame effect.
You can choose multiple gizmos. Click Pick Gizmo and press H. This opens the Pick Object dialog, which lets you choose multiple objects from the list.
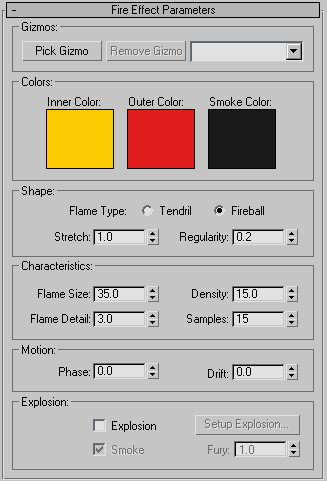
You can set three color properties for a fire effect using the color swatches under Colors. Click a color swatch to display 3ds MaxColor Selector.
Sets the color of the sparsest part of the effect. For a typical fire, this color represents the cooler, dissipating edge of the flame.
The fire effect is colored using a gradient between the inner and outer colors. The dense areas of the effect use the inner color and gradually blend to the outer color near the edges of the effect.
You control the shape, scale, and pattern of flames within the fire effect using controls under Shape.
Two options set the direction and general shape of flames.
Scales flames along the Z axis of the apparatus. Stretch works best with Tendril flames, but you can use it to give Fireballs an oval shape.
Values less than 1.0 compress flames, making them shorter and thicker.
Values greater than 1.0 stretch flames, making them long and skinny.
You can combine Stretch with non-uniform scaling of the apparatus. Use non-uniform scale to change the boundary of the effect and scale the shape of the flames.
Use the Stretch parameter to scale only the flames inside the apparatus. You can also use Stretch values to reverse the effect that scaling the apparatus had on the flames.
Effect of changing Stretch
Value=0.5, 1.0, 3.0
Non-uniform scaling of an apparatus
Stretch=0.5, 1.0, 3.0
Modifies how the flames fill the apparatus. Range=1.0 to 0.0.
A value of 1.0 completely fills the apparatus. The effect fades near the edges of the apparatus, but the overall shape is still very noticeable.
A value of 0.0 produces a very irregular effect that might occasionally reach the boundary of the apparatus, but usually gets trimmed back and is smaller.
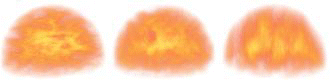
Effect of changing Regularity
Value=0.2, 0.5, 1.0
You set the size and appearance of flames using parameters under Characteristics. All of these parameters depend on the apparatus size and are interdependent on each other. Changing one parameter affects the behavior of the other three.
Sets the size of individual flames inside the apparatus. The size of the apparatus affects the flame size. A larger apparatus requires a larger flame size. Use a range from 15.0 to 30.0 for the best results.
Large values work best for Fireballs.
Small values work best for Tendrils.
If the flame size is very small, you might need to increase Samples to see individual flames.
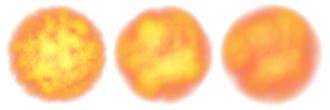
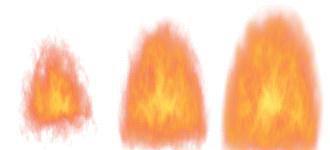
Effect of changing Flame Size
Value=15.0, 30.0, 50.0
Radius of apparatus=30.0
Controls the amount of color change and edge sharpness seen within each flame. Range=0.0 to 10.0.
Low values produce smooth, fuzzy flames and render faster.
High values produce patterned, sharp flames and render slower.
Use higher detail values for large flame sizes. If the detail value is greater than 4, you might need to increase Samples to capture the detail.
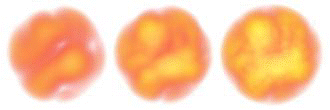
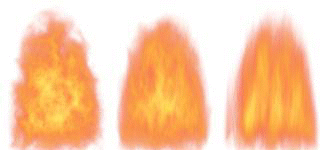
Effect of changing Flame Detail
Value=1.0, 2.0, 5.0
Sets the opacity and brightness of the fire effect. The size of the apparatus affects the density. A large apparatus with the same density as a small apparatus appears more opaque and brighter because of its larger size.
Low values make the effect less opaque and use more of the outer color. High values make the effect more opaque and brighten the effect by gradually replacing the inner color with white. The higher the value, the more white the center of the effect is.
If you turn on Explosion, Density animates from 0.0 at the start of the explosion to the set density value at the peak of the explosion.

Effect of changing Flame Density
Value=10, 60, 120
Sets the rate at which the effect is sampled. Higher values produce more accurate results but take longer to render.
You might consider raising the samples value under the following conditions:
Use the parameters in the Motion group to animate the churning and rise of flames.
Sets how flames are rendered along the Z axis of the fire apparatus. The value is the amount of rise in units.
Low values give a slow-burning, cool fire.
High values give a fast-burning, hot fire.
For the best fire effects, drift should be a multiple of the height of the fire apparatus.
You can also animate the location and size of the fire apparatus and most of the fire parameters. For example, a fire effect can animate color, size, and density.


