Command entry:
Create panel


(Geometry)
Compound Objects
Object Type rollout
Mesher
Command entry:Create menu
Compound
Mesher
The Mesher compound object converts procedural objects to mesh objects on a per-frame basis so that you can apply modifiers
such as Bend or UVW Map. It can be used with any type of object, but is designed primarily to work with particle systems. Mesher is also useful for low-overhead instancing of objects with complex modifier stacks.
Procedures
To use a Mesher object:
- Add and set up a particle system.
- On the Create panel, with (Geometry) active, choose Compound Objects from the drop-down list. On the Object Type rollout, turn on Mesher.
- Drag in a viewport to add the Mesher object. The size doesn't matter, but the orientation should be the same as that of the
particle system.
- Go to the
 Modify panel, click the Pick Object button, and then select the particle system.
The Mesher object becomes a clone of the particle system, and shows the particles as mesh objects in the viewports no matter
what the particle system's Viewport Display setting is.
- Apply a modifier to the Mesher object, and set its parameters. For example, you might apply a Bend modifier and set its Angle
parameter to 180.
-
 Play the animation.
Depending on the original particle system and its settings, as well as any modifiers applied to the Mesher object, you might
be getting unexpected results. This typically occurs because the bounding box for the modifier, as applied to the particle
system, is recalculated at each frame. For example, with a bent Super Spray particle system set to spread out over time, as
the particles stream away and separate, the bounding box becomes longer and thicker, potentially causing unexpected results.
To resolve this, you can use another object to specify a static bounding box.
- To use another object's bounding box to limit the modified Mesher object, first add and set up the object. Its position, orientation,
and size are all used in calculating the bounding box.
-
 Select the Mesher object, and go to the Mesher stack level.
- On the Parameters rollout, turn on Custom Bounding Box, click the Pick Bounding box button, and then select the bounding box
object.
The particle stream uses the new, static bounding box.
TipYou can use any object as a bounding box, so it is often fastest to use the particle system itself. Move to the frame where
the particle system is the size you want and pick it.
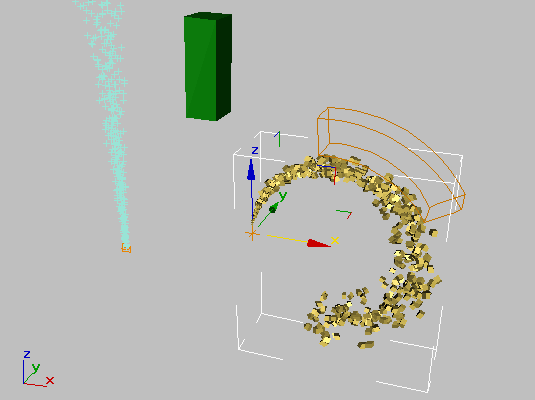
In the following illustration, you can see a Super Spray particle system (left) and a Mesher object derived from the Super
Spray (right). A Bend modifier is applied to the Mesher. In the center is a box object being used as a custom bounding box.
The bounding box applied to the Bend modifier is visible as an orange wireframe when the modifier is highlighted in the stack.
To modify the particles aspect of the Mesher, edit the original particle system.
To modify the custom bounding box, move, rotate, or scale the bounding box object, and then reapply it using the Mesher object.
At this point, both particle systems will render. The original particle system must exist in order to be able to be used by
the Mesher object, so if you want only the Mesher replica to render, hide the original system before rendering.
Interface
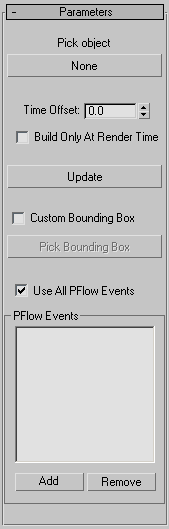
Parameters rollout
- Pick Object
-
Click this button and then select the object to be instanced by the Mesher object. After doing so, the name of the instanced
object appears on the button.
- Time Offset
-
The number of frames ahead of or behind the original particle system that the Mesher's particle system will run. Default=0.
- Build Only At Render Time
-
When on, the Mesher results do not appear in the viewports, but only when you render the scene. Default=off.
Use this option to reduce the amount of computation required for the viewport display.
- Update
-
After editing the original particle system settings or changing the Mesher Time Offset setting, click this button to see the
changes in the Mesher system.
- Custom Bounding Box
-
When on, Mesher replaces the dynamic bounding box derived from the particle system and modifier with a static bounding box
of the user's choice.
- Pick Bounding Box
-
To specify a custom bounding box object, click this button and then select the object.
The custom bounding box appears as an orange wireframe when the modifier is highlighted in the stack.
TipYou can use any object as a bounding box, so it is often fastest to use the particle system itself. Move to the frame where
the particle system is the size you want and pick it.
- (coordinate values)
-
Displays the coordinates of the opposite corners of the custom bounding box.
- Use All PFlow Events
-
When on, and you've applied Mesher to a Particle Flow system, Mesher automatically creates mesh objects for every event in the system.
To use only certain events, turn this off and specify the events to use with the PFlow Events group controls (see following).
PFlow Events group
When the Mesher object is applied to a Particle Flow system, use these controls to create meshes for specific events in the
system. Mesher does not create meshes for the remaining events.
- [list box]
-
Displays all Particle Flow events currently affected by Mesher.
- Add
-
Lets you specify Particle Flow events to be affected by Mesher.
If the Mesher object is applied to a Particle Flow system, when you click Add, an Add PF Events dialog opens listing all events
in the system. Highlight the events to add, and then click OK. The events now appear in the list.
- Remove
-
Deletes highlighted events from the list.