IPT and IAM are the native Autodesk Inventor® file formats for parts (IPT) and assemblies (IAM). You can import both file formats into 3ds Max.
NoteYou can import Inventor files as Body Objects. This allows geometry in the ACIS solids format to remain in that format while
in
3ds Max. To output this format, use the
SAT exporter.
The components of models that you import into 3ds Max retain their object naming as assigned in Autodesk Inventor and can be brought in either as editable meshes or Body Objects. Once imported, you can edit the model just as you would any other type of object that you construct. You
can apply modifiers, alter materials, add lighting and cameras, create animations, and so on.
Requirements and Limitations
Limitations of the Inventor Import feature are as follows:
- Camera animation paths are not converted to 3ds Max cameras so any animation you've set up in Inventor is lost during import.
- Any lighting from brightness and ambience settings created in the Inventor file are not imported. You will have to relight
the scene once the import is complete.
- A model that is set up with constraints to limit the movement of parts will lose those constraints upon import. You will need
to use inverse kinematics (IK) to restore the constraints.
- Dragging and dropping an Inventor file into 3ds Max uses the settings last set on the Inventor File Import dialog with the except for Mesh Resolution, which always resets to
0.
Material Handling
Materials and material assignments made to the original Inventor model are retained and imported along with the geometry.
Materials are imported as Architectural materials or if a single object has several materials assigned to it, they are imported as a Multi/Sub-Object material.
Procedures
To import an IAM or IPT file:
- Choose

 Application menu
  Import.
- Choose Autodesk Inventor in the Files Of Type list.
- Specify a file name to import.
- Set options in the Autodesk Inventor File Import dialog.
TipTo retain the solid-geometry format from Inventor, set the Import As option to Body Objects and follow the procedures in
SAT Files.
Interface
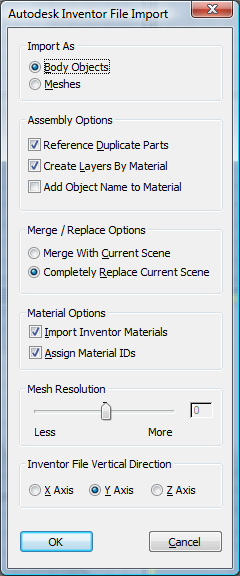
Import As group
- Import As
-
Choose the format in which the Inventor file is imported:
- Imports the Inventor file in the SAT Files also used when importing SAT files, which retains all ACIS solids information. To save these objects as solids, use the SAT
exporter.
- Imports the Inventor file as editable mesh objects. Use the Mesh Resolution setting (see following) to determine the fineness or coarseness of the imported mesh.
Assembly Options group
- Reference Duplicate Parts
-
When on, the importer treats duplicate parts in the Inventor file as references of each other.
- Create Layers by Material
-
Generates layer information based on incoming materials. All objects sharing a material will be placed on the same layer.
- Add Object Name to Material
-
When importing materials, uses the imported material name as part of the object name.
Merge/Replace Options group
- Merge/Replace Option
-
Choose how the importer treats current scene contents:
- Incoming geometry is merged with any existing geometry in the scene. This setting is useful for combining components from
separate files into a single scene.
- The imported data completely replaces any existing geometry in the current scene. If the current scene has not been saved,
you are given the opportunity to save the scene before proceeding with the import process. This is the default choice.
Material Options group
- Import Inventor Materials
-
When on, all Inventor materials and texture maps are translated and imported into the scene. When off, no materials are imported
with the model.
- Assign Material IDs
-
Lets you control whether material IDs are assigned to objects that are imported from Inventor. You can assign different materials
to different surfaces of the same object while working in Inventor. When these objects are imported to 3ds Max, material IDs are assigned to the faces of single objects to which multiple materials are applied.
For example, say you've created a single object that represents a knob with a threaded shaft and you've applied a black, plastic
material to the knob and a silver, metal material to the threaded shaft. If Assign Material IDs is on when you import the
model into 3ds Max, the imported faces that have the plastic material are assigned material ID #1 and the faces that have the metal material
are assigned material ID #2. If you choose to try different materials while working in 3ds Max, you can quickly make sub-object selections based on the material IDs or apply a Multi/Sub-Object material that contains materials that correspond to the IDs assigned to the faces.
Mesh Resolution group
- Mesh Resolution
-
When importing as meshes, this slider lets you determine the degree of refinement applied to the mesh objects. When set to
0 (zero), the geometry is imported as it appears in Autodesk Inventor. When set less than zero, the mesh is optimized with
fewer faces, thus reducing detail. If the mesh resolution is set higher than zero, the mesh is tessellated with more faces,
providing greater detail.
The Mesh Resolution slider is always set to 0 when you initiate an import.
NoteThe option to adjust mesh resolution is available only for models imported from Autodesk Inventor 10 or later.
Inventor File Vertical Direction group
This option determines the model's orientation upon import. You can choose which axis of the Inventor model is vertical.
- Inventor File Vertical Direction
-
Choose the axis option:
- The X axis of the model, as seen in Inventor, is rotated so it is vertical when the model is imported.
- The model is imported with the Y axis oriented as the vertical axis.
- The imported model is rotated so its Z axis is the vertical axis.
 Command entry:
 Application menu