 Command entry:
 Material Editor
  Arch & Design material Special Purpose Maps rollout Displacement button
A Displacement map displaces the geometry of surfaces. The effect is similar to using the Displace modifier. Unlike Bump maps, a Displacement map actually changes the geometry of the surface or patch tessellation. Displacement maps apply the gray scale of the map to generate the displacement. Lighter colors in the 2D image push outward more strongly than darker colors, resulting in a 3D displacement of the geometry.
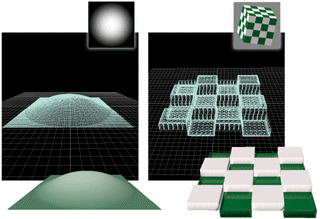
Using a Displacement map to alter a surface
The Displacement Amount value is measured as a percentage of the diagonal of the bounding box for the object that contains the patch or surface. This makes the displacement effect consistent for all surfaces in an object, and it also means that when you scale the object, the displacement is scaled with it.
You can apply a Displacement map directly to the following kinds of objects:
With other kinds of geometry such as primitives, extended primitives, compound objects, and so on, direct use of a Displacement map is unsupported. To make such objects’ surfaces displaceable, apply a Disp Approx (Displacement Approximation) modifier. Disp Approx works with any kind of object that you can convert to an editable mesh.
The effect of a Displacement map isn't visible in viewports unless you use a modifier:
Under certain circumstances, such as when the underlying mesh is fairly simple, using a Displacement map on an editable mesh can cause problems because of the way the underlying mesh is tessellated. (These problems don't occur when you apply displacement mapping to a NURBS surface.) When this happens, smoothing does not work properly and you can see the underlying wireframe mesh in the surface itself. To correct this problem, use these techniques:
To apply a Displacement map to a NURBS surface, editable mesh, or patch:
3ds Max opens the Material/Map Browser.
(If you choose Bitmap as the map type, 3ds Max opens a file dialog that lets you choose the image file.)
To apply a Displacement map to other kinds of objects:
 Select the object. Go to the
  Modify panel and choose Disp Approx from the Modifier drop-down list.
You can adjust the Disp Approx modifiers parameters, or you can leave them at their default settings.
Open the Material Editor.
3ds Max opens the Material/Map Browser.
(If you choose Bitmap as the map type, 3ds Max opens a file dialog that lets you choose the image file.)


