To create shape animation by selecting target shapes, you first create a series of similar objects deformed in different ways. The objects must have the same type of geometry (polygon mesh or NURBS surface) and the same topology (number and arrangement of points) as the base object that they're shape-animating. The easiest way to do this is to duplicate the base object that you want to shape-animate, and then deform each of the copies in a different way that will correspond to a target shape.
You then select the base object, or cluster on that object, and pick (select) the deformed objects (target shapes) in a specific order to create shape keys. If you select a cluster, only the portion of the base object that corresponds to this cluster creates the shape key — the rest of the object is ignored.
Selecting target shapes sets up a relation between the base object or cluster and the shape keys, allowing to you fine-tune the target shapes and have those adjustments appear on the base object or cluster. For example, if your client thinks that the nose is too long on one of the target shapes, all you have to do is change the nose for it and the nose on the base object is updated. However, you can choose to break the relationship between the base object/cluster and its target shapes (see Breaking the Link between the Base and Its Target Shapes).
When you're done selecting the target shapes to create shape keys, you can have the shape keys automatically instantiated in the animation mixer to create shape clips, or add them to the mixer later. See Applying Selected Shape Keys Automatically for more information.
If you don't want to use the mixer, you can apply each shape key to the base object at different frames (see Applying Shape Keys).
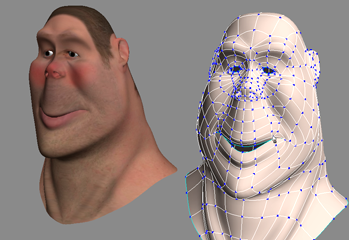
These images show the basic steps to take for selecting target shapes to create shape keys. See below for information on each step.
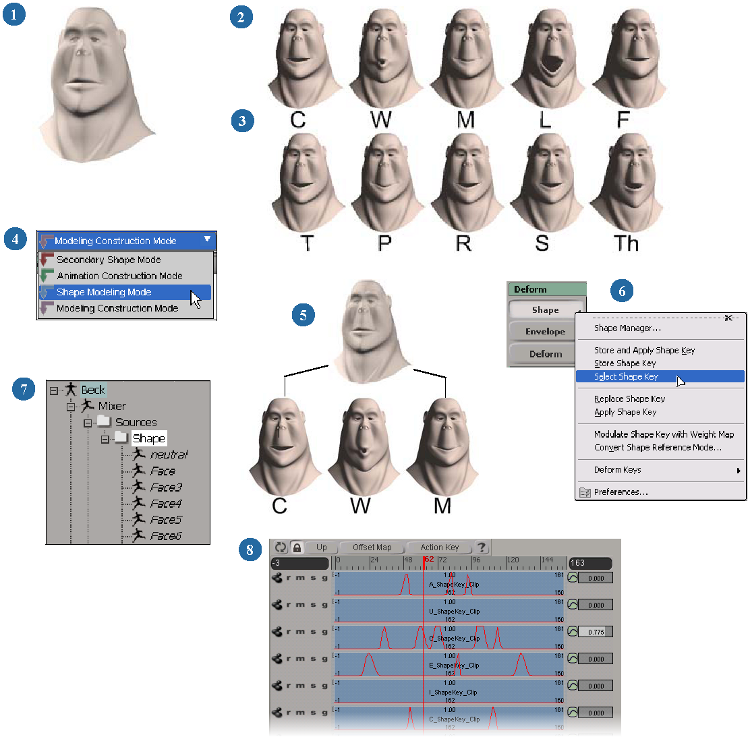
Create the base object in a neutral pose. This is the object to be deformed with the target shapes.
Duplicate this object as many times as the number of the target shapes you want to set. Move them out of the way of the camera.
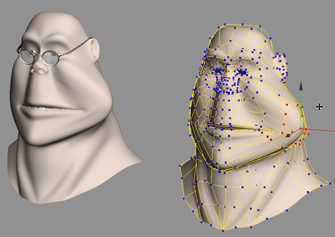
Deform the duplicates using any method of deformation (you can even animate the deformations). In this example, the mouth is deformed into different shapes on each of the duplicated heads to represent different phonemes for speech.
Select Shape Modeling from the Construction Mode list on the main menu at the top of the interface.
Select the base object or cluster that you want to shape-animate. If you select a cluster, only the portions of the object corresponding to the selected cluster are used to create the shape keys.
Choose Deform  Shape Select Shape Key from the Animate toolbar and pick each of the deformed objects in the order that you want the target shapes to be animated
on the base object.
Shape Select Shape Key from the Animate toolbar and pick each of the deformed objects in the order that you want the target shapes to be animated
on the base object.
In the dialog box that opens, label the first shape key created in the Name text box. The other shapes use this name plus a number, such as face, face1, face2, etc.
For each target shape you pick, a shape key is added to the model's Mixer > Sources > Shape folder.
Play back the animation to see the base shape change using the different target shapes you used for the shape keys.
Do one of the following to apply, sequence, and/or mix the shapes:
Apply the shape keys to the base object at different frames — see Applying Shape Keys.
Load the shape keys as clips into the mixer where you can sequence and mix them — see Using the Animation Mixer for Shape Animation. If you chose the Apply Selected Shape Keys option before you picked the target shapes, the shape clips are already in the mixer.
If you drag the shape keys to the mixer tracks, the resulting shape clips are 10 frames long. You can then resize and layer the clips, add transitions between the clips for a smooth change between shapes, and change the weight of each shape clip against each other.
As well, you can put create a compound clip that contains all these clips so that you can mix and copy them easily.
With selected shape keys, the mixer is a powerful tool that lets you easily sequence, rearrange, and mix the weights of the
shape keys as you like. If you know you want to use the mixer, make sure to activate the Apply Selected Shape Keys option before you choose Shape Select Shape Key and pick the target shapes for shape keys.
When you're finished the picking session, this command applies the shape keys to the base object or cluster and automatically creates a shape clip for each shape key in the mixer. The shape keys are instanced in the mixer using the currently selected instancing mode, with Mixed Weight being the default (see Choosing a Shape Instance Mode for Shape Clips).
Selecting shape keys sets up a relation between the base object or cluster you're shape-animating and the target shapes that it's drawing from. This is done via a Copy Shape operator in the shape's cluster that continually copies from the target shapes. Because of this operator, you can adjust the target shapes and have those adjustments appear on the base object or cluster that they're deforming.
Base object on the left is still linked to one of its target shapes on the right. When you deform the target shape, the base object is also deformed in the same way.
However, you can choose to not maintain this link after you've finished selecting the target shapes, or you an manually break the link at any time. Once you have done this, changes to the target shapes no longer affect the base object or cluster.
Choose Deform Shape Preferences and deselect the Relational Select Shape Keys option in the Shape Preferences property editor before you start selecting the target shapes to create shape keys.
By default, this command is active, which means that the target shapes that you pick for the shape keys continue to drive the shape animation. When this command is off, the link between the target shapes and the base object or cluster is broken after you've picked the target shapes to create shape keys.
In the explorer, expand the object with shape animation, then expand its geometry node, its Clusters folder, and the cluster associated with the shape animation.
Expand the cluster key associated with one of the target shapes that you selected to create a shape key. By default, the cluster key name begins with the same name as the base object and ends with _ShapeKey.
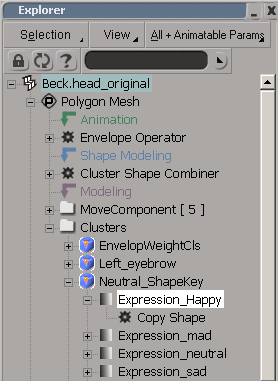
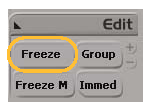
Freeze the Copy Shape operator under the cluster key by selecting it and clicking the Freeze button in the Edit panel.
Repeat this procedure for each of the target shapes whose link you want to break.
The link is now broken between the base object on the left and one of its target shapes on the right. Now when you deform the target shape, the base object is not deformed.
 Except where otherwise noted, this work is licensed under a Creative Commons Attribution-NonCommercial-ShareAlike 3.0 Unported License


