In addition to controlling an objects basic surface shading characteristics, surface shaders also control reflectivity, transparency and refraction.
As you may suspect, a surface shader's Reflection parameters control an object's reflectivity. The more reflective an object is, the more other objects in the scene appear as reflections on the object's surface.
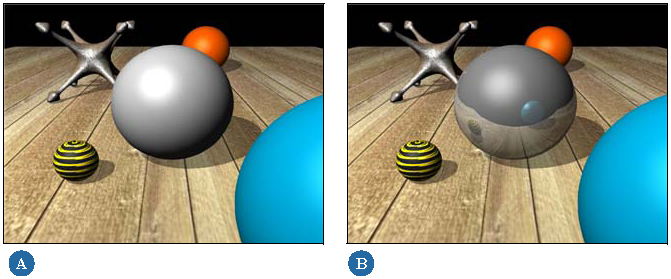
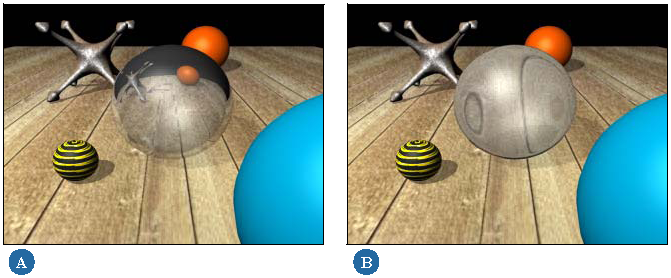
As an object becomes more reflective, its other surface parameters, such as those related to diffuse, ambient, and specular areas of illumination, become less visible. If an object's material is fully reflective, its other material attributes are not visible at all.
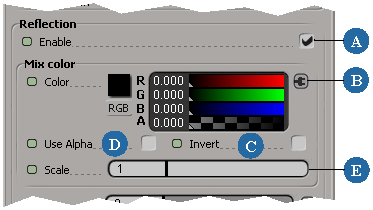
You adjust reflectivity using the Reflection options on the Transparency/Reflection tab of a surface shader's property editor. Reflection values usually range from 0 to 1, with 0 representing no reflectivity and 1 representing complete reflectivity, giving the object a perfectly mirrored surface.
There are two ways to set the reflectivity values:
Use the color sliders to set the reflection values. To adjust all of the color sliders at once, hold down Ctrl and adjust one slider. All of the color sliders will be moved to the same position.
For more information about setting color values, see Defining Color Properties [Interface and Tools].
Select the Use Alpha option to control reflectivity using only the alpha slider.
Controlling Reflection with Textures
You can control reflectivity using a texture by connecting the texture to the surface shader's reflectivity input. Follow the procedure called Reflectivity Maps [Texturing] or use any of the methods described in Applying a Texture [Texturing].
Typically, a black-and-white texture or an image's alpha channel is used to create a reflectivity map, with well-defined areas for reflectivity and non-reflectivity.
If you are controlling reflectivity with a texture, you may find the Invert and Scale settings useful.
Invert simply inverts the color or alpha value that is driving the reflectivity.
This is useful when you are using a black-and-white image or an image's alpha channel to control reflectivity. Normally, the white areas of the image are the most reflective, while the black areas are not reflective at all. This option reverses the effect of these values. Selecting Invert is often easier than inverting the image file itself.
The Scale value adjusts the intensity of the reflectivity.
This is useful when you are using an image to control reflectivity since the amount of reflectivity defined by a given image is fixed, and may be more or less than you want. Scaling the reflectivity is often faster and easier than adjusting the actual image.
A surface shader's Transparency parameters control an object's transparency. The more transparent an object is, the more you can see through it.
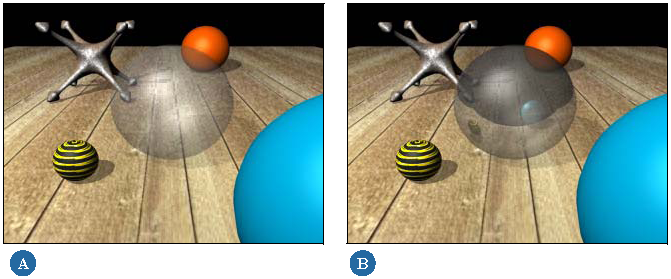
As with reflectivity, transparency affects the visibility of an object's other surface attributes. You can compensate for this by increasing the attributes' values, such as changing specular color values that were 1 on an opaque object to 10 or higher on a transparent object.
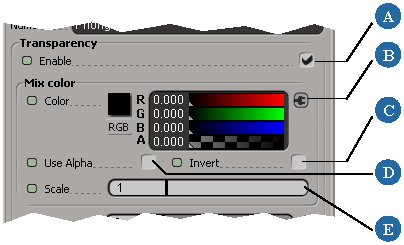
You adjust transparency using the Transparency options on the Transparency/Reflection tab of a surface shader's property editor. Transparency values usually range from 0 to 1, with a value of 0 representing no transparency and 1 making the object completely transparent. For a transparent surface such as glass, a value of 0.9 is more convincing than a value of 1.
There are two ways to set transparency values:
Use the color sliders to set the transparency value. To adjust all of the color sliders at once, hold down Ctrl and adjust one slider. All of the color sliders will be moved to the same position.
For more information about setting color values, see Defining Color Properties [Interface and Tools].
Select the Use Alpha option to control transparency using only the alpha slider.
Controlling Transparency with Textures
You can also control transparency using a texture by connecting the texture to the surface shader's transparency input. Follow the procedure called Transparency Maps [Texturing] or use any of the methods described in Applying a Texture [Texturing].
If you are controlling transparency with a texture, you may find the Invert and Scale settings useful.
Invert simply inverts the color or alpha value that is driving the transparency.
This is useful when you are using a black-and-white image or an image's alpha channel (matte) to control transparency. In a typical matte, the black areas are transparent and the white areas are opaque. For surface shaders, on the other hand, the reverse is true: black areas are opaque and white areas are transparent. Inverting the transparency gives you the correct transparency defined by the matte (black is transparent and white is opaque).
The Scale value adjusts the intensity of the transparency.
This is useful when you are using an image to control transparency since the amount of transparency defined by a given image is fixed, and may be more or less than you want. Scaling the transparency is often faster and easier than adjusting the actual image.
When transparency is incorporated into an object's surface definition, you can also define the refraction value. Refraction is the bending of light rays as they pass from one transparent medium to another, such as from air to glass or water.
You can set the refraction from a surface shader's property editor. The default value is 1, which represents the density of air. This value allows light rays to pass straight through a transparent surface without bending. Higher values make the light rays bend, while values less than 1 makes light rays bend in the opposite direction, simulating light passing from air into an even less dense material (such as a vacuum).
Refractive index values usually vary between 0 and 2, but you can type in higher values as needed.
The following table lists some common transparent materials and their refractive index value:


