When you animate with forward kinematics (FK), you move the skeleton into position, specifying the angle of each joint and then keying its rotational position (orientation). Each movement needs to be carefully planned to create the resulting animation. For example, to bend an arm, you start from the "top" and move down by rotating the upper arm bone, then the forearm bone, and finally the hand bone.

Bones in arm are rotated and keyed in order from top down to move from an outstretched position to raised with a flexed wrist.
When to Use Forward Kinematics
While rotating each joint can sometimes be tedious, it offers you complete control over the orientation of each joint with FK, allowing you to create many types of movements that may not be possible to animate with IK alone.
You can key the exact orientation (in X, Y, and Z) of a joint. This prevents any surprises from occurring when 2D chains flatten on their resolution plane.
You can control certain joints that are difficult to animate, such as shoulders.
You can have a movement properly "follow through," such as making a foot kick a soccer ball properly.
Example: Animating Kraken's Tentacles with FK
Let's say you want to animate one of the tentacles on Kraken, the Evil Sea Monster. Currently, the tentacle is coiled, and you want to animate it straightening out.
If you were to use IK by keyframing the effector translation, parts of the tentacle would pass through each other.
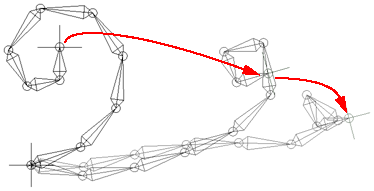
Using IK, the tentacle twists strangely when the effector's translation is keyed.
Using FK, you would rotate each joint in the chain, starting from the chain root. Although more time-consuming than using IK, the tentacle will not twist into itself.
FK also lets you choose how you want the tentacle to uncoil — from a lazy extension (Kraken is swimming peacefully) to a whip-like snap (Kraken is attacking a submarine).
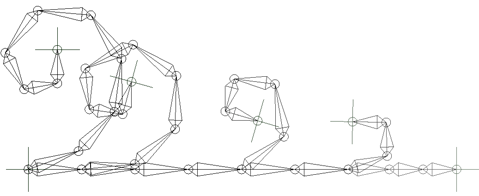
Using FK, the tentacle uncoils without strange twists. In this figure, the joints start rotating at regular intervals, with each joint completely straightening out in a constant number of frames. The result is a slow, lazy uncoiling.
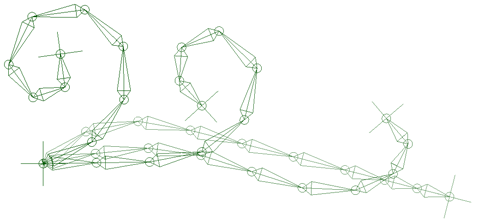
This time, the joints' rotations are keyed with some recoil on the first four joints, creating a whip-like effect. Notice how the second, third, and fourth joints bend backward compared to their original angles. This creates the whip effect, which would be impossible with IK.
Posing a Chain First with Inverse Kinematics
While you often need to rotate each bone individually to pose a chain, in some cases you can speed up the process by using inverse kinematics. Move the chain's effector to place the bones quickly as you like and then tweak the bones' rotation before keying.
When things are in the position you like, use the Key All Bone Rotations command (see Keying the Rotation for Multiple Bones) to set rotation keys for all bones in the chain.
To blend FK with IK animation on the same chain, see Blending Between FK and IK Animation.
Animating the rotation of the bones is the most basic way of animating chains with FK. You don't usually animate the bones directly; instead, you animate the rig control object that is constrained to the bone.
For more information on animating transformations in general, see Animating Transformations [Animation].
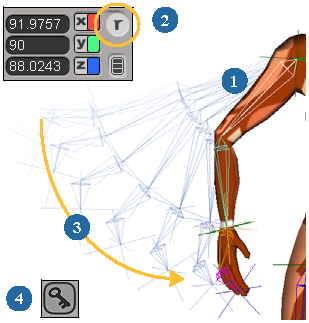
Select a bone or the rig control object that is constrained to the bone.
Click the Rotate (r) button in the Transform panel or press C.
Rotate the bone into position on any axis (X, Y, Z).
Translate the chain's effector (invoke IK) to move the bones into position, and then tweak each bone's rotation if necessary.
Key the rotation values by clicking the keyframe icon, or pressing K, or by choosing Animation Set Key from the Animation panel.
To animate your object, move the timeline pointer and continue to create rotation keys for the bone.
Here, the upper arm and forearm bones are animated by keying their rotation values at frames 1 and 20.
Keying the Rotation for Multiple Bones
If you want to key the rotation of several bones at a time, do one of the following:
Select the bones and rotate them interactively in the Add (additive) manipulation mode. This rotates the bones in relation to their parent.
Select the bones and open their Local Transform property editor (one property editor opens for the whole selection — just press Ctrl+K). On the SRT page, enter specific values in the Rotation text boxes. This is the same as rotating interactively in Add mode.
To key the rotation of all bones in a chain at once
Select any element of a chain and choose Create Skeleton Key All Bone Rotations to set keys for the rotation of all the bones in that chain at the current frame.
This means that you can select a bone, rotate it, select another bone, rotate, and so forth. Then choose the Key All Bone Rotations command without needing to select the specific bones first.
This may also be useful to do when posing a chain using IK but keying in FK. Select the chain's effector and move it to place the bones quickly as you like. Then tweak the bones' rotation before keying. When things are in the position you like, choose the Key All Bone Rotations command to set rotation keys for all the bones in that chain.
Aligning the Root's Orientation to Match the First Bone
To make it easier to work with skeletons driven by FK, you can change the orientation of the root so that it matches the orientation of the first bone. The orientation of the root is changed so that the first bone's rotation is set to 0,0,0 in its current position.
This means that when you set up the default pose for your character, you can get the first bone to that position by resetting the rotation. For example, if you want to lift the leg up 30 degrees, you set the rotation to 30.
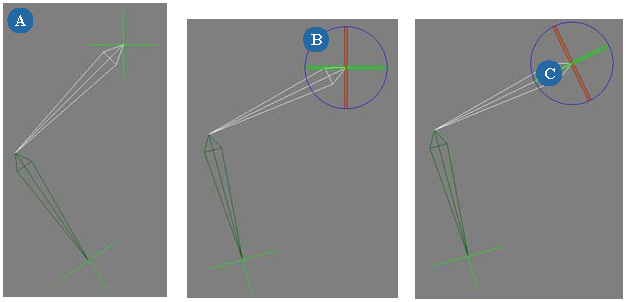
| A |
Chain in its original position. |
| B |
First bone is rotated in Z. |
| C |
Chain's root is aligned to the first bone's orientation. |
It also rationalizes any character setup you do based on the bone angle because the root and first bone are not in a position where they produce much gimbal lock on the rotation values.
To align the root's orientation to the first bone's
Select any element on the chain and choose Create Skeleton Align Root to First Bone. The chain root's orientation changes to match that of the first bone's.
Skeleton Align Root to First Bone When Drawing to automatically orient the root when you draw a chain — see Creating Chains.


