The Animation Rig Export tool lets you capture all the animated deformations of the face as shapes and put them into a simpler rig that can be easily imported into Maya or Softimage. The rig is exported as a .dotxsi file. Once this simple rig is inside your 3D animation package, you can refine the animation or build new rigs with the same animation control set that is used in Face Robot.
Before you can import the dotxsi file into Maya, you must first install Autodesk® Crosswalk on the same machine as Maya — see Importing the Animation Rig into Maya.
Because Softimage contains the Crosswalk product, you don't need to install it separately to import the animation rig into Softimage.
Notes and Limitations for the Animation Rig Export
In order for the Animation Rig to behave exactly like the Face Robot head, make sure that the zeroed-out version of the Face Robot head is identical to its original version. This is because the Animation Rig is always based on the original version of the Face Robot mesh.
If you have lip-sync animation on the mouth controls, you need to select them and plot their animation into fcurves before the Face Robot head can be exported. This is because the Animation Rig can export only fcurves, and the lip-sync animation is driven by the SpeechBlend operator.
Use the Tools  Plot All Transformations command and make sure to select Apply Plotted Animation to Object in the Plot dialog box - see Plotting (Baking) Animation for more information.
For best results with the animation rig, avoid extreme positions of the animation controls. This can cause problems with the shapes when exporting the rig.
Head rotation and translation are not supported for the Animation Rig Export.
Direction tracking is not supported for the Animation Rig Export.
The Lip Stiction feature is not supported for the Animation Rig Export.
Animated teeth collisions are not supported in Animation Rig Export, but static teeth collisions are supported.
Eyelid Bulge deformations and deformations resulting from rotating animation controls are not cached in the Animation Rig: they are simply ignored.
Overview of the Animation Rig Export Workflow
The basic Animation Rig Export workflow involves the following steps. See the steps following this for more details:

Make sure that the original Face Robot head is solved and ready to go. This head can be animated or not.
Click the Import/Export tab on the Act panel (see Saving and Loading a Fast Playback Cache File) and choose the Animation Export - Linked Shapes option.
The Export Animation Rig Property Editor opens.
Create the samplers that will sample the deformed geometry used for creating the shapes — see Creating Samplers.
Build the rig that will be exported — see Building the Export Rig.
Generate the shapes from the original head and transfer them to the export rig — see Generating the Shapes.
Plot the animation of the controls and transfer it to the export rig — see Transferring the Animation.
Save the rig in a dotxsi format file — see Exporting the Rig from Face Robot.
Install Crosswalk on the machine that has Maya installed (Softimage already contains Crosswalk), then import the rig dotxsi file into Maya or Softimage — see Importing the Animation Rig into Maya and Importing the Animation Rig into Softimage.
You can then tweak the animation a bit and render out as you would normally from that software.
You can use the buttons in the Hide/Display area of the Export Animation Rig property editor to toggle the display of:
For example, to keep the view uncluttered you may want to hide the original Face Robot head after you have built the export rig from it.
As a workaround, you can click the Display tab on the Act panel (see Displaying and Hiding Elements) and select the Toggle Face and/or Toggle Controls to return the face and/or animation controls to their hidden status.
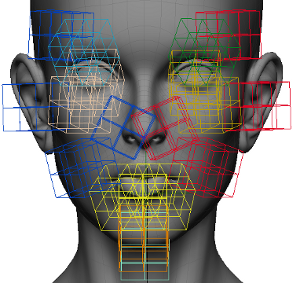
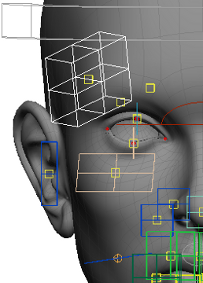
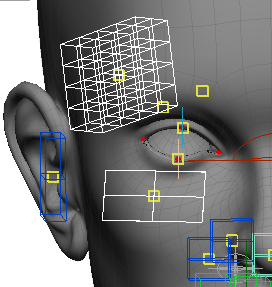
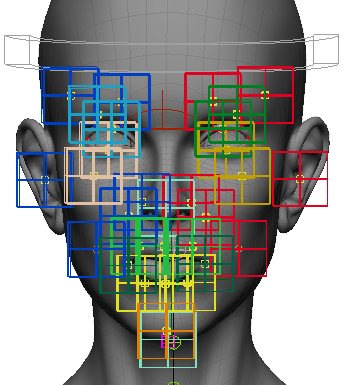
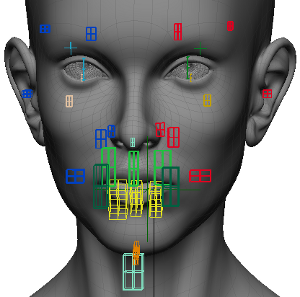
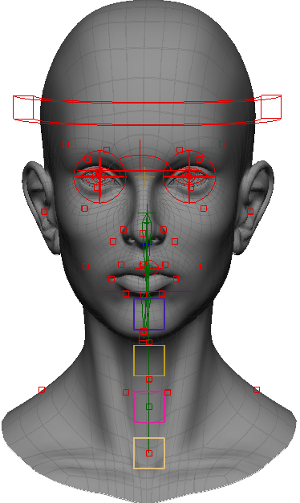
Samplers are lattice-like forms that are created for the face's animation controls. These lattices help you visualize how the geometry of the face is sampled in each area around the control. The sampled area includes the points on the face's geometry that will be used to create the shapes for exporting.
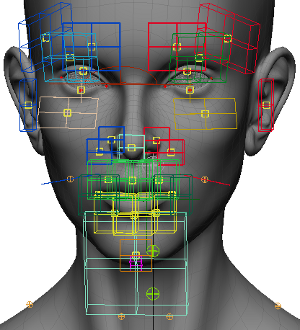
You can also create ROM samplers, which are samplers based on the animation control's range of movement in space. Face Robot calculates the animation of each control over the duration of the animation and determines the positions that it has covered. The size of the sampler reflects the control's complete range of movement. This is more useful for controls that move over a larger area in space, such as the chin or mouth.
Once you create the samplers, you can inspect them, as well as align their normals to the face's normal, change their size, and change the lattice density.
If the Face Robot head is animated, make sure it is at a frame where the head is in its rest pose or mute the animation on the head. This isn't absolutely necessary, but it may make it easier to work with the samplers.
On the face, select one or more controls for which you want to create samplers.
If nothing is selected, samplers are created for all controls.
Click the Create button in the Samplers area of the Animation Rig Export property editor. Sampler lattices of the same size are created around all or only the selected controls. You can then adjust each sampler as you like (see below).
Samplers of the same size are created when you click the Create button. You can adjust each one as you like by clicking the Inspect button and setting the options in the Inspect property editor.
Click the Create ROM button in the Samplers area to create samplers based on the range of movement of each control. Face Robot calculates the animation of each control over the duration of the animation and determines the positions that it has covered, so this may take some time if you have many frames in the timeline! Once the samplers are created, you can adjust each sampler as you like (see below).
ROM (range of movement) samplers are created based on the movement in space of each control. The larger the sampler, the greater the area in which the control has moved.
Select one or more samplers and click the Inspect button in the Samplers area.
In the Sampler Property Editor, you can align the samplers' normals to the face geometry, scale the sampler on any axis, and change the density on any axis.
To update the shapes after changing the samplers
If you've changed the samplers after you have built the export rig and generated the shapes, you need to update the shapes to reflect these changes.
Click the Create/Update button in the Shapes area of the property editor — see Generating the Shapes for information.
Saving and Loading Sampler Presets
You can save and load sampler presets to make the sampler creation process go faster, as well as being able to use the same samplers on a number of faces. Sampler preset files are saved in .smp files.
Select one or more controls for which you want to load samplers.
If nothing is selected, sampler presets will be applied to all controls for which a preset exists.
Click the Load button in the Samplers area of the property editor.
In the browser that appears, select an .smp preset file.
There is a default.smp file that ships with Face Robot that you can apply. This file is just to help you get started with samplers. You can then adjust the samplers for your particular head and save the preset using a different name.
The samplers in the preset are applied to the applicable controls. You can then edit each sampler as you like.
After you've created the samplers on the head, you're ready to build the export rig. To build the rig, Face Robot copies the geometry of the original head, then reconstructs its controls. This rig is a simpler hierarchy than what is in Face Robot because there are fewer scene elements, and the Face Robot solvers and operators are not included.
In the Rig area of the Export Animation Rig property editor, select the Copy Eyes, Teeth, and Tongue Geometry option if you want to include the eyeballs, teeth, and tongue as part of the export rig.
A model named Face Animation Rig is created, which contains all the elements of the rig.
Once you've created the animation rig, you can save the geometrical deformation of the original Face Robot face as shapes and transfer them to the export rig.
When you generate the shapes for the first time, Face Robot transfers the original head's geometry deformation to the animation rig. This creates a connection between the rig's animation controls and the face's geometry.
The shape creation process transfers the deformation by creating clusters of points that are affected by the movement of the control. One cluster of points is created for each control, then shapes (also known as shape sources or shape keys) are created for each of these clusters. Because only the clusters of points that are affected by each control are cached, the cache is smaller in size than if all points on the head were cached for each shape.
After the clusters and shapes are created, a weight operator is added for every shape (shape source) in the Mixer node of the export rig's model.
To generate and update the shapes
Click the Create/Update button in the Shapes area the first time to create clusters of points for each control and create shapes for each cluster.
After this is done, you can modify a sampler and then click the Create/Update button again. This updates only the clusters and shapes of the controls affected by the change to the sampler.
You can select the rig and open the animation mixer (press Alt+0) to check that each control has a shape compound clip on a track that contains all its shape clips. Double-click on the shape compound clip to open it and see the shape clips. Shape clips are instances of the shapes.
After you have created the shapes for the export rig, you need to transfer the animation from the original Face Robot head's controls to the export rig's controls. See Transfer for details.
Exporting the Rig from Face Robot
When you have finished all the previous steps, you're ready to export the animation rig in a .dotxsi file. The dotxsi format is the file format that is used as the default export/import format for Softimage and is also easily imported by Maya.
Exporting the rig puts all of its geometry (head, eyeballs, teeth, tongue), shapes, controls, and their fcurves into a single dotxsi file.
As well, a sampler file is exported as part of the process. The sampler file helps Softimage or Maya understand the control positions so that they can be assigned correctly to each shape when they get imported.
You can choose to export the animation on the controls or not.
See Export Rig for details.
Importing the Animation Rig into Maya
Once you've exported the Face Robot animation rig as a .dotxsi file, you can import it into Maya. There, you can use the native Maya tools to tweak the animation and shapes as you like, then render out from it as you would normally.
Before you can import the dotxsi file into Maya, you must first install Crosswalk (both 32 and 64 bits are supported) on the same machine on which Maya is installed.
When you install Crosswalk, the faceRobotUtils.mel and FaceRobotImporter.mll files that are required for importing Face Robot are both installed in Maya's Plugin folder. They use Crosswalk to import the rig and its animation controls, and then reconnect the relationship between the Face Robot rig's shapes, controls, and the head's geometry once the rig is inside Maya.
For information on Crosswalk options, see Using Crosswalk for Maya.
Install the latest version of Crosswalk on the same machine on which Maya is installed.
When you install Crosswalk, the faceRobotUtils.mel and FaceRobotImporter.mll files are installed in your Maya Application\Plugins folder.
In the Import Options dialog box that opens, set the options as described in Importing and Exporting with Crosswalk for Maya [Data Management].
In the Import dialog box, do the following:
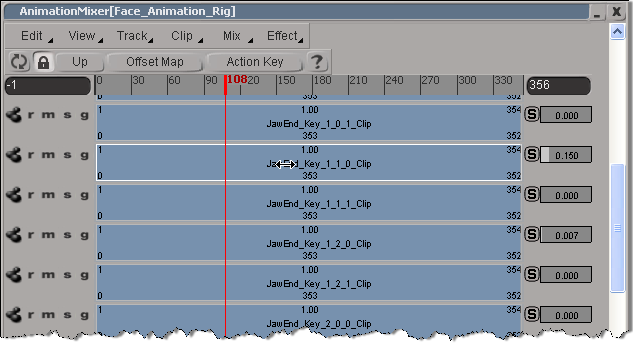
The rig with its animation controls and blend shapes is imported into Maya in a model called Face_Animation_Rig.
Importing the Animation Rig into Softimage
Once you've exported the Face Robot animation rig as a .dotxsi file, you can import it into Softimage. There, you can use the native Softimage tools to tweak the animation as you like, then render out from it as you would normally.
To import a Face Robot animation rig, Softimage uses the following files that are installed by default:
ShapeWeight.x86.dll or ShapeWeight.x64.dll (depending on your setup)
FR_ICE_Import.x86.dll or FR_ICE_Import.x64.dll (depending on your setup)
Softimage uses Crosswalk (which is part of Softimage) to import the rig and its animation controls. Then the two ICE compounds listed above re-create the relationship between the rig's shapes, controls, and the head's geometry once the rig is inside Softimage.
To import the rig into Softimage
Open Softimage and choose File Import Face Robot Shape Animation Rig.
In the dialog box that appears, select the .dotxsi file you exported from Face Robot and then click the Import button.
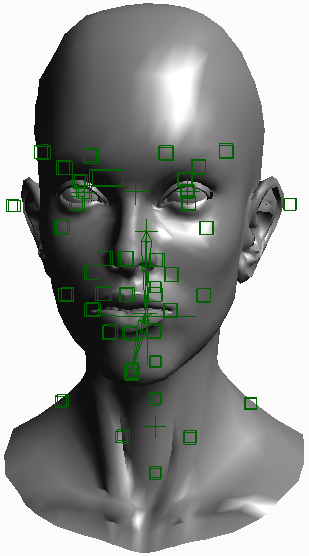
The rig with its animation controls (represented as small green boxes) is imported into Softimage in a model called Face_Animation_Rig.
If you exported the animation on the controls, you'll see red ticks in the timeline at each frame, which represent the keys on the controls. To check the control's fcurves, select a control and press 0 (zero) to open the animation editor.
You can select the head and open the animation mixer (press Ctrl+0) to check that each control has a shape compound clip on a track that contains all its shape clips. Double-click on the shape compound clip to open it and see the shape clips.
Each shape clip is controlled by the ShapeKey operator, so you can't change its weight value, but you can see how the shape for each control is working by playing the animation or scrubbing the timeline.