The up-vector constraint makes the Y axis of a constrained object point to a constraining (control) object or a specific point. For example, by constraining a camera's up vector to a control object, you can control the camera's up direction to prevent it from flipping when it reaches a vertical axis with the interest.
|
|
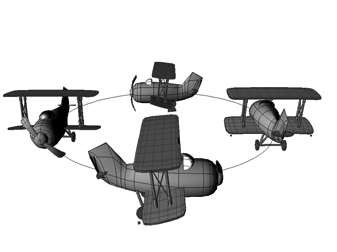
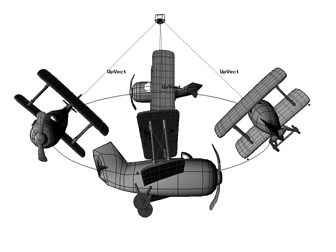
On the left, Curve (path) constraint only: the airplane's X axis is oriented to the curve's X-axis tangent.
On the right, Curve with an up-vector constraint: the airplane banks as its Y axis is oriented toward the cone (constraining object). The X axis remains oriented to the curve's tangent.
Chains have a special up-vector constraint that cannot be used on any other object because it is a property of the chain joint. If you're using chains, you should use that up-vector constraint instead of this one.
For more information, see Constraining the Chain's Up Vector (Direction) [Character Animation].
About the Up-vector Constraint
Unlike the other "real" constraints found in the Constrain menu, the up-vector constraint is a property (actually a low-level expression that determines which direction the object should point) of these other constraints: the Direction, Position, Surface, 2-Point, 3-Point, or Curve (Path). The up-vector constraint cannot exist on its own: it only works only if one of these constraints is already applied to an object.
Because the up-vector constraint is not a real constraint, you cannot remove it as you do other constraints (see Removing an Up-Vector Constraint for how to remove an up-vector constraint). However, you can view it as any other constraint in a 3D view or the schematic view (see Viewing Constraints and Their Information).
Constraining the Up Vector to an Object
A typical way to determine an object's up-vector direction is to constrain it to another (control) object. You can constrain the up vector using a menu command or by using the up-vector controls in the constraint's property editor. The controls in the property editor allow you to easily see and change the up-vector values and relationships.
To constrain the up vector to an object using a menu command
Create an object that you will use to control the up vector of the constrained object.
Apply one of these constraints to the object whose up vector you want to constrain: Constrain  Direction, Position, Surface, 2-Point, 3-Point, or Curve (Path). Only these constraints have up-vector controls.
If the constrained object has more than one constraint with an up-vector property (any of the constraints listed in the previous step), select which constraint you want to use. You can do this in the explorer (constraints are listed in the object's Kinematics > Constraints folder).
Choose Constrain Up Vector and pick the constraining (control) object. The constrained object's Y axis is now constrained to this object.
To constrain the up vector to an object using the constraint's property editor
In the constrained object's constraint property editor (Direction, Position, Surface, 2-Point, 3-Point, or Path), click the Up Vector tab and select the Active option to activate the up-vector constraint.
Then click one of these buttons on the Up Vector page according to what you want to do:
Click Select to select the current up-vector control object.
Click Pick New and pick a different constraining object (this also activates the Active up vector option if not already active).
Click Create New to create a little implicit cube (named upvctctrl) and use that as the constraining object. It is placed according to the Affected Axis direction (see the next step).
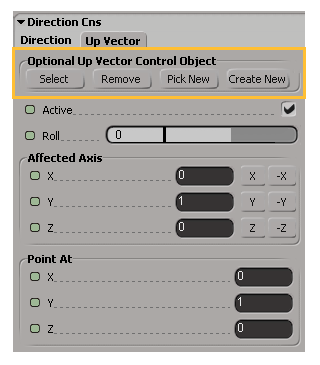
In the Affected Axis area, select which axis of the constrained object is to be the one used as the up vector (Y is the default). You can either click the axis buttons (positive and negative X, Y, Z) or enter 1 or -1 in the axis text boxes.
You will see the position values of the control object in the Point At X, Y, Z settings, but you won't be able to move that object using those settings: they serve only to indicate its position.
Constraining the Up Vector without an Object
While it is common to constrain an object's up vector to a control object, you can simply make the object's up vector always point in a certain direction using the controls on the Up Vector page. This is known as a static up vector.
To create a static up-vector constraint
Select an object and apply any of these constraints which have an up-vector property: Constrain Direction, Position, Surface, 2-Point, 3-Point, or Curve (Path).
In the constraint's property editor, click the Up Vector tab and select the Active option.
In the Affected Axis area, select which axis of the constrained object is to be the one used as the up vector (Y is the default). You can either click the axis buttons (positive and negative X, Y, Z) or enter 1 or -1 in the axis text boxes.
Set the Point At X, Y, and Z values to specify a position at which the constrained object's up vector is to point.
Controlling Flipping with Path Animation
In the Path constraint property editor (see Setting Objects on Paths), the Point along Path Roll Frame Normal on the Up Vector page constrains the up-vector of the constrained object to the roll-frame normal of the path curve instead of constraining it to a separate control object or direction (as defined by the Point At options on the Up Vector page). The roll frame normal is a frame based only on the moving tangent of a path curve.
When you select this option, the Point At options become unavailable.
Because this option defines the up-vector direction independently from a separate control object or direction, this can help prevent the constrained object from flipping in cases where the trajectories of the path curve and the up-vector control object would cross.
Removing an Up-Vector Constraint
The up-vector constraint is not the same as other "real" constraints, so you cannot remove it in the same way (see Removing (Relaxing) Constraints). However, you can remove it in the two ways described here.


