You can blend multiple constraints on an object with each other, as well as constraints with other animation. When you blend the constraints, you are actually blending the weight (or "strength") of one against the others or even against fcurve or expression animation on the same parameters. And, of course, you can animate the blending to have it change over time.
Blending is done in the order in which you applied the constraints, from the first-applied constraint to the last. Each constraint takes the previous result and gives a new one based on the value you set.
Blending Constraints with Each Other
To blend constraints with each other
Select an object that has two or more constraints applied to it. These can be any type of constraints.
Set the Blend Weight value in each constraint's property editor, according to the blend you want it to have with the other constraints.
Set keys for this parameter to animate its weight, if you like.

Each constraint takes the previous result and gives a new one based on the value you set. So to blend from one pose to another they have to set the first constraint blend to 1, and the second to the blend percentage.
For example, you could apply three position constraints to an object, with the first-applied weighted at 1, the second one at 0.5, and last one at 0.333. This keeps the constrained object in the middle of the three constraining objects.
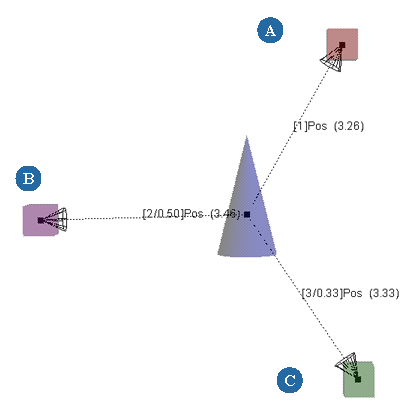
Cone has three position constraints:
This keeps the cone positioned in the middle of the triangle formed by A, B, and C.
To easily average the effect of multiple constraints on an object, enter this formula in the Blend Weight text box: 1/constraint ID.
For example, if you have three position constraints on an object and you want the object to be placed exactly in the center of them:
The blend weight automatically figures out the average weight based on the previous value.
Blending Constraints with Animation
If your object is animated locally (as opposed to globally) with fcurves, you can blend the effect of one or more constraints with the animation. For example, you can animate an object's position as usual (keys, expressions, etc.) and apply a position constraint to it. You can then use the Blend Weight for the constraint to mix the weight of the constraint against the animation.
If the constrained object has no fcurve/expression animation, and the bottom constraint has a weight that is not 1 (full on), what you see is a lag effect. Since there is nothing for the constraint to blend against, it will blend partially (based on the weight) against whatever the last result was. Depending on the blend weight, the constrained object trails what is constraining its pose.
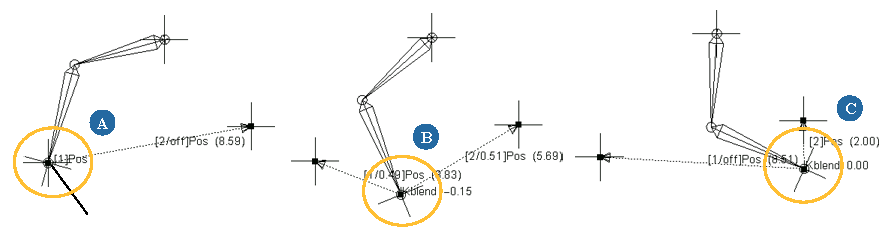
If you want to blend against any non-constraint animation already there (you can blend global against local, not just against itself), then you can weight the first applied constraint to a value other than 1, and the blend will take into account what's below and blend that in.
To blend constraints with local animation
Select an object whose local transformation parameters are animated with keys or expressions.
Open the constraints' property editors and set the Blend Weight value.
In the example below, the first bone of the chain has keys set on its rotation (FK). However, its effector is position-constrained to two nulls. The blend weight for each constraint is then animated (one from 0 to 1, the other from 1 to 0) so that the effector goes from one null to the other, with the effect of the FK still on the chain.