You can transfer and merge clusters with properties from object to object. The cluster properties that you can transfer in this way include materials, texture UVs, vertex colors, property weight maps, envelope weights, and shape animation.
Attributes can be transferred in two ways:
When you generate a polygon mesh object from others, for example using Merge or other commands, you can transfer attributes from the input objects to the generated objects.
Using Property GATOR (Generalized Attributes Transfer Operator), you can transfer attributes from any set of input objects to a target object
or cluster. You can use any combination of polygon meshes and NURBS surfaces.
GATOR (Generalized Attributes Transfer Operator), you can transfer attributes from any set of input objects to a target object
or cluster. You can use any combination of polygon meshes and NURBS surfaces.
There are a few things you should be aware of when transferring attributes.
Transferred attributes can be "read" from the top of any of the construction regions. When generating polygon meshes, the same connection point is used as for creating the geometry. However, there are special considerations when transferring attributes on generated meshes:
When you transfer envelopes and shapes, the connection point is automatically set to the top of the modeling region. Otherwise, there would be a double deformation as the deformed inputs drive the generated object's base shape, and then the generated object is deformed further by the transferred attributes.
If there is shape animation on the inputs and you need to read the source geometry from above the Modeling construction region, you can mute all shapes to avoid the double deformation.
If you are transferring only materials, texture UVs, color at vertices properties, or weight maps, then you can set the connection point to any value.
For more information about the connection point in general, see Choosing the Connection Point.
The transferred attributes have a modeling relation to the input objects. Any changes you make to the clusters (adding or removing components) or their properties (texture UVs, vertex colors, weight maps, envelope weights, or shape sources) of the input objects are automatically reflected in the target object.
However, some changes are not automatically updated. If you make any of the following changes, you must re-transfer the attributes to see the effect on the target:
If you freeze the generator or the GATOR operator, the modeling relation is broken and the attributes no longer update. This allows you to delete the inputs if you no longer require them in your scene. Note that freezing any of the transferred attributes, such as texture UVs or envelope weights, is equivalent to freezing the generator or GATOR node (and all operators beneath it).
When there are multiple input objects, similar clusters and cluster properties can be merged. This is useful when merging or blending polygon meshes, or when using a GATOR operator to copy attributes from several objects onto a single target.
If you transfer properties by type, Softimage automatically merges clusters when it considers them to match, for example, if clusters share the same material. See Transferring Attributes by Type.
If you transfer attributes manually, you have complete control over how clusters are merged. See Transferring Attributes Manually.
Here is a quick overview of the process of transferring attributes:
If you generated a polygon mesh from others, the attribute transfer controls are in the generator's property editor. See Transferring Attributes When Generating for some specific considerations when generating and transferring.
Otherwise, you can apply GATOR manually. See Applying GATOR.
Do either or both of the following:
Click either or both of the Transfer (or Merge) buttons to quickly transfer specific types of attributes. See Transferring Attributes by Type.
If desired, click the Edit Transfer button to transfer attributes manually. This provides more control over which attributes are transferred and how clusters are merged. You can use it instead of the other buttons, or to refine the transfer after using the other buttons. See Transferring Attributes Manually.
Once attributes are transferred, you can do any of the following:
Make changes to the attributes on the input objects. The target object updates automatically.
Make changes to the attributes on the target object. The changes you make are applied on top of the base values read from the inputs.
Freeze the transfer. The target is no longer affected by changes to the inputs.
Transferring Attributes When Generating
When you generate a polygon mesh object from others, you can use the controls on the generator's property editor to transfer attributes from the inputs to the generated object.
When transferring attributes to generated objects, discontinuities in texture UVs and color at vertices maps are always preserved.
You can use Softimage Gator to transfer clusters and attributes from any set of input objects to a target object. This is useful for transferring texture UV coordinates, envelope weighting, and other data between objects that don't share a modeling relation, such as high and low-resolution versions of the same character.
Components are mapped based on their proximity in 3D space, so the transfer works best if the objects are similar in size and shape. If you move the objects, the transfer gets updated — to avoid this, you can freeze the GATOR node. If you want to see the transferred attributes on the target object before freezing and the input object is in the way, you can hide the input or use Object Views.
Select the target object to receive the transferred attributes. Alternatively, you can select points, polygons, edges, or a cluster.
If desired, you can add the input objects to the selection now, or wait to pick them later.
Choose Get Property GATOR from any toolbar.
If you did not select the target and inputs already, you are prompted to pick them in order now: first the target if necessary and then any inputs. Right-click to end the picking session.
Set the options as desired. See GATOR Property Editor [Properties Reference] for information about all the parameters.
Transfer the attributes as described in the following sections, Transferring Attributes by Type and Transferring Attributes Manually.
Transferring Attributes by Type
You can quickly transfer specific types of attributes using the Transfer or Merge buttons in the property editor:
Materials, UVs, VertexColors, WeightMaps transfers all surface attributes including user normals (but not envelope weights). If there are multiple input objects, such as in the case of merging or blending, clusters and properties from different objects are merged automatically if Softimage considers them to match, for example, if two clusters share the same material.
Shape Animation, Envelope Weights transfers animation properties. Envelope clusters are always merged, but shapes are not merged. See Notes and Tips for Transferring Attributes for additional considerations when transferring these attributes.
If desired, you can refine how the attributes were transferred and merged as described in the next section, Transferring Attributes Manually.
If you later apply new cluster attributes, assign new materials, or add new shapes to the inputs, you must re-transfer the attributes by clicking the appropriate button to update the target.
Transferring Attributes Manually
Use the Transfer/Merge Attributes window to control how clusters and cluster properties are transferred from input objects to the target object. This is useful if you want to transfer only certain attributes, or if Softimage did not merge attributes the way you want.
To display this window, click Edit Transfer under Specify Properties in a property editor that supports attribute transfer.
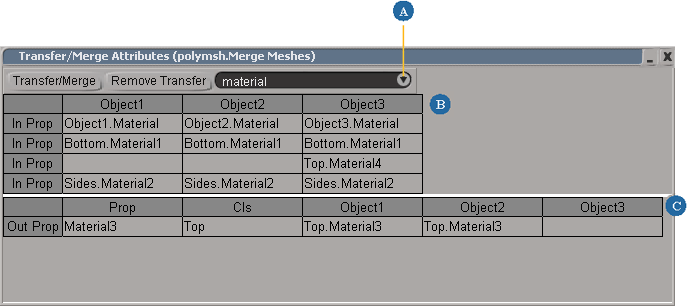
| A |
Select the type of property. |
| B |
Clusters and properties on the input objects are shown in the top table. |
| C |
Clusters and properties that have been transferred are shown in the bottom table. |
The main area of the editor contains two tables. You can resize the columns and rows by clicking and dragging a border.
The top table contains a column for each input object. The cells show the ClusterName.PropertyName for each untransferred cluster property of the type selected from the drop-down box. The cells are arranged into rows based on Softimage's best guess about which clusters and properties can be merged. Items in the same row would be merged automatically if you transferred properties by type instead of manually.
The bottom table contains a row for each cluster property of the selected type that has already been transferred. The first column shows the property name and the second column shows the cluster name. There is an additional column for each input object; these show the ClusterName.PropertyName of the input cluster properties that have been merged into the generated cluster property.
To transfer or remove attributes, you must first select the appropriate cells:
To transfer and merge attributes
Choose the type of attribute from the drop-down list at the top of the editor. For example, to transfer shapes, choose clskey (cluster key).
In the top table, select the cluster properties to transfer.
Clusters and properties are merged according to the following rules:
Click Transfer/Merge at the top of the editor.
New rows appear in the bottom table showing the generated cluster properties. The items that were transferred are removed from the top table.
Repeat steps 1 to 3 as needed to transfer additional attributes.
If cluster properties were incorrectly merged, you can "untransfer" them before re-transferring and merging them correctly.
Choose the type of attribute from the drop-down list at the top of the editor.
In the bottom table, select any cell(s) in the row(s) corresponding to the cluster properties you want to remove.
Click Remove Transfer at the top of the editor.
The selected rows are removed from the bottom table, and the untransferred items appear in the top table.
Notes and Tips for Transferring Attributes
Here is some information to help you get the best results when transferring certain types of attributes.
When you transfer shapes using the Transfer button under Shape Animation, Envelope Weights, the following things happen:
Shape sources are copied. Unlike other attributes, shapes are never merged automatically. If some but not all sources have already been copied, you are asked if you want to transfer the remaining ones.
Tracks and clips are created and weight fcurves are copied, based on the input objects' animation.
When you transfer shapes manually, only the shape sources are transferred.
The ShapeWeights custom parameter set is never transferred. ShapeWeights is created automatically when you store and apply shape keys in mixed weight mode, and contains proxy parameters for the shape weights to help mix them.
If the target has pre-existing shapes, the transferred shapes are converted to the appropriate shape reference mode (Local Relative, Object Relative, or Absolute). If there are no pre-existing shapes, then the mode specified in your Shape Animation preferences is used.
If you modify the shape sources on the inputs, the transferred shapes are automatically updated on the target. However, if you add a new source or modify the clips and weights on the inputs, you must click Copy Animation to update the target.
When you transfer an envelope, the weight information is transferred and the target object becomes deformed by the same set of deformers as the input. If there are multiple inputs, the list of deformers is combined.
If you use multiple GATOR operators to transfer envelopes from multiple objects, each GATOR operator adds a separate envelope operator.
If you add deformers to the input envelope, you must "untransfer" the envelope (see Transferring Attributes Manually) and then re-transfer it.
Note that you cannot transfer weights used for Spine or Cage deformations.
Transferring Attributes Between Dissimilar Objects
Because attribute transfer is based on proximity of points, it works best between objects that are roughly the same size and shape. But what happens if you want to transfer attributes between dissimilar objects? For example, you might want to transfer some facial animation from a kangaroo to a giraffe.
In these situations, you have a choice: before transferring the attributes, you can either deform the source to match the target or deform the target to match the source. Which technique to choose depends on which is most convenient given the shapes in question. The exact steps also depend on whether there is an envelope that you want to transfer.
To deform the source to match the target (with no envelope)
Deform the source into roughly the shape of the target, for example, by tweaking points. Make sure that corresponding areas are close enough to ensure a good transfer.
If desired, you can refine the transfer by tweaking the source geometry. Just make sure that the GATOR node is reading from the source's construction history above the position in the stack where you are adding tweaks.
At this point, you can delete the source or, if you want to keep it, delete the deformation operators that you added.
To deform the source to match the target (with an envelope)
Make sure that both the source geometry and deformers are in their reference poses.
If you want to keep the source, duplicate it or export it as an external model.
Choose Display Display Options (All Cameras) from the main menu. On the Modes tab of the Camera Display property editor, set Construction Level Viewing Mode to Sync with construction mode.
Align the target geometry with the source as well as possible by scaling, rotating, and translating.
Deform the source to match the shape of the target well enough to ensure a good transfer, for example, by tweaking points.
Apply GATOR and transfer the attributes. Note that when you transfer the envelope, Inputs' construction mode is set to Modeling — leave it at this value.
Adjust the source skeleton to fit the target geometry by transforming bones, setting the bone length, or using the Move Joint tool.
Select the skeleton objects and reset their reference poses.
Set the Construction Level Viewing Mode back to Result (top) to see the effect of the weights.
To deform the target to match the source (with no envelope)
Deform the target into roughly the shape of the source, for example, by tweaking points. Make sure that corresponding areas are close enough to ensure a good transfer.
Return the target to its original shape by selecting the duplicate as a shape key.
Freeze the Cluster Shape Combiner node in the target's operator stack.
To deform the target to match the source (with an envelope)
Make sure that both the source and target are in their reference poses.
If you want to keep the source, duplicate it or export it as an external model.
Deform the target into roughly the shape of the source, for example, by tweaking points. Make sure that corresponding areas are close enough to ensure a good transfer.
Return the target to its original shape by selecting the duplicate as a shape key.
Freeze the Cluster Shape Combiner node in the target's operator stack.
Mute the target's envelope operator, or set the viewports to display only the result of the Modeling construction region.
Adjust the skeleton to fit the target geometry by transforming bones, setting the bone length, or using the Move Joint tool.
Select both the target geometry and the skeleton, and reset their reference poses.


