The explorer displays the contents of your scene in a hierarchical structure called a tree. This tree can show objects as well as their properties as a list of nodes that expand from the top root.
You normally use the explorer as an adjunct while working in Softimage, for example, to find or select elements. Using the explorer, you can:
Create parent/child relationships between objects by dragging and dropping.
Add objects to groups, layers, and partitions by dragging and dropping.
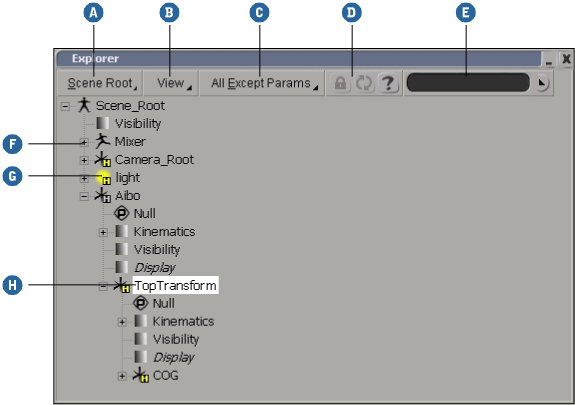
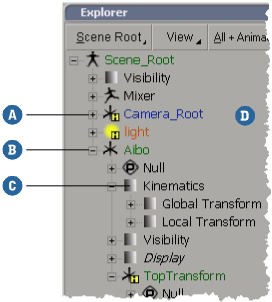
| A |
Scope of elements to view. See Setting the Scope of the Explorer. |
| B |
Viewing and sorting options. |
| C |
Filters for displaying element types. See Filtering the Display. |
| D |
Lock and update. See Locking onto a Selected Object. |
| E |
Search by name, type, or keyword. See Finding Elements in the Explorer. |
| F |
Expand and collapse the tree. See Viewing the Element Tree. |
| G |
Click an icon to open property editor. |
| H |
Click a name to select. Use Shift to select ranges and Ctrl to toggle-select. See Selecting Elements in the Explorer. Middle-click to branch-select. Right-click for a context menu. See Using Context Menus in the Explorer. |
You can open a full explorer, or any one of many specialized pop-up explorers.
Note that the pop-up explorers only allow you to select elements and open property editors. Click outside a pop-up explorer to close it.
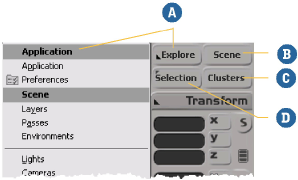
Opening Select Panel Explorers
You can use the buttons on the Select panel to quickly open specialized pop-up explorers.
You can quickly display a pop-up explorer for a single object — just select the object and press Shift+F3. If the object has no synoptic property or annotation, you can press simply F3. You can press those keys again to close it.
Opening Schematic View Explorer
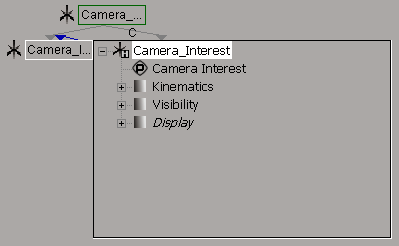
To display information on an element in the schematic view, right-click on its node and choose Explore from the menu.
For more information on the schematic view, see The Schematic View.
The explorer displays elements in a tree-like hierarchy of nodes.
You can also use keyboard shortcuts to navigate in the explorer tree.
Selecting Elements in the Explorer
Selection in the explorer is different than the 3D and schematic views, but it is quite straightforward.
You can select any element at any time in the explorer by simply clicking on its name, even if it is unselectable or hidden in the 3D views. You do not need to activate a selection tool first (unless another tool like Parent or Reorder is active), and the selection filters on the Select panel are ignored.
Selected elements are highlighted in white in the explorer, and the children of a branch-selected element are highlighted in gray.
Note that selecting parameters has the effect of marking them for animation. In addition, you cannot select components in the explorer.
For more information about selecting in general, including commands for modifying the selection, see Selecting [Scene Elements].
Multi-selecting Elements in the Explorer
You can use the Shift key to select multiple elements in the explorer. When you Shift+click to add a second element to the selection, the rules are as follows:
If the both first and second elements are of the same type (3D object, property, group, pass, partition, etc.), then all elements of that type between them are added to the selection.
Other types of elements in-between are not selected; for example, if you click on a 3D object and then Shift+click on another 3D object, then all visible 3D objects in-between become selected, but properties, shaders, and so on, remain unselected. When Shift+clicking in the explorer, models and 3D objects are considered to be one type, as are properties and materials (but not shaders).
If the two elements are of different types, the second one is simply added to the selection.
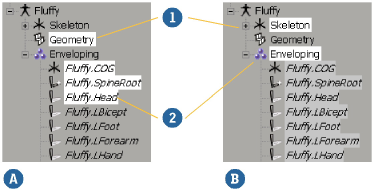
| 1 |
First click. |
| 2 |
Second click. |
| A |
Same type (3D objects): All in-between elements of that type are selected. |
| B |
Different types (3D object and group): Elements in-between are not selected. |
Only visible elements are selected. Elements that are under a collapsed node remain unaffected.
Select the first element in the range.
You can select the element in any way, using the explorer or not. However, note that if a element appears multiple times in the explorer (for example, if it is a member of a group), you should select it in the explorer so that it uses the correct "anchor point" for subsequent clicks.
Shift+click on the name of the last element in the range.
To add ranges to the selection, Ctrl+click on the first element in a new range and then Ctrl+Shift+click on the last element.
Keeping Track of Selected Elements in the Explorer
If you have selected elements in another view and their nodes are not visible in the explorer, choose View  Find Next Selected Node. The explorer scrolls up or down to display the first object node in the order of its selection. Each time you choose this
option, the explorer scrolls up or down to display the next selected node. Once the end of the selection order is reached,
the command loops around to the beginning again.
Find Next Selected Node. The explorer scrolls up or down to display the first object node in the order of its selection. Each time you choose this
option, the explorer scrolls up or down to display the next selected node. Once the end of the selection order is reached,
the command loops around to the beginning again.
Choose View Track Selection if you want to automatically scroll the explorer so that the node of the first selected object is always visible.
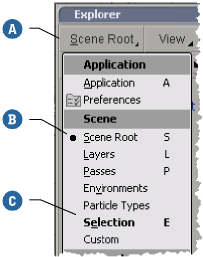
Setting the Scope of the Explorer
The Scope button determines the range of elements to display. You can display specific parts of the scene, as well as preferences and other parts of the Softimage application itself.
Locking onto a Selected Object
The Selection option in the explorer's scope menu displays information associated with the currently selected object.
If you click the Lock button with the Selection option active, the explorer continues to display the property nodes of the currently selected objects, even if you go on to select other objects using other views. Click Lock a second time to switch off the lock feature.
When Lock is on, you can also select another object and click Update to lock on to it and update the display.

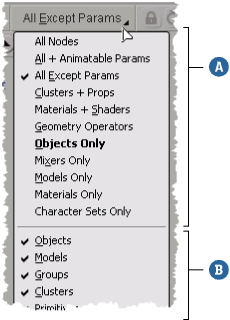
Filters control which types of nodes are displayed in the explorer. For example, you can choose to display objects only, or objects and properties but not clusters or parameters, and so on. By displaying exactly the types of elements you want to work with, you can find things more quickly without scrolling through a forest of nodes.
The basic filters are available on the Filters menu (between the View menu and the Lock button). The label on the menu button shows the current filter. The filters available on the menu depend on the scope. For example, when the scope is Scene Root, the Filters menu offers several different preset combinations of filters, followed by specific filters that you can toggle on or off individually.
The filters you set are saved and restored the next time you use the same scope. To restore the defaults for all scopes, you can restore the default preferences for the explorer view as described in Restoring Preferences [Data Management],
Note that the Groups filter toggle also affects partitions and layers.
Finding Elements in the Explorer
Although the explorer lets you search for elements, you may prefer to use the Scene Search view if you are looking for objects and other elements under the scene root. See The Scene Search View.
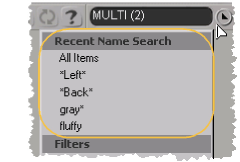
The search box on the right of the explorer command bar lets you search for elements by name, by type, or by keyword.
When you perform a search in the explorer, the matching elements are displayed in a flat list and the scope automatically changes to Custom. If there is no match, nothing happens.
If you perform a new search immediately, the previous scope is used automatically so you don't need to reset it.
To display all elements again, click the triangle to the right of the search box and choose All Items. Alternatively, select another scope.
Finding Elements by Name in the Explorer
The search box lets you search for elements by name using wildcards and regular expressions.
Set the explorer's scope to the desired range (see Setting the Scope of the Explorer).
The scope of the explorer determines the range of the search. For example, you can search for any object in the scene if the scope is Scene Root. However, if the scope is Current Layer, then the search is restricted to objects in the current layer.
Type a string in the search box. For a list of wildcards that you can use, see Valid Search Patterns.

You can use a subset of regular expressions (regex) in name searches. You can include multiple wildcards in the same search string. Search strings are not case-sensitive.
For example, *left* finds FrontLeftLeg, BackLeftLeg, FrontLeftPaw, and BackLeftPaw.
Finding Elements by Type in the Explorer
The filters available on the name search box let you search for elements by type.
Set the explorer's scope to the desired range (see Setting the Scope of the Explorer).
The scope of the explorer determines the types of element you can search for. For example if the scope is Scene Root, then you can search for nulls, curves, polygon meshes, and so on.
Click the triangle to the right of the search box, and choose an item from the Filters or Custom Filters submenu.
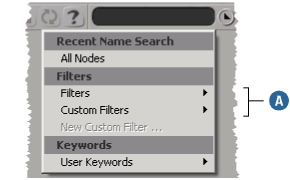
For information about adding your own custom filters, see Custom Filter [SDK Guide].
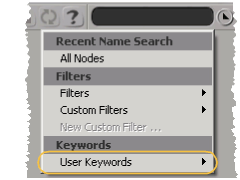
If there are user keywords on elements, you can search for them in the explorer. For information about adding keywords to elements, see User Keywords [Scene Elements].
Set the explorer's scope to the desired range (see Setting the Scope of the Explorer).
The scope of the explorer determines the types of element you can search for. For example if the scope is Scene Root, then you can search for keywords on objects.
Click the triangle to the right of the search box, and choose an item from the User Keywords submenu. If the current scope is Custom, then the previously selected keyword appears with a checkmark.
Sorting and Reordering Elements in the Explorer
You can sort the elements in the explorer according to various criteria using options in the View menu. In addition, you can reorder elements to change the default, or creation, order.
The sort orders are remembered for each scope and they are updated and saved in your Explorer [Preference Reference].
To sort objects, sources, clips, and other basic elements, choose the desired option from the View General Sort submenu of the explorer:
None (creation) uses the default order, based on when an element was created or parented.
Alphabetical sorts the elements alphabetically. Any numeric suffix is sorted in correct numerical order, so Object2 comes before Object10. The children of an object are always listed after any parameter sets of the object.
Type + Alphabetical sorts the elements by type first, and then alphabetically within each type. The types depend on the scope. For example with the Scene Root scope, the explorer lists all the cameras in alphabetical order, then all the lights, models, referenced models, nulls, chains, curves, polygon meshes, NURBS surfaces, text, point clouds, hair objects, control objects, forces, dynamic constraints, implicits, and geoshaders, each in alphabetical order. If the scope contains only one type of element, this option is equivalent to Alphabetical.
Used + Alphabetical sorts the elements into used and unused groups, and then sorts alphabetically within each group. This option is available only with the Sources/Clips scopes.
To sort parameters, choose the desired option from the View Parameter Sort submenu of the explorer:
None (creation) uses the default order based on when the parameter was created.
Alphabetical sorts the parameters alphabetically. Any numeric suffix is sorted in correct numerical order, so Param2 comes before Param10.
Layout uses the order in which the parameters appear in their property editor. If a parameter does not appear in the corresponding property editor, it is not listed.
Reordering Scene Objects in the Explorer
By default, elements in a scene are ordered according to when they were created or when they became children of their parent. This underlying order is reflected in the explorer and schematic views when elements are not sorted, and is also used when selecting the next or previous sibling using the buttons on the Select panel or the Alt+arrow keys.
You can change this underlying order in the explorer using the Reorder tool. The Reorder tool allows you to reorder:
Using Context Menus in the Explorer
You can right-click on any element in the explorer to perform a variety of functions, such as expanding or collapsing hierarchies, renaming or deleting nodes, or opening property editors.
Right-clicking certain nodes provides specific options. For instance, you can use a constraint node's context menu to activate or deactivate the constraint. Right-clicking a container node (for example, the node that contains all of an object's constraints) displays a menu for activating, deactivating, or deleting all the nodes in the container at once.
In general, when you open a context menu:
If the element under the mouse pointer is not selected, then only that element is affected by the menu command you choose.
If the element under the mouse pointer is selected, then all selected elements are affected.
The exception is when you use the context menu in the explorer to mute/unmute deformations or activate/deactivate constraints. These commands act like toggles, and affect only the deformation or constraint under the pointer. A check mark in the menu indicates whether the node is currently muted or active.
Renaming Scene Elements in the Explorer
You can rename elements in your scene using the explorer. You can rename lights, cameras, geometric objects, render passes, and layers.
Type a new name. You can click with the mouse or use the arrow keys to shift the cursor position. You can drag with the mouse or use the Shift+arrow keys to select text.
To finish, either press Enter or click outside the highlighted name area.
If the new name is not unique in its namespace, a number is appended automatically.