These options let you set the defaults for many of the commands for shape animation in the menu on the Animate toolbar.
To display: Choose from the main menu or choose from the Animate toolbar. In the explorer that appears, click or its icon.
|
|
Determines the way in which shape clips are instantiated (created) in the mixer when shape keys are saved or applied. Once you store and apply a shape, you cannot change the shape key mode for that cluster.
-
creates shape clips that are 10 frames long when using the or commands. They are instantiated on separate tracks within a compound shape clip.
The Instance Only mode is not compatible with working in the shape manager. If you have shapes created for an object in these
modes, you need to first delete its shape clips before being able to work with it in the shape manager. See Creating Shapes [Shape Animation] for more information.
-
(the default) creates clips that are as long as the scene with weight fcurves that peak at the current frame when using the
or commands. This mode is compatible with working in the shape manager.
These clips are created on separate tracks with default weight curves. This is useful if you want to control shapes by mixing
the weights of different shapes instead of transitioning from one shape to another, as you can with either the standard or
Cardinal transition modes.
When you store and apply shape keys in this mode, a Shape Weights custom parameter set is created for the object to help you
mix weights easily.
-
creates zero-frame shape clips when using the or commands. It creates transitions with a linear interpolation in space between the shapes, moving directly from one shape
to the next. The results are a mechanical-looking transition.
These clips represent a transition point. The clips are instantiated on the same track, and transitions are automatically
generated between them, making it easy to create a simple shape sequence. Each transition has a curve that you can edit in
the animation editor.
If you create a number of deformed objects and select them as shape keys for an object, this mode makes it easy to create
transitions between them, rather like a pose-to-pose type of animation. You can create the same transitions between shape
clips manually using the or commands in the animation mixer.
This mode and the Cardinal Transition mode are not compatible with working in the shape manager. If you have shapes created
for an object in these modes, you need to first delete its shape clips before being able to work with it in the shape manager.
See Creating Shapes [Shape Animation] for more information.
-
creates zero-frame clips when using the or commands. This mode is the same as Standard Transition Mode except that it creates transitions with a Cardinal interpolation
in space, resulting in a smooth, arcing curve that still passes through each shape key at the defined key frames.
You need at least four shape clips for the curve to be fully Cardinal, but three shape clips will give you a bit of a curve
too. The interpolation on any segment is influenced by the four nearest shape clips.
|
|
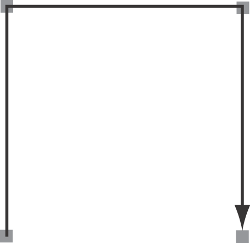
| On the left, a transition: points follow a linear path between key positions.
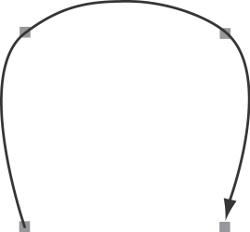
On the right, a transition: points follow a curved path between key positions.
|
Note that the transition curve on the clip controls the shape clip's weight in time, not the shape of the Cardinal transition
in space.
-
creates shape clips that are the same length as your scene (you can always change the length of the clips as you like later).
However, the shape weights for each clip don't have fcurves automatically created for them.
This is the default mode for working in the shape manager.
|
|
|
Determines how shapes are deformed in reference to the shape-animated object's base geometry that is a result of the operators
that are in the Modeling region of the object's construction history.
For more information, see Deformations and Shape Reference Modes [Shape Animation].
-
Shapes are stored relative to the each point's local reference frame. When you deform the surface, the shape maintains its
position and orientation relative to its immediate surroundings and deforms the object. For example, if you use shapes to
animate a lump on a finger and then bend the finger, the lump moves with the finger as you would expect. This mode is the
default, but it also requires the most computation.
Note that in some cases, it may be necessary to freeze the object's transformations before using local relative mode.
Also, Local Relative mode can generate incoherent results on curves because the local reference frame of points on curves
is not always well defined and can sometimes flip.
-
Shapes are stored relative to the object as a whole. If you deform the object, the shape moves with it but maintains its
original orientation. If there is no deformation animation before you save or store shape keys, the effect is the same as
local relative mode.
-
Shapes are absolute and not relative. They are stored in terms of the local coordinate system of the object. If the object
is deformed, the cluster with the shape is unaffected, with the effect being similar to a "lockdown."
|
|
|
Keeps the link between the deformed target shape objects that you pick for the shape keys using the command and the object you're deforming. This means that the shape keys continue to drive the shape animation on the object.
When this option is off, the link between the target shape objects and the deforming object is broken and the shape keys do
not drive the shape animation.
For more information, see Selecting Target Shapes to Create Shape Keys [Shape Animation].
|
|
|
Creates shape clips in the mixer automatically when you select shape keys with the command.
|
|
|
Mutes any existing deform operators on the object when you create (instantiate) a shape clip in the mixer. This prevents the
operator from being deleted when you create a shape clip. However, if an operator doesn't support muting, it is deleted even
if this option is on.
|
 Shape menu on the Animate toolbar.


