Playing a simulation is simple: just click the Play button in the playback controls! However, before you play a simulation, you should make sure that you have set up the time information for it in the environment's Simulation Time Control. To do this, you set the duration of the simulation, and select the playback mode (standard, live, or interactive) - see the sections below for information on doing any of these.
You can also choose to cache the simulation to create an action source for it. For information on caching, see Caching ICE Simulations in the ICE Tree.
Setting Up the Simulation's Playback Range
When you play a simulation, it uses the settings you've defined in the environment's Simulation Time Control Property Editor. The settings are taken from the scene's timeline information by default, but you can modify them as you like.
Do either of the following to open the Simulation Time Control property editor:
Select an ICE-simulated object and choose Particles  Simulation Inspect Environment from the ICE toolbar.
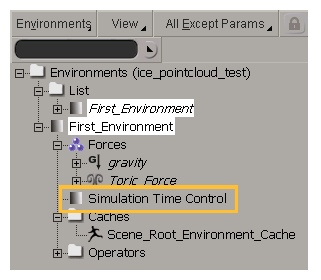
Click the environment's Simulation Time Control icon in the explorer.
You can set the following options in the Simulation Time Control property editor:
Using the timeline's values for the simulation range
Select the Use start frame and Use end frame options to automatically use and stay linked to the scene's timeline (start and end frames) settings for the simulation's range. This way, if you change the timeline's settings, the simulation frame range follows suit.
The Use start/end frame options set the Offset and Duration values to match the scene's time, so when you make a change to the scene timeline's start or end frame, the change is automatically reflected in the Offset and Duration values.
Offsetting the simulation's time
Deselect the Use start frame option so that the Offset text box is enabled; otherwise, the start frame on the scene's timeline is automatically used.
Set the Offset value, which is the number of frames that the simulation is offset from the scene's first frame.
For example, if the first frame of the scene is frame 1 and you want the simulation to start 20 frames after the scene's first frame, enter 21 here.
The way in which the ICE simulation is updated depends on which play mode you are using: Live (the default mode for ICE simulations), Standard, or Interactive.
See Simulation Time Control Property Editor for more information on each of these options.
Click the Play button in the playback controls below the timeline to play the simulation.
The simulation is calculated starting from the first frame of the simulation according to the Time Reference settings in the Simulation Time Control property editor (see below).To stop the simulation playback, click the Stop button or click the Play button again in the playback controls, or press the Down Arrow key.
To resume playback from the current frame, middle-click the Play button or press the Up Arrow key.
For more information on the standard playback controls, see Using the Playback Controls.
If you want to scrub and play the simulation backwards, you need to cache it into a file — see Caching ICE Simulations in the ICE Tree for information.
To calculate the whole simulation quickly, go to the last frame of the simulation. Each frame of the simulation is calculated without having to play it.
While the simulation is being calculated, you can stop it at any point by clicking Cancel on the progress bar.
Before you save and close a scene with a simulation, go back to the first frame. If you're at any other frame when you close the scene (such as the last frame), each frame of the simulation up to that one has to be calculated the next time you open the scene.
To mute the simulation, deselect the Active option in the Simulation Time Control Property Editor.
Viewing Simulation and Caching Information
You can display the simulation/cache information of the current simulation environment in the lower-left corner of a viewport. The information shown is the start and end of the simulation, the last frame that has been cached, whether the cache is on, and whether the cache is locked.


