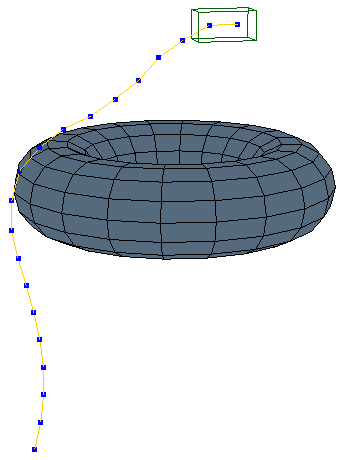
You can use the Syflex ICE Cloth compound to deform a polygon mesh by simulating its vertex positions directly. Likewise, you can use the Syflex ICE Curve compound to deform a linear curve in the same way.
A Syflex ICE tree modifies an object's point positions without adding or deleting points, creating a deformation. Deformations typically get the current point positions, modify them based on various other data like normal direction, and then set the new positions.
Because the Syflex Cloth and Curve compounds create simulated deformations, you use a simulated ICETree operator. In a simulated deformation, the point positions are updated based on the previous frame instead of the lower operators in the construction stack. When you return to the first frame of the simulation, the geometry returns to its initial undeformed state.
For more information on ICE simulation basics, see ICE Simulation Regions and Nodes and ICE Trees and the Construction Stack.
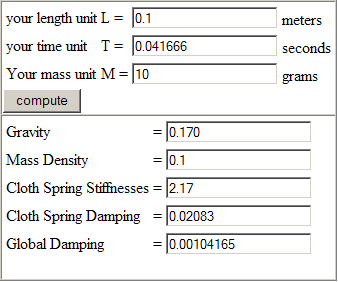
The Syflex ICE nodes are tuned so that 1 Softimage unit is equal to 10 cm, but you can use a different scale as you need, keeping in mind the issues listed in Creating the Cloth Geometry. You can get a rough idea of which parameter values (such as for gravity and mass) to use for your simulation with the JavaScript form in the Syflex Cloth (non-ICE) reference documentation that is installed in your Softimage install path/Docs/Syflex folder - open the syflex_units.html file and scroll to the bottom of the page.
Creating a Syflex ICE Cloth Simulation
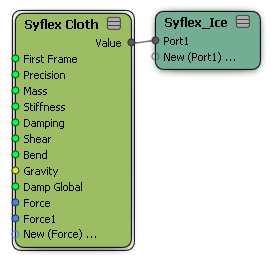
The Syflex ICE Cloth operator is a deformer that can be applied to a polygon mesh object. This creates a simulated ICE tree for that object: you can then modify this ICE tree with most typical ICE nodes as usual.
For an example Syflex ICE tree, see Anatomy of a Syflex ICE Tree.
Select the polygon mesh object that you want to simulate as cloth. See Creating the Cloth Geometry for tips on modelling the cloth.
Choose Deform  Simulate Syflex Cloth from the ICE toolbar.
An ICE tree is created for the cloth object, with its operator in the Simulation region of the object's operating stack.
In the Syflex Cloth property editor that opens, set the First Frame value to be the frame at which you want the simulation to start. This can be any frame within the timeline's playback range.
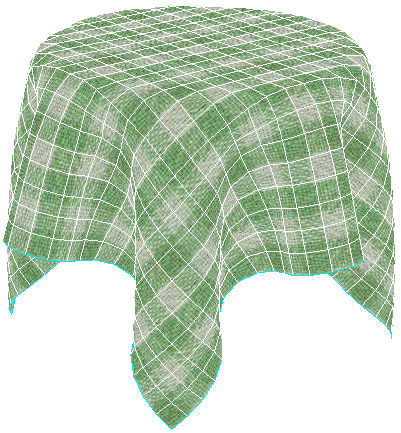
For example, if you need a tablecloth to be settled on a table by frame 1, you can set this to a negative frame value to create a pre-roll that gives enough time for the simulation to occur.
Set the other cloth properties in this property editor to define the cloth behavior, such as the stiffness, shear, and bend, as described in Syflex Cloth. This allows you to test the cloth stretching and speed of animation before the scene becomes to complex.
If you want to set these properties later, just lock the property editor to keep it open as you're working in the ICE Tree view.
Press Alt+9 to open the ICE Tree view. Click the Refresh icon to update the view so that you can see the cloth object's ICE tree.
Adjust the gravity and damping forces in the Syflex Cloth property editor, or add new ones to the cloth's ICE tree as described in Syflex ICE Forces.
You can set up the cloth object to collide with obstacles or with itself, as described in Syflex ICE Collisions.
You can create constraints to create pinning, nailing, and mimicking effects on the cloth using vertex clusters or null objects, as described in Syflex ICE Constraints .
Play back the simulation - see Playing and Caching Syflex ICE Simulations for more information.
Creating a Syflex ICE Curve Simulation
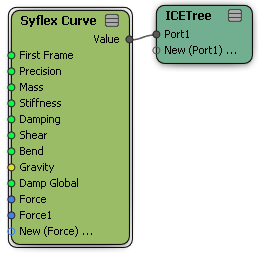
The Syflex Curve operator is a deformer that can be applied only to linear curve objects. This creates a simulated ICE tree for that object: you can then modify this ICE tree with most typical ICE nodes as usual.
Press Alt+9 to open the ICE Tree view. Click the Refresh icon to update the tree for the curve object, it if it's locked.
In the ICE Tree view, choose Create Simulated ICE Tree to create a simulated ICE tree for the curve.
This creates an ICETree node whose operator is applied in the Simulation region of the curve's operating stack.
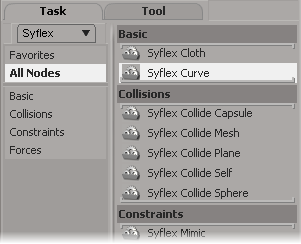
From the preset manager on the left side of the ICE Tree view, click the Task tab and select Syflex from the list.
From the Basic group, drag the Syflex Curve compound into the ICE Tree workspace.
Connect the Syflex Curve node's Value output to the top port on the ICETree node.
You can now build the ICE tree for the curve deformation in a similar way as for described above for building a cloth ICE tree.
For an example Syflex ICE tree, see Anatomy of a Syflex ICE Tree.