The first step to creating a simulated cloth or curve object is to start with geometry that is the correct size for the simulation, using the correct geometrical construction, and having the correct resolution. This has a big impact on the way that the cloth or curve is deformed in the simulation.
You can use only polygon mesh objects for Syflex cloth simulations.
You can use only linear curve objects for Syflex curve simulations.
Most of the tips in this section apply to cloth objects, but there are some general tips that also apply to curves.
Always keep the scale of Softimage units and your scene objects in mind when designing a Syflex simulation. As with other simulation calculations, scale is crucial when dealing with Syflex simulated deformations. Before you start, you need to define what unit of measurement a Softimage unit will mean in your world: 1 meter, 10 cm, 1 cm, 1 foot, etc. And you need to model your objects in reference to this and to make sure that their mass or density also reflects this.
For example, if you create a cube to be 1 unit wide and you set its mass to 1 kg, this is going to be an extremely dense cube if you define 1 Softimage unit as 1 cm. On the other hand, if you define 1 Softimage unit to be 100 meters, the cube will be as big as a football field, so 1 kg would be lighter than air.
Because simulations imitate physical laws by performing intensive calculations, there are certain limitations. For example, a tiny cloth object with hardly any mass should be avoided because the calculations required may introduce numerical errors into the simulation.
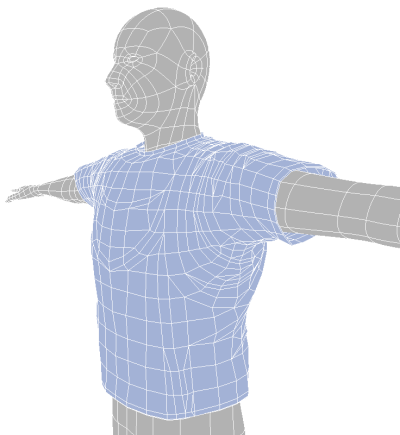
For best results, the cloth geometry should be as uniform as possible, with all polygons and edges being roughly the same size as each other. This is because every edge becomes a spring in the simulation, with additional cross-bracing springs to keep polygons from shearing. The more regular the polygons, the more regular the springs, and the more predictable the results.
For information on cloth springs, see Using the Syflex Spring Forces.
The size the polygons matters for the type of cloth you're creating: for heavy fabric such as leather, large faces work well; for silk, it's better to use smaller faces.
Quadrangle-shaped polygons are better for cloth than triangles: this allows the springs to bend in a more predictable way.
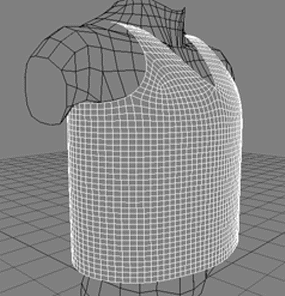
Keep edges simple: the fewer edges the better to prevent self interpenetration. If you want torn edges, it's better to add them as textures instead of modeling them.
Modeling holes in the cloth object is not a good idea because it prevents the cloth from moving like real fabric. There are no springs where there are no polygons, and edges only have springs on the mesh side, so the cloth tends to look too stiff.
If you want the cloth to have static wrinkles, you need to model them - Syflex cloth doesn't create wrinkles.
Resolution of the Cloth Geometry
The cloth's resolution not only affects the speed of the simulation, but also the behavior of the cloth. A cloth whose resolution is either too high or too low can change the behaviour. The first step is to find out what resolution you need to make the geometry behave as you want in the simulation. For example, just getting the cloth to solve correctly in collisions is a good place to start.
As with all simulations, the trick is to find the lowest resolution acceptable for the results you want. One way to accomplish this is to use an acceptable low-resolution "stand in" model while you're setting up the basic simulation and collisions, which is faster. Then swap in the high resolution mesh for the render (with more details like pockets.) The simulation mesh drives the render mesh with a hull or cage deformer.
Make sure that the cloth model has a high enough resolution to give the effect you want. For example, if you want silk draped over a chair, the resolution needs to be higher than for a piece of burlap. However, the more subdivisions on the cloth, the more complex the spring calculations.
If you want detailed folds in the cloth, use lots of subdivisions. You can also consider making the clothes baggier than normal which should help to create more wrinkles in those areas.
Generally, the resolution of the cloth model must not be too low for two reasons:
You need a sufficient number of vertices for having satisfactory collisions. If the resolution is too low, edges may penetrate some polygons of the collision object even if the vertices are well managed.
Subdivision not only adds new vertices, but also moves the original ones, so the collisions might be offset.
Once you have the cloth behaving as you want, adapt the collision objects to suit the cloth simulation. For tips on cloth and collision objects, see Tips for Successful Collisions with Polygon Mesh Objects. For example, instead of increasing the cloth's resolution, you can increase the collision envelope that is created for polyon mesh collision objects - see The Collision Envelope for information.
If you want to build a garment, set up the appropriate parent-children hierarchy for the cloth model. As with all standard objects, a cloth object inherits the animation from its parent. When making clothes for characters, it's generally a good idea to make the skeleton root the parent of the cloth object.
Edges can be a problem with the ends of clothing (like sleeves on shirts or the bottom of pant legs) if the cloth bunches up or wrinkles in such a way that the boundary edge of the clothing touches the collision object (arms, legs): this can allow the clothing to pass through the collision object. Try creating with cuffs to avoid this, or make the cloth stiffer.
Avoid collisions with the clothing and character's body before the first frame of ths simulation. Pre-collision intersections will have those area's normals facing away from each other, and once simulated, the cloth will never collide correctly with the body in those areas.
Your character should be in a neutral or T- pose at the beginning of the cloth simulation, before it assumes an action. Keep the clothing away from the character's body so that none of its surface penetrates the character's geometry in that pose. Then give a pre-roll of however many frames you need for the character and the cloth to "settle" together before the character's action begins. The character should ease into its action.