You can fix many simple mesh issues in Mudbox by selecting faces, deleting them, and then patching holes in the mesh. In some cases, simply smoothing or stretching parts of the mesh can help.
The following table lists the possible mesh errors in Mudbox and suggests ways to fix them if the problem is minor. Depending on your task in Mudbox, you can safely ignore some errors. For example, a High-valence vertex error won't affect your retopology operation.
If you encounter more complex problems, they can be corrected using the mesh editing and cleanup tools in programs like Autodesk Maya. (Send files to Maya, 3dsMax, and Softimage or Export a Mudbox model using FBX)
| Problem/Error Message | Possible Solution | |
|---|---|---|
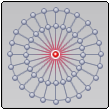 |
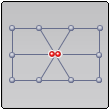
High-valence vertex At least one vertex has more than 16 adjacent edges. You can use this mesh, but if you use it for a map extraction with Mesh Smoothing turned on, there will be artifacts in the resulting map. |
Continuing with this mesh is fine for retopology operations, but it is not suitable for subdivision. If you need to subdivide the mesh, you can select and delete the offending faces, then select the border and patch the hole. |
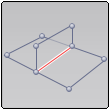 |
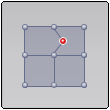
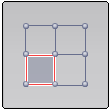
Non-manifold (T-shape) At least one edge in this mesh is shared by more than two faces. This must be corrected before the mesh can be used in Mudbox. |
Select and delete the offending faces, then patch the hole. Export to Maya if the problem is difficult to fix. |
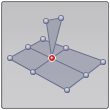 |
Non-manifold (vertex splice) At least one vertex in this mesh is shared by faces that are not a part of the same fan. This must be corrected before the mesh can be used in Mudbox. |
Select and delete the offending faces, then patch the hole. Export to Maya if the problem is difficult to fix. |
 |
Two-sided faces There is at least one face in this mesh whose boundary is made up of only two edges. Using this mesh in Mudbox will cause errors when sculpting and painting. |
Select and delete the offending faces, then patch the hole. Export to Maya if the problem is difficult to fix. |
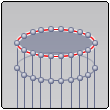 |
Too many sides in a face The boundary of at least one face in the mesh comprises more than 16 edges. This mesh will not subdivide properly, and will show visible artifacts near this face if painted. |
Select and delete the faces, then patch the hole. Export to Maya if the problem is difficult to fix. |
 |
Boundary Vertex has Too Many Edges A vertex is shared by more than two boundary edges. This must be corrected before the mesh can be used in Mudbox. |
Select and delete the corresponding faces, then patch the hole. Export to Maya if the problem is difficult to fix. |
 |
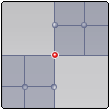
Interior Vertex has Valence Two A vertex on the interior of the mesh has exactly two edges connecting it. This mesh cannot be subdivided, and will cause problems when sculpting. |
Select and delete the corresponding faces, then patch the hole. Export to Maya if the problem is difficult to fix. |
 |
Zero-length edges At least one edge in this mesh is zero-length. If painted, this mesh will show visible artifacts. This can be corrected by subdividing the mesh once with Smooth Positions turned on. |
Turn Smooth Positions on in the Subdivision Options (Mesh > Add New Subdivision Level Options), then press Shift + D to subdivide the mesh. Smoothing out the area to make the problem faces slightly larger can also help. |
 |
Lamina Faces Some faces in this mesh lie exactly on top of other faces. This mesh will not subdivide properly, and will have visible artifacts if painted. |
Turn on Display > Mesh Errors to identify where lamina faces occur. Delete the problem faces and patch any holes. |
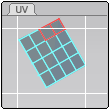 |
UV Faces Crossing Tile Boundaries The UV coordinates of some faces on this mesh cross tile boundaries. (In Mudbox, UV tiles are bounded by integer UV values, such as 0-1, 1-2, 2-3, etc.) This mesh cannot be painted properly. To see the problem, go to the UV View tab. |
With the problem mesh active or selected in the 3D View, select Mesh > Flatten to UV Space (Hotkey: Alt + T). With the mesh displaying flat, select the Grab brush from the Sculpt Tools tray, then drag the UV faces to be within the UV tile boundaries. See also Adjust UV positions in 2D. |
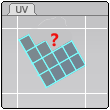 |
Incomplete UV Set This mesh has an incomplete set of UVs. You must fix this problem before you can subdivide or paint the mesh properly. To replace the UVs, use "Create UVs in the Mesh menu. |
Select Mesh > Create UVs from the main menu bar, then click Replace Existing UVs in the dialog box that appears. See also Create basic UVs. |
 |
Degenerated Face This mesh has faces where corners either lie on the same line or location in space. |
This issue can occur in tightly detailed areas like the inner corners of the eye. The mesh can't be retopologized while this error occurs. Select the Smooth tool from the Sculpt Tools tray (or press Shift to activate smoothing on another sculpt brush) and smooth out the area to make the problem faces slightly larger. |
 Except where otherwise noted, this work is licensed under a Creative Commons Attribution-NonCommercial-ShareAlike 3.0 Unported License


