Paint layers can be exported from Mudbox as Adobe® Photoshop® files (.psd file format). The .psd format files can either be edited or used as reference layers within Photoshop, saved,
and subsequently re-imported to update the original paint layers within Mudbox.
The paint layer and channel export features greatly reduce the number of steps required to work between Mudbox and Photoshop
by sharing files in a more seamless manner and take advantage of the powerful features within each application. Three workflows
are possible:
- Export a single paint layer from the paint layer editor with an additional layer containing an image of the UV layout. You
can edit your paint textures using the UV layout layer as a reference and import the edited layer back into Mudbox. For more
information, see Export a single paint layer to Photoshop.
- Export an entire paint channel containing multiple paint layers including a layer containing an image of the UV layout. You
can create and edit your paint layers using the UV layout as a reference and import the edited paint channel back into Mudbox.
For more information, see Export a paint channel containing multiple layers to Photoshop.
- Export an image of your model as it appears in the so you can create new paint textures or perform touch up work on existing ones using the tools within Photoshop and the 3D
model view as a reference. Importing the file back into Mudbox automatically projects the texture updates on the model and
updates the textures. For more information, see Export a paint layer of the 3D View.
Export a single paint layer to Photoshop
- (In Mudbox) In the window, ensure the display button is set to .
- Select the paint layer you want to export.
- From the window menu (
 ), select . (Right -clicking the paint layer also displays the same menu).
The window appears.
- Select a directory, enter a filename, and then set the image format file type to: before clicking .
A .psd format file is saved from Mudbox.
- (In Photoshop) Open the .psd file containing the paint layer you exported from Mudbox.
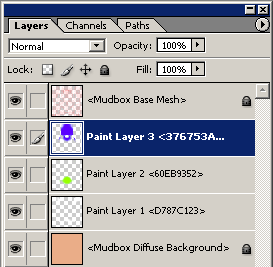
The Layers window in Photoshop (Hotkey: F7) displays the paint layers. The .psd file contains two layers:
- Mudbox Base Mesh - A layer that includes an image of the UV texture coordinates (based on how they appeared on the base subdivision level
for the model) that is aligned with the paint layer you selected. The layer is intended to be used as a reference for your texture creation and editing work in Photoshop. It appears above the
paint layer in the list. You can keep the layer visible or turn it off as required.
- Mudbox Texture Layer - The paint layer you selected for export.
Note
Any changes made to layer blend modes settings when working within Photoshop are ignored when the file is reimported to Mudbox.
- Perform any paint work or edits as required on the using the tools within Photoshop. Ensure that the paint work is contained on the and that it remains at the bottom of the layer stack as it appears in the layer editor. If you create any other paint layers,
they must be merged down onto the before export.
- After completing your paint or editing work in Photoshop, save the file by selecting .
Note
When you re-import the .psd file into Mudbox as a paint layer, it reads only the bottom of the Photoshop file. That is, it ignores the layer and any other layers above the bottom layer.
- (In Mudbox) If you have not saved your Mudbox scene since exporting the paint layer, the connection between the paint layer and the exported
.psd file will still exist. Right-click the paint layer in the window within Mudbox and select to update the original paint layer with your Photoshop edits. Otherwise, right-click the layer and select .
- Save the Mudbox file to ensure the photoshop edits are updated in the original texture files associated paint layer.
Export a paint channel containing multiple layers to Photoshop
- (In Mudbox) In the window, ensure the display button is set to .
- Select the paint channel containing the layers you want to export. For example, , , , and so on.
- From the window menu (), select (Right -clicking the paint channel bar or a single layer in that channel also displays the same menu).
The window appears.
- Select a directory, enter a filename, then click .
The paint channel containing the multiple paint layers is exported as an 8 bit (RGBA) .psd file.
Note
When you export the .psd file, Mudbox automatically launches Photoshop and the file appears in the Canvas view. The automatic
launch will not occur if Photoshop is not installed on your computer or if the file association between the .psd file format
type and the Photoshop application has not been set or the texture map is composed of many UV tiles. For more information,
see Troubleshoot paint layers. When the texture is composed of multiple UV tiles a separate .psd file is created for each tile. The origin tile file name
(U0, V0) is named similar to the file name you specify. Non-origin UV tile files have their tile position appended to their
file name (for example: <layername>_unumber_vnumber appended to the file names where number specifies the starting point in UV space for that tile.
- (In Photoshop) Open the .psd file you exported from Mudbox (if Photoshop did not automatically launch).
The Layers window in Photoshop (Hotkey: F7) displays the paint layers you exported from Mudbox with two additional layers: located at the top of the layer stack, and the layer at the bottom.
- Mudbox Base Mesh (Locked): Contains an image of the UV texture coordinates (based on how they appeared on the base subdivision level for the model)
that is aligned with the paint layer you selected. This layer can be turned on or off in Photoshop and is intended to be used
as a visual reference for your texture creation and editing work. Otherwise, this layer is locked by default and should not
be modified.
- Paint layer name <n>: The layers in the paint channel you exported are displayed with their respective layer names. Any layer blend mode, opacity,
visibility, or lock settings that were made in Mudbox are also maintained when the file is opened in Photoshop.
If the Mudbox paint channel contained paint layers with different resolutions and file formats when exported, the images are
scaled to the same resolution as the highest resolution image within the exported channel. Any images that get scaled during
import are subsequently returned to their original resolution, bit depth, and file format when the paint channel is re-imported
to Mudbox using
- Mudbox <channel name> Background - This layer contains the name of the Mudbox paint channel that was exported and the diffuse color of the default material
background color. This layer can be turned on or off in Photoshop and is intended to be used as a visual reference for your
texture creation and editing work. Otherwise, this layer is locked by default and should not be modified.
You can turn the visibility on or off for any layer as you work in Photoshop but these settings will be ignored when the file
is re-imported to Mudbox.
Note
Do not change the layer names or the text or numerical content within the angle brackets <> when working on the file within
Photoshop. Editing either the layer name or the numerical strings prevents the layers from being imported back to Mudbox.
In general, the channel export and import workflow requires that you not delete or change the order of the original layers
or make changes to the layer blend modes or opacity settings from how they were originally exported. These changes will adversely
affect re-importing the file to Mudbox.
- Perform any paint work or edits as required on the using the tools within Photoshop ensuring that you do not change the layer order.
Note
You can create other paint layers in the file but they must be merged down to any of the original paint layers that existed
in the file you exported from Mudbox. Otherwise, these additional layers are ignored when re-imported to Mudbox.
- After completing your texture creation/editing work in Photoshop, save the file by selecting .
- From the window menu (), select (Right -clicking the paint channel bar or a single layer in that channel also displays the same menu).
The browser window appears.
When you import the .psd file into the original file in Mudbox using it determines what edits were made on the paint layers and imports only the layers that changed since the export, scales
them if required, and converts them back to their original bit depth. The contents of the and layers are ignored during the re-import.
Note
When re-importing a paint channel containing multiple UV tiles Mudbox will attempt to load one .psd file per UV tile. The
origin tile (U0, V0) is loaded by selecting the specified .psd file name as usual and the associated non-origin tiles are
subsequently loaded automatically. If a .psd file for a non-origin tile is missing, it is ignored and the associated UV tile
is not updated in Mudbox.
- Save the file in Mudbox to ensure the photoshop edits are updated in the original texture files associated with the paint
layers for the paint channel.
Export a paint layer of the 3D View
- (In Mudbox) Set up your model in the as you want it to appear on the paint layer in Photoshop. That is, dolly, track or tumble the view as required.
- In the window, select the diffuse paint layer you want to be exported with the image of the . Temporarily hide any diffuse layers that are not required by clicking the visibility button.
Note
Diffuse paint layers are the only layer type available for export and re-import using this workflow.
- Export an image of the screen by selecting (Windows Hotkey: Alt + E) (Mac OSX Hotkey: Command + E)
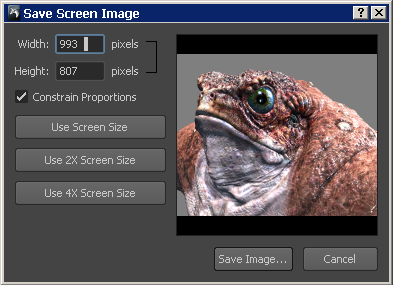
The window appears.
- To save an image of the current , click , otherwise, click either the or buttons if a larger resolution is desired, or specify a custom and for the image (in pixels), and then select .
Note
If you enter custom and values, ensure that the resulting image aspect ratio matches the screen resolution exactly. Otherwise, the texture may not
align correctly with the model when it’s re-imported. Using an exact integer multiple of the current screen size is recommended.
- In the file browser window that appears, set the directory path, enter a filename, then click .
Note
When you save the PSD image, Mudbox automatically launches Photoshop and the file appears in the Canvas view. This will not
occur if Photoshop is not installed on your computer or the file association between the .psd file format type and the Photoshop
application has not been set. For more information, see Troubleshoot paint layers.
Exporting a paint layer as a .psd format file using the feature saves an image of the . This is a useful method if you want to create or edit textures using a view of your 3D model as a reference.
- (In Photoshop) Ensure the .psd file containing the screen capture image you exported from Mudbox is open in Photoshop.
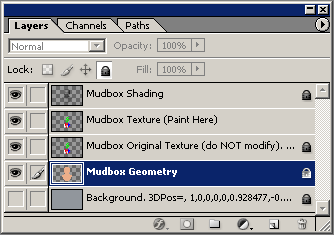
In Photoshop, the Layers window (Hotkey: F7) displays the five layers the get exported from Mudbox (listed in order from bottom
to top):
- Background (Locked) - Contains an image of the background and camera information. The numerical string listed after the layer name records camera position information used
to set back to its exact location when you re-import the .psd file after editing in Photoshop. Locked by default. Do not modify.
Warning
Editing the numerical string after the layer name or the image on the background layer prevents the texture from aligning
correctly when the .psd file is re-imported to Mudbox. Do not resize the in Mudbox between export and re-import of the .psd file.
- Mudbox Geometry (Locked) - Contains a screen capture of your model(s) as it appeared in the . It displays a non-shaded (flat shaded) preview of the model with the assigned shading material. Mudbox uses this layer to
accurately composite your paint edits when you re-import the file. Locked by default. Do not modify.
- Mudbox Original Texture (Locked) - Contains a copy of the original paint layer(s) as it appeared from the camera at screen capture. Mudbox uses this layer
to make a comparison between the original paint layers and any edits you make on the Mudbox Texture layer. Locked by default.
Do not modify.
- Mudbox Texture - Where you paint or apply any paint edits. These are applied to your model after you save the .psd file and re-import to
Mudbox.
Warning
Do not change this layer name. Renaming this layer prevents you from re-importing the file to Mudbox.
- Mudbox Shading (Locked) - Contains a screen capture of the 3D shading of your model(s) as it appeared within the . Mudbox uses this layer to accurately composite your paint edits when the file is re-imported. It can be useful to keep this
layer visible as a reference for your paint edits in Photoshop. Locked by default. Do not modify.
Note
Mudbox materials containing high specular values or reflection maps do not display in Photoshop exactly as they appear in
Mudbox. This does not affect your paint layer work, and will appear correct again in Mudbox when you re-import the file.
- Perform any paint work or edits as required on the layer using the tools within Photoshop. If you have created any other paint layers in the file you should merge them into
the layer before saving the file and returning to work in Mudbox.
Note
When editing the file in Photoshop, do not change the blend mode setting nor any of the original layer names. Changing the layer names will result in Mudbox not aligning the camera
correctly, or determining the correct paint layer to apply as a stencil.
- Select to save your work.
- (In Mudbox) With the original model loaded in the , and the original paint layer selected, re-import the file you edited within Photoshop by selecting (Windows Hotkey: Alt + R) (Mac OSX Hotkey: Command + R)
Note
automatically projects the paint onto the currently selected layer. If you want to apply the paint edits to a different layer,
ensure it is selected prior to using the feature.
The window appears.
- Select the file you saved in Photoshop and click .
Importing the PSD file causes the following to occur:
Note
Reimport from PSD uses the stencil tool. If you have a stencil currently selected, it is replaced with the imported texture.
When the re-import and auto-projection are successful, the stencil remains hidden. If the auto-projection does not occur as
expected, or you receive an error message stating a problem within the PSD file the stencil may be displayed in the 3D View.
It can also be manually displayed by pressing the Q key. In these situations, refer to the Troubleshoot paint layers topic for possible solutions.
- Save the file in Mudbox to ensure the Photoshop edits are updated in the original texture files associated with the diffuse
paint layer.