Repositions the UV shells for selected objects so their arrangement is improved. The desired workflow is generally to lay
out UV shells so they are not overlapping.
> 
The default settings give the best results in most situations.
Select the manner in which you want to layout the UV shells.
- )
-
When multiple objects are selected in the scene this option specifies to lay out the UV shells for each object individually
within the .
- )
-
Specifies the multiple UVs to be positioned in the as if it were one single object.
Scales the area of the UV Shell proportional to either the surface area of the selected objects in object space or world space
before laying out the UVs. Prescale is usually combined with Uniform Scale mode to scale UVs from multiple objects into a
single UV region.
Prescale is only available when Layout Objects is set to Single or Multiple Objects (non-overlapping).
-
-
-
-
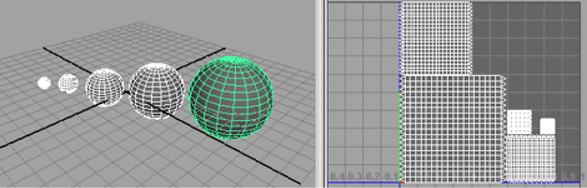
Automatically scales the UV shell to accommodate the selected objects’ surface areas in object space.
For example, the UV Shells for a scene consisting of 5 spheres of radius 1 will appear equal in size using the setting regardless of their individual scaling. Scaling only affects the objects’ size in world space.
-
-
Automatically scales the UV shell to accommodate the selected objects’ surface areas in world space.
For example, the UV shells for a scene consisting of 5 spheres of radius 1, will appear according to their individual scale
sizes.
Specifies how you want to cut and separate overlapping UV shells.
-
-
Does not separate overlapping UV shells. Only the option has an effect.
-
-
Separates only shells where the surface normals of overlapping shells point in opposite directions. This method is faster,
especially for larger models. However, you may be left with overlapping UVs.
-
-
Separates all shells where the UVs overlap. This is the default.
-
-
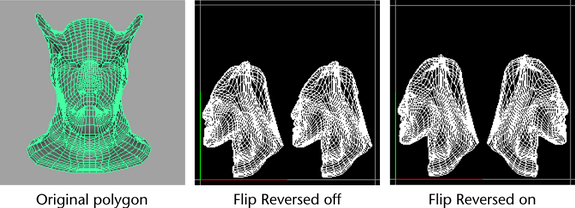
Flips UV shells that have normals pointing in opposite UV winding order.
Tip
If your model is symmetrical (for example, a character’s face), you can save texture space by turning this option off and
superimposing the UV shells so they occupy the same texture space.
Specifies where the UV shells will lie in UV texture space.
-
-
Does not lay out UV shells after they have been cut. Some shells may lie on top of others.
-
-
Positions the UV shells along the U axis.
-
-
Positions the UV shells to lie within the 0 to 1 texture space. This is the default setting.
Select how you want the UV shells scaled within the UV texture space.
-
-
-
-
Scales the shells to fit the 0 to 1 texture space without changing the aspect ratio. This is the default.
-
-
Stretches the UV shells to fit within the 0 to 1 texture space. The UV shells may become distorted as a result.
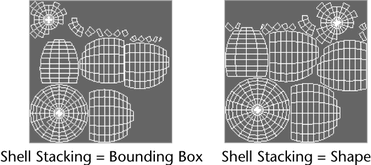
Determines how the UV shells get stacked in relation to each other when laid out in the .
-
-
Creates a rectangular bounding box around each UV shell, then stacks the shells based on the borders of the bounding boxes.
The UV shells will have more space between them when this option is set.
-
-
Stacks the UV shells based on the boundaries of each individual shell. The UV shells can be more tightly arranged to fit into
any available spaces when this option is set.
Allows the UV texture shells to be rotated in order to better fit the UV texture space.
-
-
Specifies that the UV shells will not be rotated.
-
-
Specifies that some UV shells can be rotated by 90 degrees to maximize the space within the 0 to 1 UV texture space.
-
-
Rotates the UV shells so they are oriented vertically in the based on their longest axis. This aids the Layout feature in packing the shells more densely, thereby maximizing UV texture
space.
-
-
Layout UVs creates a bounding box around each UV shell and then lays out the UVs so that the individual bounding boxes are
positioned close together. Sometimes when the borders of two UV shells are positioned very close to each other, the two UV
shells may end up sharing the same pixels on a texture map.
When this situation occurs, a portion of one texture may bleed onto another or may wrap incorrectly on the surface, resulting
in visual artifacts. When painting a texture, overscanning can also cause the paint to spill onto the adjacent piece.
To avoid this situation, you’ll want to specify a spacing preset to ensure that there is at least one pixel separating the
individual UV bounding boxes. Select a preset that corresponds to your texture map size. If you don’t know the size, select
a smaller map, which will result in a larger spacing between adjacent shells in the UV space. (The smaller the map in pixels,
the bigger the UV spacing must be between bounding boxes.)
Select to set the size of the space as a percentage of the map size (in the box) and enter a distance value that is appropriate for your texture map.
-
-
When the is set to you can specify a distance measurement to specify the space between bounding boxes as a percentage of the map size.
-
-
A set of common settings for Scale U, Scale V, Offset U and Offset V. The following table outlines the presets.
| Label |
Scale U |
Scale V |
Offset U |
Offset V |
| Bottom Half |
1.0 |
0.5 |
0.0 |
0.0 |
| Top Half |
1.0 |
0.5 |
0.0 |
0.5 |
| Left Half |
0.5 |
1.0 |
0.0 |
0.0 |
| Right Half |
0.5 |
1.0 |
0.5 |
0.0 |
| Bottom Left |
0.5 |
0.5 |
0.0 |
0.0 |
| Bottom Right |
0.5 |
0.5 |
0.5 |
0.0 |
| Top Left |
0.5 |
0.5 |
0.0 |
0.5 |
| Top Right |
0.5 |
0.5 |
0.5 |
0.5 |
| Full Square |
1.0 |
1.0 |
0.0 |
0.0 |
-
-
Lets you set the scale of the UV mapping in the U direction. You can use the Offset in conjunction with the Scale to define
the area on your model upon which your texture is laid out.
-
-
Lets you set the scale of the UV mapping in the V direction. You can use the Offset in conjunction with the Scale to define
the area on your model upon which your texture is laid out.
-
-
Lets you set the UV mapping so that each UV is a specific distance in the U direction from its default position at the lower
left corner of the UV layout region. You can use the Offset in conjunction with the Scale to define the area on your model
upon which your texture is laid out.
-
-
Lets you set the UV mapping so that each UV is a specific distance in the V direction from its default position at the lower
left corner of the UV layout region. You can use the Offset in conjunction with the Scale to define the area on your model
upon which your texture is laid out.
 Except where otherwise noted, this work is licensed under a Creative Commons Attribution-NonCommercial-ShareAlike 3.0 Unported License